Tagged: Claims
Customize the Default #WIF ASP.NET #STS to Support Multiple #SharePoint Web Applications
Thanks to Claims-based identity in SharePoint 2010 and 2013, we have the ability to develop our own trusted login providers. These providers take the form of a Security Token Service (STS), an ASP.NET web site that packages and signs SAML tokens containing claims. SharePoint is then configured to trust this STS. In this blog post, I walk through the steps required to develop a custom STS using the Windows Identity Foundation (WIF) SDK 4.0 that supports LinkedIn as an identity provider for SharePoint. However, there is one significant shortcoming with the approach I use in that post: it can only be used for a single SharePoint web application, intranet.contoso.com. This is due to two factors:
- The realm used by the SPTrustedIdentityTokenIssuer is configured as the URL of SharePoint’s STS within that web application (e.g., intranet.contoso.com/_trust).
- The default behavior of the WIF STS web site is to forward tokens for authenticated users to the specified realm URL. From there, SharePoint’s STS will forward the logged in user back to the page he or she was trying to access.
If you tried to use this trusted identity provider on another web application (such as hr.contoso.com or finance.contoso.com), you would end up disappointed as your users would be forwarded back to the intranet.contoso.com web application no matter which site they were actually trying to access!
In this blog post, I will make some slight modifications to the out-of-the-box WIF STS web site so that:
- The same trusted identity provider may be used across multiple different web applications, each with different host header URLs.
- The SPTrustedIdentityTokenIssuer does not need to be updated and can leverage the same realm value no matter how many web applications make use of it.
- The WIF STS web site I build and customize does not need to be updated and can leverage the same realm value no matter how many web applications make use of it.
What is a realm?
The default behavior of the WIF STS web site is to forward an authenticated user back to the URL specified as the realm. According to MSDN, the realm value is “used by the STS to identify the relying party instance and to select the corresponding token issuance policy and encryption certificate.” The realm is specified as a URI (which can actually be a URL or a URN), but in many walkthroughs (mine included), we specify a value for the realm that is tied to a specific host header URL (e.g., intranet.contoso.com/_trust).
Decoupling the realm from a specific host header URL
In an environment where only one web application needs to use a trusted identity provider, it may make sense to associate the realm with the URL of that web application. But in an environment where multiple claims web applications in a SharePoint farm need to use that same trusted identity provider, a different approach must be taken. As Steve Peschka describes in this post, we can use a URN (e.g., urn:linkedin:sts) instead of a URL to work around this limitation. In the case of ADFS v2 (disclaimer: I have not worked with ADFS v2), you can define mappings between these URNs and their associated web applications as Steve describes in the blog post linked above.
Updating the default WIF STS web site
If I change my SPTrustedIdentityTokenIssuer to use the generic realm urn:linkedin:sts, but make no changes to my STS web site, what will happen? As it turns out, I will be redirected to this URN, which of course is not the URL I want my logged in users to visit. Hilarity ensues:
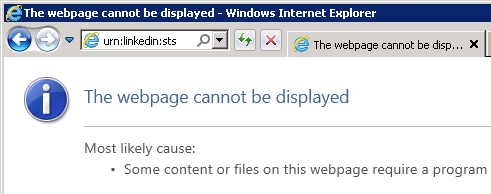
As you can see, the STS redirects the logged in user to urn:linkedin:sts, which of course produces a 404 error.
The key to having the STS redirect logged in users to the proper URL is in the CustomSecurityTokenService class, which contains a function GetScope() that sets the ReplyToAddress of the SecurityTokenService.Scope object. The default STS web site implementation uses the following code:
// Set the ReplyTo address for the WS-Federation passive protocol (wreply). This is the address to which responses will be directed.
// In this template, we have chosen to set this to the AppliesToAddress.
scope.ReplyToAddress = scope.AppliesToAddress;
The AppliesToAddress value is determined from the wtrealm parameter specified as the “OAuth Accept Redirect URL” in our LinkedIn application configuration. Remember that we had previously set this value to intranet.contoso.com/_trust (which would work as a URL), but have since updated it to urn:linkedin:sts.
How can I fix this?
The way you choose to work around this behavior depends on your requirements. If you need to use different token encrypting certificates based on the relying party (RP) application, or if you want to potentially execute any custom business logic specific to some (but not all) of your RP applications, you may choose to update the code in the GetScope() function to look more like the following:
if (scope.AppliesToAddress == "urn:linkedin:sts")
{
    scope.EncryptingCredentials = new X509EncryptingCredentials(CertificateUtil.GetCertificate(StoreName.My, StoreLocation.LocalMachine, "EncryptingCert1"));
    scope.ReplyToAddress = "http://intranet.contoso.com/_trust";
    // More things specific to the intranet web application and the urn:linkedin:sts realm...
}
else if (scope.AppliesToAddress == "urn:someother:sts")
{
    scope.EncryptingCredentials = new X509EncryptingCredentials(CertificateUtil.GetCertificate(StoreName.My, StoreLocation.LocalMachine, "EncryptingCert2"));
    scope.ReplyToAddress = "http://extranet.contoso.com/_trust";
    // More things specific to the extranet web application and the urn:someother:sts realm...
}
This approach carries the following “baggage” (which may be completely necessary based on your requirements):
- The STS has to be recompiled and redeployed anytime a new web application needs to be supported.
- It still cannot be reused across any host-header named web applications.
But what if I don’t have any special requirements? What if I just want my STS to redirect authenticated users back to whichever web application referred them, even new web applications that I don’t know about yet? We can do this! The way I chose to accomplish this is as follows:
- In Login.aspx.cs of my STS web site (which is the first page a user will hit prior to being authenticated), I can grab the host header from the UrlReferrer property of HttpContext.Current.Request and store it in a session variable with /_trust appended. This will serve as the realm value I want my STS to use and will contain the value of the referring SharePoint web application.
- In Default.aspx.cs of my STS web site, see if the session variable I created above exists. If it does, pass it in to the constructor for my CustomSecurityTokenService class.
- In App_Code/CustomSecurityTokenService.cs, store the updated realm value in a member variable. If the STS was called with a realm value of urn:linkedin:sts (some minimal validation of the RP), redirect the user to the appropriate realm URL in the GetScope() function.
Here are the relevant code snippets required to accomplish this:
Login.aspx.cs:
Uri referrer = HttpContext.Current.Request.UrlReferrer;
if (referrer != null)
{
    string defaultRealm = referrer.ToString();
    // From SharePoint, this value will be:
    defaultRealm = defaultRealm.Substring(0, defaultRealm.IndexOf("_login")).TrimEnd('/') + "/_trust/";
    Session["defaultRealm"] = defaultRealm;
}
Default.aspx.cs:
// Process signin request.
SignInRequestMessage requestMessage = (SignInRequestMessage)WSFederationMessage.CreateFromUri( Request.Url );

string defaultRealm = "";
if (Session["defaultRealm"] != null)
{
    defaultRealm = Session["defaultRealm"] as string;
}

if ( User != null && User.Identity != null && User.Identity.IsAuthenticated )
{
    SecurityTokenService sts = new CustomSecurityTokenService( CustomSecurityTokenServiceConfiguration.Current, defaultRealm );
    SignInResponseMessage responseMessage = FederatedPassiveSecurityTokenServiceOperations.ProcessSignInRequest( requestMessage, User, sts );
    FederatedPassiveSecurityTokenServiceOperations.ProcessSignInResponse( responseMessage, Response );
}
App_Code/CustomSecurityTokenService.cs:
private string defaultRealm = string.Empty;

public CustomSecurityTokenService( SecurityTokenServiceConfiguration configuration, string realm = "" )
    : base( configuration )
{
    defaultRealm = realm;
}

protected override Scope GetScope( IClaimsPrincipal principal, RequestSecurityToken request )
{
    ValidateAppliesTo( request.AppliesTo );

    Scope scope = new Scope( request.AppliesTo.Uri.OriginalString, SecurityTokenServiceConfiguration.SigningCredentials );

    string encryptingCertificateName = WebConfigurationManager.AppSettings[ "EncryptingCertificateName" ];
    if ( !string.IsNullOrEmpty( encryptingCertificateName ) )
    {
        // Important note on setting the encrypting credentials.
        // In a production deployment, you would need to select a certificate that is specific to the RP that is requesting the token.
        // You can examine the 'request' to obtain information to determine the certificate to use.
        scope.EncryptingCredentials = new X509EncryptingCredentials( CertificateUtil.GetCertificate( StoreName.My, StoreLocation.LocalMachine, encryptingCertificateName ) );
    }
    else
    {
        // If there is no encryption certificate specified, the STS will not perform encryption.
        // This will succeed for tokens that are created without keys (BearerTokens) or asymmetric keys.
        scope.TokenEncryptionRequired = false;
    }

    // Set the ReplyTo address for the WS-Federation passive protocol (wreply). This is the address to which responses will be directed.
    // In this template, we have chosen to set this to the AppliesToAddress.
    if (scope.AppliesToAddress == "urn:linkedin:sts")
    {
        scope.ReplyToAddress = defaultRealm;
    }
    else
    {
        scope.ReplyToAddress = scope.AppliesToAddress;
    }

    return scope;
}
Putting it all together
After deploying this updated STS, any new SharePoint web application I create that leverages the LinkedIn trusted identity provider will redirect users back to the appropriate URL after they are authenticated, regardless of whether the new web applications use a different host header, port, or both. To prove this, I created a new web application on port 39668 and set a “Full Read” user policy for all LinkedIn users. Upon accessing the site, I choose to sign in using my LinkedIn identity provider:
![]()
After supplying my credentials, LinkedIn will redirect me back to my STS. My STS will then determine where to redirect me based on the code above, and voila, I will be taken to my new SharePoint site, authenticated and signed in!
![]()
Using LinkedIn as an Identity Provider for SharePoint 2010
Updated 5/29/2013: LinkedIn has changed the format of the profile URLs it sends back. Consequently, I had to change the GetProfileId function in my STS code. The code in this post has been updated. Thanks to Dee for commenting and bringing the issue to my attention!
Updated 1/27/2013: I am pleased to report that the steps below also work for setting up LinkedIn as an identity provider for SharePoint 2013! The SharePoint screens will look a little different, but the steps to set up the integration are the same. If you run into any issues with this setup in SharePoint 2013, please leave a comment at the bottom of this post.
Updated 1/22/2013: After almost a year, I thought I would go back and revisit this post (as it continues to be one of the most popular posts on my blog). As it turns out, some updates to the code were required and many of the LinkedIn user interfaces required to complete this integration had changed. I can verify that the steps below work properly and that all screenshots are current as of January 22, 2013. Please leave a comment on this post if you run into any issues.
Those of you who have seen me speak at a user group or SharePoint Saturday event recently know how much I love Windows Azure AppFabric’s Access Control Services and how easy ACS makes it to configure SharePoint 2010 to allow users to log in with OpenID identity providers such as Facebook, Google, Yahoo!, and Windows Live. But what about LinkedIn? While LinkedIn isn’t an OpenID provider per se, numerous sites on the web allow users to sign in using their LinkedIn account credentials via OAuth. When the subject of external identity providers for a future version of the SharePoint User Group of Washington, DC site came up during my recent presentation there, the audience overwhelmingly agreed that LinkedIn was the most “professional” identity provider to integrate (and certainly one that most SharePoint professionals would feel more comfortable using than Facebook). There was only one problem…Azure AppFabric ACS does not natively support LinkedIn as an identity provider. What was I to do?
As one astute observer pointed out during my presentation, ACS is not required to configure SharePoint 2010 to interact with any external identity provider. While ACS greatly simplifies the management and configuration required to set up an external identity provider and its associated claim rules, it is possible to write code that leverages a custom STS (Security Token Service) to manage all of this without involving Azure at all.
Getting Started
Luckily for me, the vast majority of the technical “heavy lifting” required to accomplish this integration had already been done by Travis Nielsen. In this blog post, Travis details the steps (and development prerequisites, including the Windows Identity Foundation SDK 4.0) required to integrate SharePoint 2010 with Facebook as an identity provider using a custom STS (and without using Azure ACS). The steps for integrating LinkedIn are basically the same as they are for Facebook. Below I will detail how configuring the two identity providers differs.
C# OAuth Class for LinkedIn
I was preparing to have to adapt the Facebook OAuth class Travis had found to work with LinkedIn. Fortunately, I stumbled upon a C# OAuth class for LinkedIn that had already been developed by Fatih YASAR. All credit for this aspect of the solution belongs to him.
Creating the Application
Much like configuring Facebook as an identity provider requires the creation of an “application” within Facebook, LinkedIn requires the creation of an application as well.
Anyone with a LinkedIn account can create an application through the LinkedIn Developer Network.
1. Go to https://www.linkedin.com/secure/developer.
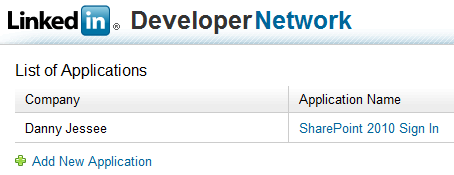
2. Click Add New Application. Fill out the form to register your new application. Any values you enter here can be changed later on.
3. Press Add Application. The following screen will confirm creation of your LinkedIn application.
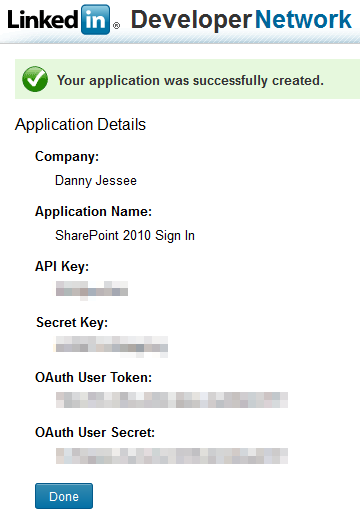
4. As with Facebook, it is important that you take note of the API Key and Secret Key values that are displayed. We will need to use these values in our code (note that you are also provided with OAuth User Token and OAuth User Secret values; these are not required for this setup). Press Done. We will return to our application setup when we have identified the SharePoint 2010 web application with which we want to integrate LinkedIn.
Customizing the STS
First, add the oAuthBase2 and oAuthLinkedIn classes from Fatih YASAR to the App_Code folder of your STS project. You shouldn’t need to make any changes to the two .cs files, but you will notice that the oAuthLinkedIn class expects to find your API Key and Secret Key values in the
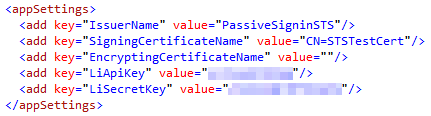
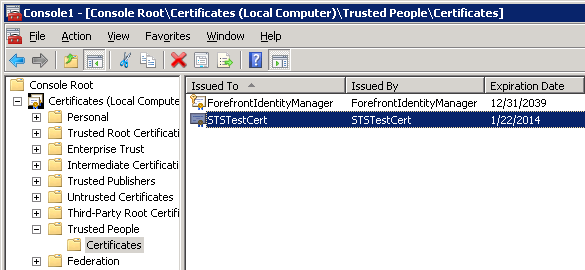
While we are here, it’s worth noting that the STS is configured by default to use the certificate with CN=STSTestCert to sign the SAML tokens it generates containing the claims we configure it to send. This certificate is installed as part of the Windows Identity Framework SDK. We will need to export this certificate so that we can configure SharePoint 2010 to use our custom STS as a Trusted Identity Provider and add this certificate to its trusted certificate store. I was able to find and export this certificate by loading the Certificates (Local Computer) snap-in and navigating to Trusted People > Certificates:
It goes without saying that you would not want to use this certificate in a production environment. Remember to update the SigningCertificateName in your STS’s Web.config to match the name of your production certificate.
Back to the STS code…I tied everything together in Login.aspx.cs. When the login page first loads (with no oauth_token value present in the query string), the user is redirected to the appropriate authorization link (hosted by LinkedIn). Once the user has an access token from LinkedIn, we are able to populate a series of claims for that user. Much like Travis did with Facebook, I make a call to the LinkedIn API to get profile information associated with the current user and define a series of output claims based on this information. The claims I have defined are:
- Name – concatenated first and last name
- Webpage – the LinkedIn user’s profile URL
- NameIdentifier – the LinkedIn user’s profile ID (parsed from the profile URL)
- GivenName and Surname (just because I could)
Below is the code that I used. In a production environment, you will want to include better error handling and more robust XML parsing!
public partial class Login : System.Web.UI.Page
{
    private oAuthLinkedIn liAuth = new oAuthLinkedIn();
    private string profileId = string.Empty;

    protected void Page_Load(object sender, EventArgs e)
    {
        if (Request.QueryString["oauth_token"] == null)
        {
            // If "oauth_token" does not appear in the query string, the user has not been authenticated
            // This call sets the Token and TokenSecret values
            string authLink = liAuth.AuthorizationLinkGet();
            Application["requestToken"] = liAuth.Token;
            Application["requestTokenSecret"] = liAuth.TokenSecret;
            Response.Redirect(authLink);
        }
        else
        {
            // User has been authenticated
            // Use the request token to get the access token
            liAuth.Token = (string)Application["requestToken"];
            liAuth.TokenSecret = (string)Application["requestTokenSecret"];
            liAuth.Verifier = Request.QueryString["oauth_verifier"];
            liAuth.AccessTokenGet(Request.QueryString["oauth_token"]);

            if (liAuth.Token.Length > 0)
            {
                // Make a LinkedIn API call to get claim information
                Dictionary claims = GetClaims();
                HttpContext.Current.Session.Add("LinkedInClaims", claims);
                // Set FedAuth cookie (without this line, SharePoint will not consider the user logged in)
                FormsAuthentication.SetAuthCookie(profileId, false);
                // Pass along the query string - STS default.aspx will redirect to SharePoint
                Response.Redirect("default.aspx?" + Request.QueryString.ToString());
            }
        }
    }

    private Dictionary GetClaims()
    {
        Dictionary claims = new Dictionary();
        string response = liAuth.APIWebRequest("GET", "https://api.linkedin.com/v1/people/~", null);

        if (!string.IsNullOrEmpty(response))
        {
            string firstName = string.Empty;
            string lastName = string.Empty;
            string headline = string.Empty;
            string url = string.Empty;

            // Parse values from response XML
            using (XmlReader reader = XmlReader.Create(new StringReader(response)))
            {
                reader.ReadToFollowing("first-name");
                firstName = reader.ReadElementContentAsString();
                reader.ReadToFollowing("last-name");
                lastName = reader.ReadElementContentAsString();
                reader.ReadToFollowing("headline");
                headline = reader.ReadElementContentAsString();
                reader.ReadToFollowing("url");
                url = reader.ReadElementContentAsString();
                profileId = GetProfileId(url);
            }

            claims.Add(System.IdentityModel.Claims.ClaimTypes.Name, string.Format("{0} {1}", firstName, lastName));
            claims.Add(System.IdentityModel.Claims.ClaimTypes.Webpage, url);
            claims.Add(System.IdentityModel.Claims.ClaimTypes.NameIdentifier, profileId);
            claims.Add(System.IdentityModel.Claims.ClaimTypes.GivenName, firstName);
            claims.Add(System.IdentityModel.Claims.ClaimTypes.Surname, lastName);
        }

        return claims;
    }

    private string GetProfileId(string url)
    {
        // Parse the profile ID from the profile URL
        string id = url.Substring(url.IndexOf("id=") + 3);
        return id.Substring(0, id.IndexOf('&'));
    }
}
Also, don’t forget to update the GetOutputClaimsIdentity() function in the CustomSecurityTokenService.cs class to make use of the output claims that are stored in a Session variable:
protected override IClaimsIdentity GetOutputClaimsIdentity( IClaimsPrincipal principal, RequestSecurityToken request, Scope scope )
{
    if ( null == principal )
    {
        throw new ArgumentNullException( "principal" );
    }

    ClaimsIdentity outputIdentity = new ClaimsIdentity();

    var oAuth20Claims = HttpContext.Current.Session["LinkedInClaims"] as Dictionary;
    if (oAuth20Claims != null)
    {
        foreach (var claim in oAuth20Claims)
        {
            outputIdentity.Claims.Add(new Claim(claim.Key, claim.Value));
        }
    }

    return outputIdentity;
}
Deploying the Custom STS and Updating the OAuth Redirect URL for the LinkedIn Application
Following the steps outlined in Travis’ blog post will give you an ASP.NET 4.0 web site that serves as your Security Token Service. You must deploy or publish this web site so that your SharePoint users will have access to it. For the purposes of this blog post, I have set up an IIS web site at http://sts.contoso.com that points to my custom STS. (Remember to set the .NET Framework version of your STS application pool to v4.0!)
Once I have deployed my STS, I need to return to my LinkedIn application setup and provide the URL to this STS as the OAuth Redirection URL, with a couple of important query string parameters appended:
1. Return to https://www.linkedin.com/secure/developer and click the name of your application.
2. In the OAuth User Agreement section near the bottom of the form, enter the URL to the Default.aspx page at the root of your STS site with the following query string:
?wa=wsignin1.0&wtrealm=http%3a%2f%2fintranet.contoso.com%2f_trust%2f
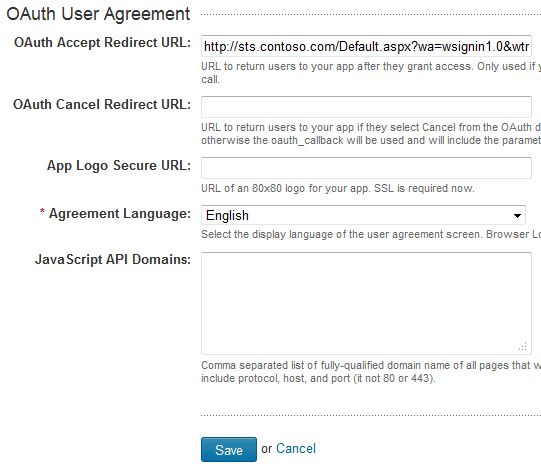
These parameters are defined in greater detail here. The wtrealm parameter should be the URL-encoded value of your SharePoint web application with /_trust/ (%2f_trust%2f) appended. As you can see, you also have the option of specifying a different URL if the user selects “Cancel” from the authorization dialog. Finally, you may also optionally specify a URL to an 80×80 logo image for your app (that must use SSL).
3. Press Save to update your application.
Configuring the Trusted Identity Provider for SharePoint 2010
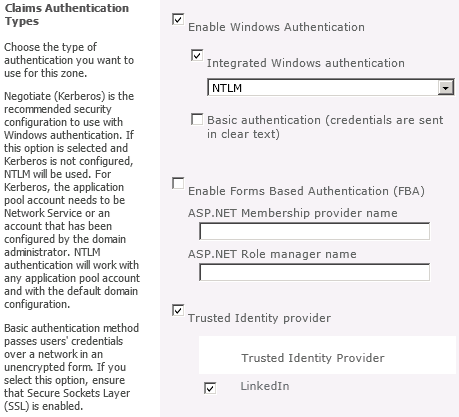
We will configure our LinkedIn Trusted Identity Provider for SharePoint 2010 to map the following claim types that are included in the SAML tokens we receive from our custom STS:
- http://schemas.xmlsoap.org/ws/2005/05/identity/claims/nameidentifier (LinkedIn profile ID)
- http://schemas.xmlsoap.org/ws/2005/05/identity/claims/name (First and last name)
- http://schemas.xmlsoap.org/ws/2005/05/identity/claims/webpage (LinkedIn profile URL)
This is done by running the following PowerShell script:
$cert = New-Object System.Security.Cryptography.X509Certificates.X509Certificate2("c:\STSTestCert.cer")
$map1 = New-SPClaimTypeMapping -IncomingClaimType "http://schemas.xmlsoap.org/ws/2005/05/identity/claims/nameidentifier" -IncomingClaimTypeDisplayName "LinkedIn ID" -LocalClaimType "http://schemas.xmlsoap.org/ws/2005/05/identity/claims/upn"
$map2 = New-SPClaimTypeMapping -IncomingClaimType "http://schemas.xmlsoap.org/ws/2005/05/identity/claims/name" -IncomingClaimTypeDisplayName "Display Name" -LocalClaimType "http://schemas.xmlsoap.org/ws/2005/05/identity/claims/givenname"
$map3 = New-SPClaimTypeMapping -IncomingClaimType "http://schemas.xmlsoap.org/ws/2005/05/identity/claims/webpage" -IncomingClaimTypeDisplayName "LinkedIn URL" -SameAsIncoming
$realm = "http://intranet.contoso.com/_trust"
$signinurl = "http://sts.contoso.com/"
New-SPTrustedIdentityTokenIssuer -Name "LinkedIn" -Description "LinkedIn custom STS" -Realm $realm -ImportTrustCertificate $cert -ClaimsMappings $map1,$map2,$map3 -SignInUrl $signinurl -IdentifierClaim $map1.InputClaimType
New-SPTrustedRootAuthority -Name "LinkedIn" -Certificate $cert
The script is fairly straightforward. A couple items to note:
- The $cert defined in line 1 is created based on the exported STS signing certificate mentioned previously. In this case, I exported the certificate to my C:\ drive and reference it there.
- Because certain claim type mappings are already used by SharePoint (such as name and nameidentifier), I had to define different LocalClaimType values for 2 of my 3 claim mappings.
- I use the LinkedIn profile ID (and not the first and last name of the user) as the IdentifierClaim because only the profile ID is guaranteed to be unique (e.g., two different users could have the same first and last names). I will write some custom code to update the display name property of the SPUser objects associated with LinkedIn users so that they see their first and last name (instead of that 7-digit ID) at the top of the screen when they sign in to SharePoint.
Running this script will add a Trusted Identity Provider called LinkedIn to the list of Trusted Identity Providers that can be added to any web application through Central Administration:
After adding the new Trusted Identity Provider, it helps to define a User Permission policy for the web application that allows any users who authenticate using this Trusted Identity Provider to be authorized to have read access to the web application:
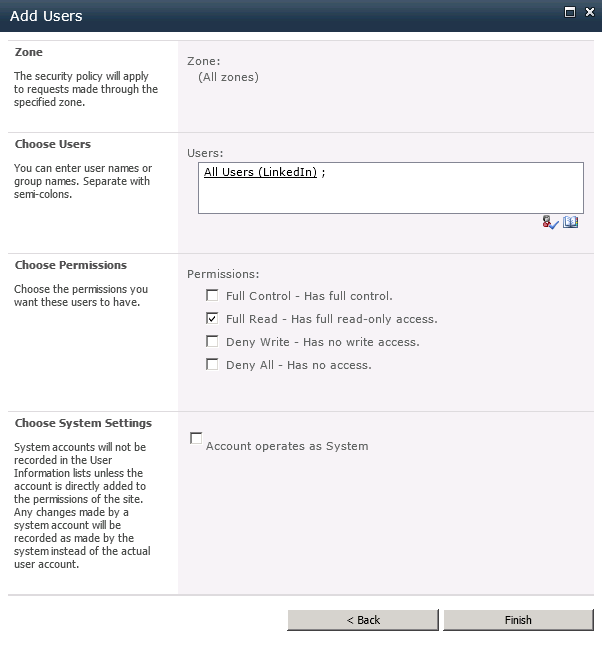
The Moment of Truth
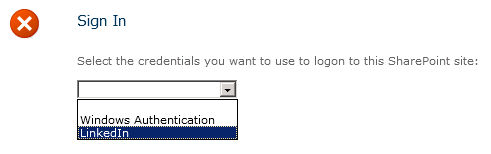
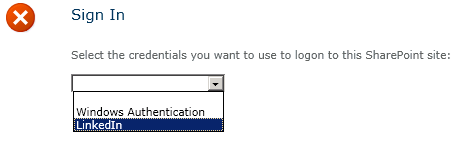
Users should now be able to sign in to SharePoint with their LinkedIn accounts. Let’s give it a shot! Depending on the different authentication providers configured for a given web application, you may or may not see a sign-in page allowing you to choose which credentials to use to log in to SharePoint. We will choose LinkedIn:
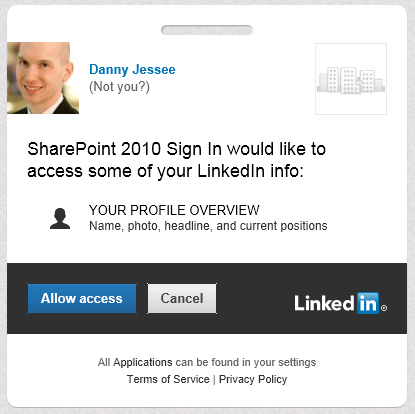
A series of HTTP redirects will take place. If the user has previously logged in to LinkedIn and has a cookie, that user will not need to enter his/her credentials again. In this screen, the user is agreeing to allow the LinkedIn application to have access to his or her account information (which consists of name, profile headline, and profile URL):
If the user has not previously logged in to LinkedIn and/or does not have a cookie, the following screen will appear:
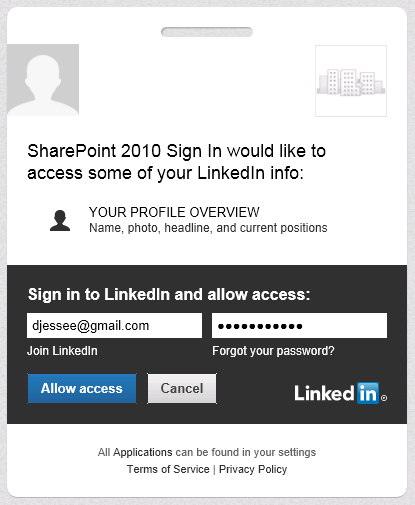
Users always retain the ability to revoke your application’s permission at any time. Press Allow access and some more HTTP redirects will take place that should eventually land the user back in SharePoint. I have used Travis Nielsen’s Claims Web Part on the team site where users log in with LinkedIn. Here you can see the claims mappings we configured earlier and how those claims are presented to SharePoint from our custom STS:
Because we are using the user’s LinkedIn profile ID as the nameidentifier claim, that value initially appears at the top right of the page when the user first signs in:

To improve the personalization experience for the end user, we can write the following code (in a web part, for instance) to update the DisplayName property of the SPUser to read the value from the givenname claim instead:
public class LinkedInNameChanger : WebPart
{
    string givenName = string.Empty;
    IClaimsIdentity claimsIdentity;
    Label lblOutput = new Label();
    Button btnFixUserName = new Button();

    protected override void OnLoad(EventArgs e)
    {
        // Read the incoming claims and assign values
        IClaimsPrincipal claimsPrincipal = Page.User as IClaimsPrincipal;
        claimsIdentity = (IClaimsIdentity)claimsPrincipal.Identity;

        foreach (Claim c in claimsIdentity.Claims)
        {
            if (c.ClaimType.EndsWith("givenname"))
            {
                givenName = c.Value;
                break;
            }
        }
    }

    protected override void CreateChildControls()
    {
        btnFixUserName.Text = "Fix Display Name";
        btnFixUserName.Click += new EventHandler(btnFixUserName_Click);
        this.Controls.Add(btnFixUserName);
        this.Controls.Add(lblOutput);
    }

    void btnFixUserName_Click(object sender, EventArgs e)
    {
        try
        {
            Guid siteId = SPContext.Current.Site.ID;
            Guid webId = SPContext.Current.Web.ID;
            SPUser currentUser = SPContext.Current.Web.CurrentUser;
            SPSecurity.RunWithElevatedPrivileges(delegate()
            {
                using (SPSite site = new SPSite(siteId))
                {
                    using (SPWeb web = site.OpenWeb(webId))
                    {
                        web.AllowUnsafeUpdates = true;
                        SPUser user = web.AllUsers[currentUser.LoginName];
                        user.Name = givenName;
                        user.Update();
                        lblOutput.Text = "
Display name successfully updated.
";
                    }
                }
            });
        }
        catch (Exception ex)
        {
            lblOutput.Text = "
Exception: " + ex.Message + "
";
        }
    }
}
There now, that’s better!

Using Claims Authentication to Configure Multiple Authentication Providers in a CloudShare Environment
This post originally appeared in the CloudShare Community Blog on October 25th.
CloudShare’s very own Chris Riley recently shared an environment of mine in a blog post about network orchestration. This environment leverages some exciting new capabilities in SharePoint 2010: namely Claims Authentication in a SharePoint 2010 web application and the ability to configure multiple authentication providers in a single zone. These technologies offer exciting prospects to anyone who previously had to configure separate host headers and URLs for different extranet customers, depending on the mechanism required for each subset of users to log in.
How does this look to end users? To see Claims in action, fire up the “SharePoint 2010 (Clean Installation)” image from the shared environment, open Internet Explorer and navigate to http://intranet.contoso.com.
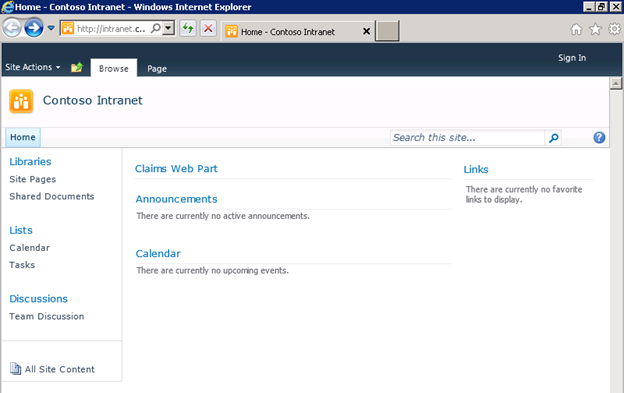
You’ll see an empty Team Site with a “Claims Web Part” at the top. Since anonymous access to the site is enabled, the Claims Web Part will initially be empty.

Press the “Sign In” link at the top right of the page. The page that appears, http://intranet.contoso.com/_login/default.aspx, is new in SharePoint 2010 and allows users to choose from all the different authentication providers configured for that web application. (As a side note, there are some exciting opportunities for custom code development here, including the ability to automatically redirect users to a specific authentication provider based on parameters such as their IP address, bypassing this page of options entirely! After all, not all end users are going to appreciate the distinction between “Windows Authentication” and “Forms Authentication.”)
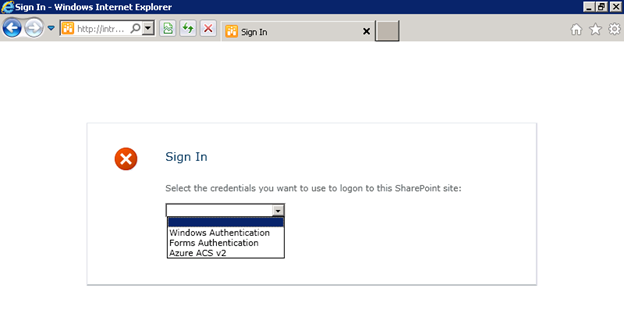
In this web application, I have configured the following providers:
- Windows Authentication – standard NTLM credentials.
- Forms-Based Authentication (FBA) – you may remember this option from MOSS. In this environment, I have created a custom membership provider that validates inputted credentials against a SQL Server database. In practice, FBA can be used to authenticate external users against Active Directory or any other account database.
- Azure Access Control Services (ACS) v2 – allows users to log in with credentials from Open ID providers such as Windows Live ID and Facebook.
For a more in-depth read about how to configure Azure ACS v2 as an authentication provider in SharePoint, including adding other Open ID providers such as Google and Yahoo, check out this blog post by Travis Nielsen.
If I choose Azure ACS v2 (this can be given a friendlier name when you set it up as a Trusted Identity Provider through PowerShell), I will see the following screen. Claims Authentication relies on a series of HTTP redirects to seamlessly direct users between SharePoint and external trusted identity providers such as Azure ACS to log them in. This page is hosted completely outside of my SharePoint environment:
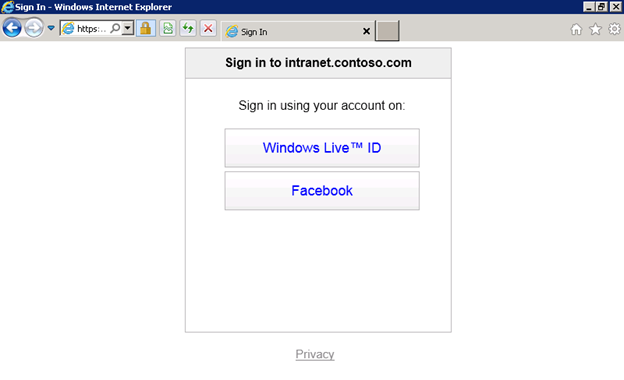
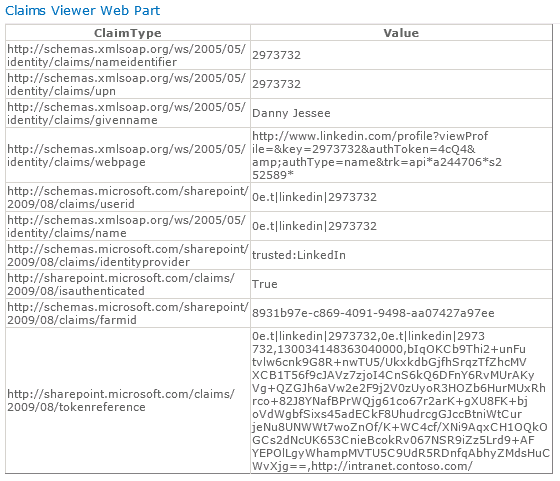
By choosing “Windows Live ID,” I will be redirected to https://login.live.com, where I will be prompted to enter my Windows Live ID credentials. (Similarly, you will be redirected to any of the other Open ID providers’ sites should you choose them instead.) After I sign in, another series of HTTP redirects takes place that eventually lands me back in my SharePoint environment, all logged in. The Claims web part on the page shows the various Claims that were sent by the Trusted Identity Provider in an XML-based Security Assertion Markup Language (SAML) token back to SharePoint:
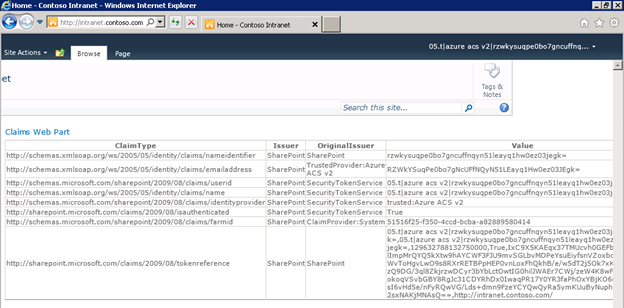
As an application developer, I can leverage these Claims (you see some examples of Claims in the screenshot above include nameidentifier, emailaddress, userid, name, etc.) to make various authorization (what resources may this authenticated user access) and personalization (how is this particular user or class of user’s experience customized) decisions about how to handle this user.
Claims-based authentication and Azure ACS offer exciting possibilities to application developers who are liberated from having to maintain (or even worse, design and develop!) a user management system and all the nightmares that go along with it (think about password resets, forgotten passwords, security requirements for maintaining account information, etc.) As Chris mentions in his blog post, the same paradigm can be applied using Active Directory Federation Services (AD FS v2) to support users logging in to a SharePoint environment using credentials from a trusted external domain.
That said, Claims-based authentication is not always as easy to set up and work with as it may seem. Using CloudShare, developers and IT professionals can focus their valuable time and energy on solving the issues surrounding the implementation of Claims-based identity in SharePoint 2010 and not be concerned with software licensing, hardware, or other infrastructure concerns.
A Checklist for New Forms-Based Authentication Users in SharePoint 2010
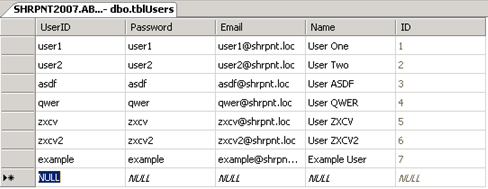
In recent weeks, I have done a fair amount of analysis and testing of various Claims-Based Identity scenarios in SharePoint 2010. One of these scenarios involves a web application configured to use Forms-Based Authentication (FBA obviously requires the use of Claims in SharePoint 2010) that is tied to a custom membership provider. The membership provider is quite simple, storing user IDs and passwords in a table within a SQL Server database (in plain text, so please don’t do this in production!) The solution was initially developed in MOSS 2007 and then migrated to SharePoint 2010. I have not yet performed a Visual Upgrade, which is why my screenshots still look “MOSS-y.”
There are numerous primers out there that explain how to handle the migration of existing FBA users to their Claims-based counterparts in SharePoint 2010, but what happens when you add new users to the custom membership database after the migration? Does everything go smoothly? In my experience, there are a few steps you should always perform to ensure all new users added to the membership database have the end-user experience you would expect.
First, I will create a new user and show you what may happen if you take no further action.
Step 1: Create the New User
This procedure will vary based on your custom membership provider. In this example, I will create the user example in my database table with an equally secure password (again, please don’t do this in production!)
What if I did nothing further at this point? Should the user example be able to log in to the FBA-protected site if he or she has not been explicitly granted any access (and when “All Authenticated Users” has not been granted any level of access to the site)? The answer may surprise you…
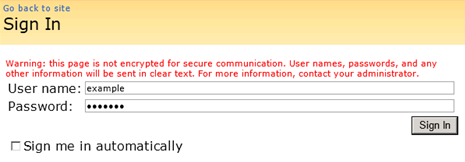
I’m in!
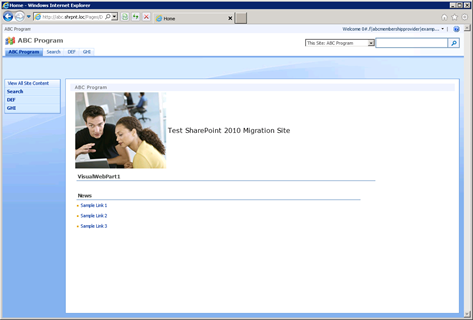
We’ll deal with this little bit of nonsense (the ugly Claims-encoded welcome name for the new user) in a minute. By the way, does anyone else find it amusing that the last two characters of the user’s display name are dropped in favor of a three character ellipsis (…)?

What’s even “better” is that example can click “View All Site Content” and navigate to all the lists and libraries within the site.
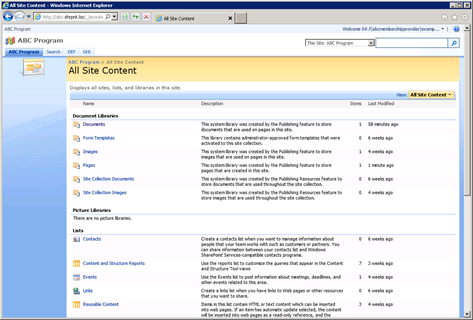
This does not seem like the behavior we would expect to see. How can we clean things up?
Step 2: Create an SPUser Object for the New User
In my initial quest to learn why a new FBA-user’s welcome name is always in Claims-encoded format, I stumbled upon Tyler Holmes’ excellent blog post entitled Awkward Usernames Courtesy of Claims Authentication (FBA). This led me to realize that I needed to update the DisplayName property of the SPUser object associated with the new user. Unfortunately, when I tried to run the PowerShell cmdlet Tyler provides, I found out that my new user doesn’t even have an associated SPUser object yet!
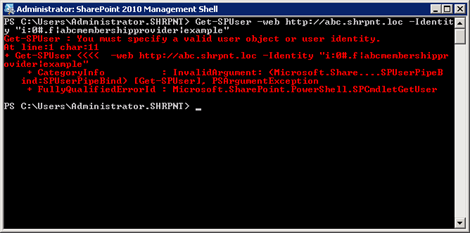
To create this object for my new FBA user, I run the following cmdlet:
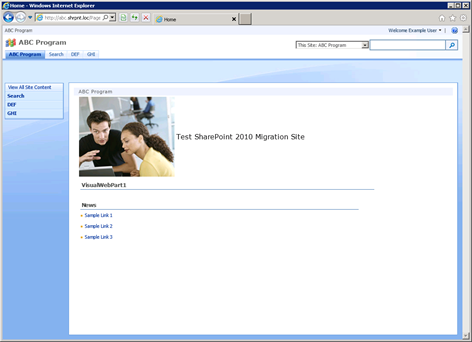
New-SPUser -Web http://abc.shrpnt.loc -UserAlias “i:0#.f|abcmembershipprovider|example”

Before I run Tyler’s cmdlet to set the DisplayName for my SPUser to a friendlier value (although I now see example as the user’s name rather than its Claims-encoded equivalent), I thought I’d try logging in as example again to see if having an SPUser object for my new user makes a difference.
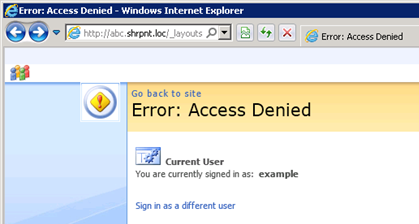
Access Denied?! But all I did was create a security principal (SPUser) for my new FBA user, I didn’t change any permissions…
Naturally this is the behavior one would expect to see when a new user is created and has not yet granted access to any resources. It’s a new FBA user (without a security principal)’s ability to have reader access across a site that has me more troubled.
Step 3: Grant the New User the Appropriate Level of Access
Unless you have assigned “All Authenticated Users” with a certain level of access to the site, you will experience the Access Denied error shown above. Just as in any other SharePoint deployment, a user with the appropriate level of access should assign the new user (either through a SharePoint group or directly) the permissions he or she will need on the site.
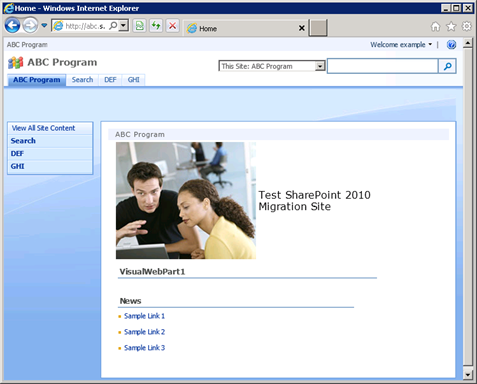
After this has been done, example is able to log in to the site once again. As an added bonus, example‘s welcome name at the top right of the page is no longer in Claims-encoded format.
Step 4: Set the New User’s DisplayName Value
When I created the user example in Step 1, I gave the user a name of Example User. I can run the following in PowerShell to set the user’s display name accordingly:
$user = Get-SPUser -Web http://abc.shrpnt.loc -Identity “i:0#.f|abcmembershipprovider|example”
$user.DisplayName = “Example User”
$user.Update()

This step is absolutely necessary if you do not use LDAP or BCS to map user profile properties to your custom membership provider’s data store. (Conversely, if you do use LDAP or BCS and have user profile synchronization configured, the value you set in this step will be overwritten the next time profile synchronization occurs.)
Now when example logs in, we see the new welcome name.

It’s worth noting that nothing within the infrastructure of Claims itself has anything to do with the user’s welcome name or how it is displayed. In fact, using the Claims Viewer Web Part, we can see that the information contained within example‘s Claim looks exactly the same as it did before example had an associated SPUser object. The display name we just set is not contained within the user’s Claim; it is only maintained within the SPUser object.

Conclusion
By following the above steps each time a new user is created, you guarantee consistency with each new user’s ability to access the site (and not have read access to all site content by default if this is not the desired behavior) and how the new user’s name is displayed. I strongly encourage you to automate this process using PowerShell or the object model if you need to create a lot of new users.
Have any questions, comments, or ideas you want to share? Feel free to post them in the comments below. If you will be at #SPSTCDC next month, feel free to come to my presentation on Claims-Based Identity at the August 11 meeting of the SharePoint User Group of Washington, DC. The meeting begins at 6:00 p.m.