Tagged: CSOM
Updating Legacy SharePoint Customizations to the Add-in Model
If you follow this blog, you have probably read many of my posts through the years dedicated to the Add-in (formerly app) model for SharePoint 2013, 2016, and SharePoint Online. Microsoft introduced the Add-in model in SharePoint 2013 to address the various shortcomings associated with running custom code on the SharePoint server — most notably, of course, that custom code cannot be deployed to SharePoint Online in Office 365. SharePoint-hosted Add-ins are great for simple functionality that can be achieved with 100% client-side solutions (HTML, CSS, and JavaScript), while provider-hosted Add-ins allow you to run custom server-side code in Azure or anywhere other than the SharePoint server.
Using the Add-in model is a no-brainer for most new development efforts, especially if you are developing for SharePoint Online and still need to write server-side code. (At the time of this writing, the new SharePoint Framework is still in Developer Preview but is definitely worth adding to your repertoire for client-side SharePoint development in the years to come!)
But what about your existing solutions? Many organizations using SharePoint maintain large portfolios of custom code solutions that leverage different legacy development approaches advocated by Microsoft through the years, and most of the custom code developed for earlier versions of SharePoint cannot be directly migrated to the cloud. If your organization decided to move to the cloud tomorrow, where would you begin?
Taking inventory of your customizations
I have found that most legacy SharePoint customizations can be placed into the following categories:
- User interface enhancements (master page, branding, themes, custom web parts)
- Declarative items (XML for custom site columns, list instances, and content types)
- Timer jobs (and other administrative extensions to the platform) running in SharePoint Central Administration on-premises
These customizations may take the form of farm or sandboxed solutions that depend on SharePoint’s legacy feature framework. In the case of some user interface customizations, custom HTML markup, CSS, or even JavaScript might be embedded directly within a site’s master page file. For the most part, these are situations we should try to avoid as much as possible when migrating our customizations to the cloud for the following reasons:
- Farm solutions cannot be deployed to SharePoint Online.
- Sandboxed solutions that contain managed code can no longer be deployed to SharePoint Online (note that sandboxed solutions contain a managed code assembly by default, even if the solution does not contain any managed code).
- Custom master pages, while still supported in SharePoint Online, should be avoided unless absolutely necessary. (Microsoft has a history of making significant changes to the default master page in SharePoint Online, such as the addition of the app launcher/waffle/Hollywood Squares in the upper left corner. Sites with heavily customized master pages may not always have access to these changes as they are introduced in the future.)
The role of the Add-in model
When migrating these customizations, keep in mind that you will not necessarily be building and deploying a SharePoint Add-in to replace each customization. In fact, in many cases, you will simply be leveraging techniques from the Add-in model. These include paradigms that were introduced and/or popularized with the introduction of the Add-in model:
- Using client-side script wherever possible
- Remote provisioning of assets (everything from CSS/JavaScript files to site columns, content types, etc.) using the .NET Managed client object model (CSOM) or PowerShell
- Running server-side code outside the SharePoint server that communicates with SharePoint via its APIs
In some cases, all you may need to do is build and deploy a “throwaway” provider-hosted Add-in within a local development environment that performs some one-time remote provisioning tasks, but is not intended to be accessed by end users and can be removed after its work is done.
Add-in model techniques enable us to make our SharePoint customizations with a “lighter touch.” By lighter touch, I am referring to a lighter footprint and/or impact on the SharePoint server. As we decrease the burden on the SharePoint server, we enable SharePoint to run more reliably and efficiently while also making it easier to administer and upgrade (at least on-premises…yes, these techniques all work on-prem as well!) To better explain this concept, I put together the table below contrasting legacy SharePoint development approaches with their modern lighter touch equivalents:
| Legacy Approach | Lighter Touch |
|---|---|
| Farm solutions with custom code running in the SharePoint IIS worker process | Provider-hosted Add-in with custom code running outside of SharePoint |
| Farm or sandboxed solutions that deploy declarative artifacts such as site columns, content types, and list instances | Remote provisioning these artifacts from a provider-hosted Add-in using CSOM |
| Custom master pages with embedded markup, styles, and script | Remote provisioning of branding assets, embedding of JavaScript UI customizations using ScriptLink custom actions |
| Custom timer jobs running in Central Administration using the SharePoint server object model | Remote timer jobs running as Windows scheduled tasks or Azure WebJobs using CSOM |
SharePoint Developer PnP: here to help!
Because the Add-in model represents such a strong departure from the way things were done in the past with full-trust code in SharePoint, Microsoft started the SharePoint Developer Patterns and Practices (or PnP) initiative to assist developers with transforming their existing solutions to be cloud-ready as they migrate to SharePoint Online in Office 365.
The PnP team maintains several Github repositories that include reusable, production-ready components, templates, and solution starters that demonstrate the preferred modern approach to SharePoint development — making customizations with a lighter touch wherever possible.
Eric Overfield just published a great blog post detailing the PnP initiative and how you can get involved.
My Pluralsight course
If you are interested in learning more, I recently published a Pluralsight course with lots of demos: Updating Legacy SharePoint Customizations to the Add-in Model. The course covers the process of migrating a heavily customized on-premises SharePoint site to SharePoint Online from start to finish. The clip below is a demo from the course showing how a legacy timer job customization can be made cloud-ready with the help of the PnP Timer Job Framework and Azure WebJobs.
In this course, you will see me leverage the PnP Core Component to drastically simplify writing .NET Managed CSOM code. I also use several great samples and solution starters from the PnP team, all with the objective of easing the pain associated with migrating legacy SharePoint customizations to the Add-in model.
Accessing SharePoint Data from Provider-Hosted Apps: Use the Right Context
I have spent the better part of the last two years working with the new app development model for SharePoint 2013. Recently I have focused on building apps that access, manipulate, and interact with data stored in SharePoint Online with Office 365. If you have done any development using the client-side object model (CSOM) for SharePoint, you understand the importance of instantiating the proper ClientContext object to access data in a particular SharePoint site. The ClientContext constructor takes as an argument the URL of a SharePoint site and allows you to access data stored in the Lists collection of the Web associated with it. In this post, I will discuss the various context objects you should use in your provider-hosted app depending on where the data your app needs to access resides and if the user’s permissions need to be considered. If you have been developing apps for SharePoint for awhile now (and even if you haven’t), I strongly encourage you to use Visual Studio 2013 and the Office Developer Tools for Visual Studio 2013 – March 2014 Update.
Host webs and app webs
When dealing with apps for SharePoint, you will become familiar with host webs and app webs:
- Host web – the SharePoint site to which an app is installed
- App web – the special isolated site (a unique app web is provisioned for each installation of the app) where the app for SharePoint’s internal components and content, such as lists, content types, workflows, and pages, are deployed
Note that a provider-hosted app is not required to have an app web, and in fact may not need one depending on your business requirements.
Your app will always have Full Control permissions to its app web. However, your app will need to request (and be granted) permissions by the user installing your app in order to access data in the host web. This is handled through the app manifest.
If your app needs to access data in the SharePoint site where it is being installed, you will be working with a host web context of some sort. As you will see, there are actually two different host web context objects, depending on the app authorization policy you choose.
Life made easy, thanks to SharePointContext.cs
When you create a new provider-hosted app in Visual Studio 2013, you have the option to create a new ASP.NET Web Forms or MVC application to serve as your app’s remote web application. If you are using the Office Developer Tools for Visual Studio 2013 – March 2014 Update, you also have the option to convert an existing ASP.NET web application to an app for SharePoint project (really cool!) In either case, you will notice that SharePointContext.cs is added to the remote web application project. This file contains class definitions for SharePointAcsContext and SharePointHighTrustContext, which allow you to create host web and app web context objects based on whether your trust broker is ACS (which it is with Office 365) or if you are on premises. I won’t delve into too much more detail in this post, but Kirk Evans has an outstanding writeup about these classes.
Accessing data in the app web
To access data in the SharePoint app web from your app, use the following pattern:
CSOM (C#)
var spContext = SharePointContextProvider.Current.GetSharePointContext(Context);

using (var clientContext = spContext.CreateUserClientContextForSPAppWeb())
{
    Web web = clientContext.Web;
    clientContext.Load(web);
    clientContext.ExecuteQuery();

    ListCollection lists = web.Lists;
    clientContext.Load(lists);
    clientContext.ExecuteQuery();
}
REST (C#)
var spContext = SharePointContextProvider.Current.GetSharePointContext(Context);
HttpWebRequest listRequest = (HttpWebRequest)HttpWebRequest.Create(spContext.SPAppWebUrl + "/_api/web/lists");
listRequest.Method = "GET";
listRequest.Accept = "application/atom+xml";
listRequest.ContentType = "application/atom+xml;type=entry";
listRequest.Headers.Add("Authorization", "Bearer " + spContext.UserAccessTokenForSPAppWeb);
JSOM
var appweburl = decodeURIComponent(getQueryStringParameter("SPAppWebUrl"));
var clientContext = new SP.ClientContext(appweburl);
var appWeb = clientContext.get_web();
var appWebListColl = appWeb.get_lists();
clientContext.load(appWebListColl);
clientContext.executeQueryAsync(onAppWebGetListSuccess, onError);
Accessing data in the host web
To access data in the SharePoint host web (the SharePoint site where your app is installed) from your app, use the following pattern:
CSOM (C#)
var spContext = SharePointContextProvider.Current.GetSharePointContext(Context);

using (var clientContext = spContext.CreateUserClientContextForSPHost())
{
    Web web = clientContext.Web;
    clientContext.Load(web);
    clientContext.ExecuteQuery();

    ListCollection lists = web.Lists;
    clientContext.Load(lists);
    clientContext.ExecuteQuery();
}
REST (C#)
var spContext = SharePointContextProvider.Current.GetSharePointContext(Context);
HttpWebRequest listRequest = (HttpWebRequest)HttpWebRequest.Create(spContext.SPAppWebUrl + "/_api/web/lists");
listRequest.Method = "GET";
listRequest.Accept = "application/atom+xml";
listRequest.ContentType = "application/atom+xml;type=entry";
listRequest.Headers.Add("Authorization", "Bearer " + spContext.UserAccessTokenForSPHost);
JSOM
var appweburl = decodeURIComponent(getQueryStringParameter("SPAppWebUrl"));
var hostweburl = decodeURIComponent(getQueryStringParameter("SPHostUrl"));
var clientContext = new SP.ClientContext(appweburl);
var factory = new SP.ProxyWebRequestExecutorFactory(appweburl);
clientContext.set_webRequestExecutorFactory(factory);
var appContextSite = new SP.AppContextSite(clientContext, hostweburl);
var hostWeb = appContextSite.get_web();
hostWebListColl = hostWeb.get_lists();
clientContext.load(hostWebListColl);
clientContext.executeQueryAsync(onHostWebGetListSuccess, onJSOMError);
Note that using JSOM, we still need to construct a ClientContext for the app web before we generate an AppContextSite for the host web, made possible through the SP.ProxyWebRequestExecutorFactory.
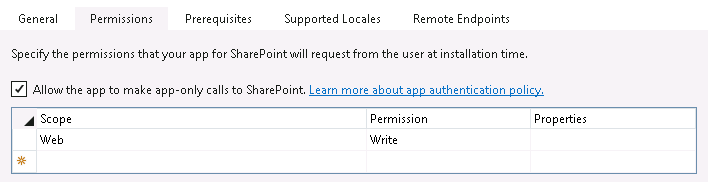
A note about the app-only authorization policy
By default, authorization checks in the host web succeed only if both the current user and the app have sufficient permissions to perform the action in question, such as reading from or writing to a list. We are reminded that the user’s permissions are taken into account based on the names of the context and access token objects we use in these scenarios: for instance, CreateUserClientContextForSPHost and UserAccessTokenForSPHost. However, your app has the ability to do something akin to running with elevated privileges using the app-only policy for authorization. Also controlled through the app manifest, the app-only policy is useful when an app doesn’t need or want to consider the permissions of the current user. In Visual Studio 2013, you can specify that your app would like to have the ability to use the app-only policy by checking this box in the AppManifest.xml editor, on the Permissions tab:
That being said, just because your app is granted this permission does not mean that you can use the same host web context or access token as before to automatically leverage it. To access data from the SharePoint host web (taking only your app’s permissions into account and ignoring the current user’s permissions) from your app, use the following pattern:
CSOM (C#)
var spContext = SharePointContextProvider.Current.GetSharePointContext(Context);

using (var clientContext = spContext.CreateAppOnlyClientContextForSPHost())
{
    Web web = clientContext.Web;
    clientContext.Load(web);
    clientContext.ExecuteQuery();

    ListCollection lists = web.Lists;
    clientContext.Load(lists);
    clientContext.ExecuteQuery();
}
REST (C#)
var spContext = SharePointContextProvider.Current.GetSharePointContext(Context);
HttpWebRequest listRequest = (HttpWebRequest)HttpWebRequest.Create(spContext.SPAppWebUrl + "/_api/web/lists");
listRequest.Method = "GET";
listRequest.Accept = "application/atom+xml";
listRequest.ContentType = "application/atom+xml;type=entry";
listRequest.Headers.Add("Authorization", "Bearer " + spContext.AppOnlyAccessTokenForSPHost);
Remember that in order to use the app-only policy, your app must request and be granted this permission by the site owner who installs your app. Also note that there is no JSOM example using the app-only policy because apps that do not make OAuth authenticated calls (such as apps that are only JavaScript running in the app web) cannot use the app-only policy.
As you can see, the code you write in each of the above scenarios (accessing data in the app web, host web, or using the app-only authorization policy) is identical except for the method or property you use from the SharePointContext class to get the appropriate context or access token. Understanding these subtle differences is vitally important when making sure your app has the ability to access and manipulate the SharePoint data it needs.
Set the Bing maps API key in Office 365 using CSOM to leverage SharePoint 2013 Geolocation features
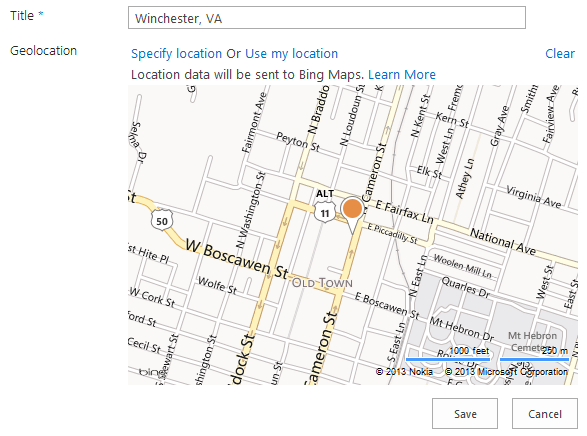
Much has been written about the new Geolocation capabilities of SharePoint 2013. If you haven’t already, I would highly recommend reading this overview on MSDN. In short, SharePoint 2013 offers a new field type called Geolocation, which represents point location data (latitude and longitude) that can be automatically plotted on a Bing map.
In order to take full advantage of the built-in Bing mapping functionality, you must obtain an API key from the Bing Maps portal. Different API key types are available depending on your needs (Trial keys work great for demos and development environments, while Basic or Enterprise keys may better suit your needs in a production environment).
If you attempt to leverage a Geolocation column in SharePoint 2013 (on-premises or in Office 365) without obtaining and setting a Bing Maps API key, you will receive a subtle reminder that you need to do so:
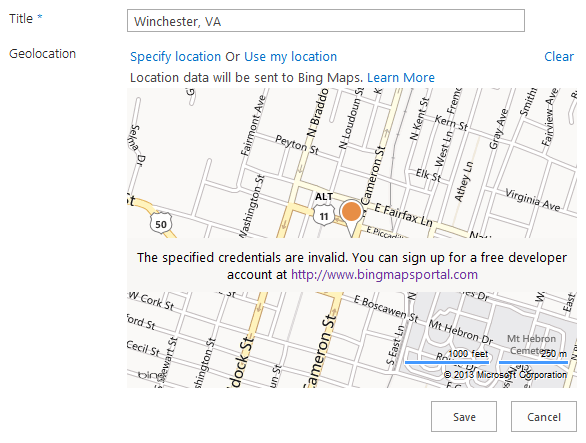
In an on-premises environment, you can use the PowerShell Set-SPBingMapsKey cmdlet to set the Bing maps API key at the farm level. However, it is not possible to use this cmdlet in an Office 365 environment. Fortunately, the Bing maps API key is also stored in the property bag of an SPWeb (with key “BING_MAPS_KEY“). We can set this value via .NET or JavaScript using the client object model.
To set the API key I obtained for my Office 365 site, I used the following code in a simple .NET console application:
        static void Main(string[] args)
        {
            var webUrl = new Uri("");
            using (ClientContext ctx = new ClientContext(webUrl))
            {
                var login = "";
                var password = "";
                var secureStrPwd = new SecureString();
                foreach (char c in password)
                {
                    secureStrPwd.AppendChar(c);
                }

                var creds = new SharePointOnlineCredentials(login, secureStrPwd);
                ctx.Credentials = creds;

                var web = ctx.Web;
                web.AllProperties["BING_MAPS_KEY"] = "";
                web.Update();

                ctx.ExecuteQuery();
            }
        }
Once the API key has been set, your maps will render without that annoying message!