Tagged: SharePoint 2016

Deploy SharePoint Framework client-side web parts to SharePoint 2016 on-premises
Earlier this month, Microsoft released Feature Pack 2 for SharePoint 2016. With this release came the long-awaited introduction of some SharePoint Framework capabilities on-premises, beginning with client-side web parts on classic pages (of course, there are no modern page experiences on-premises…yet).
So what do you need to do to start using client-side web parts on-premises? Follow the steps below!
Download and apply the September 2017 Public Update for SharePoint 2016
Of course it all starts with downloading and applying Feature Pack 2 (also known as the September 2017 Public Update for SharePoint 2016), which can be downloaded here. Once you’ve applied the Feature Pack, verify your configuration database version is 16.0.4588 in Central Administration:
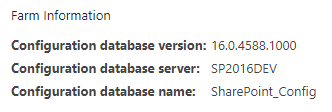
Farm information shown on the Central Administration “Servers in Farm” screen.
Verify the farm configuration for apps/add-ins
If you are already using SharePoint add-ins and have completed the necessary steps to configure your on-premises environment for apps, you can skip this section. Otherwise, there is some infrastructure work that needs to be done before you can leverage the app/add-in model. Since SharePoint Framework packages must be uploaded to an app catalog, your on-premises farm must be configured for apps in order to use the SharePoint Framework. This is true even if you do not intend to leverage the add-in model (although you should definitely should consider it, as SharePoint Framework capabilities are complementary to–and not a wholesale replacement for–the add-in model).
At a high level, the steps you must perform include:
1. Creating the forward lookup zone and CNAME alias in DNS.
2. Configuring the Subscription Settings and App Management service applications.
3. Setting up app URLs in Central Administration.
4. Granting access to the app catalog to user(s) who may install your client-side web parts to a site (this is an important one and is definitely the first place to look if users trying to add them to a site don’t see them on the Add an app screen).
These steps are outlined in further detail here.
Update the Yeoman generator
Assuming you have already configured your SharePoint Framework development environment, ensure your Yeoman generator has been updated to version 1.3.0 or later. You can also develop client-side web parts for SharePoint 2016 on-premises using version 1.0.2 of the generator, but I would highly encourage you to update to the latest version of the generator using this command:
npm i -g @microsoft/generator-sharepoint
Beginning with v1.3.0 of the generator, you are given the option to choose whether your solution needs to support SharePoint 2016 on-premises and/or SharePoint Online:
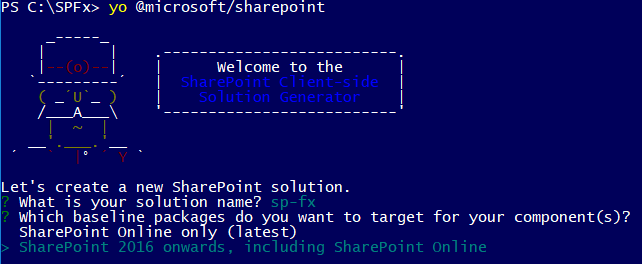
Version 1.3.0 of the Yeoman generator now prompts you to choose between targeting SharePoint on-premises and/or SharePoint Online.
This is important because SharePoint Online will always have support for newer SharePoint Framework capabilities than what will be available on-premises and will therefore target different dependencies within its baseline packages.
Build, package, and deploy the client-side web part
This process is largely the same as developing client-side web parts for SharePoint Online. There is even a live online workbench for local testing available within your on-premises sites at _layouts/15/workbench.aspx (in addition to the local workbench that is always available when you run gulp serve).
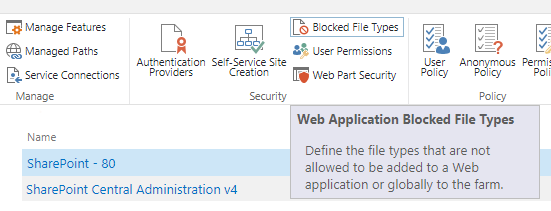
Before you build and package your solution, remember to update the cdnBasePath value in config/write-manifests.json to match the location where you intend to deploy your client-side web part’s assets. The files you will need to deploy are one .json and two .js files. NOTE: If you intend to deploy these assets to a SharePoint document library, you may need to remove .json files from the list of blocked file types. This may be done in Central Administration under Manage web applications by selecting Blocked File Types in the ribbon and removing json from the list:
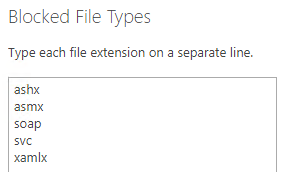
Ensure that json does NOT appear in the list of blocked file type extensions if you intend to deploy your solution’s assets to SharePoint.
After you have deployed your solution’s assets, upload the .sppkg file from the sharepoint/solution directory to your app catalog. This will then make the solution available to install on sites where you wish to add the client-side web part.
Add the client-side web part to a site
From the Add an app screen, select your solution. You will then be able to add the web part to a page by selecting Web Part from the Insert tab of the ribbon on a wiki or web part page. By default, your client-side web part will appear in the Other category:
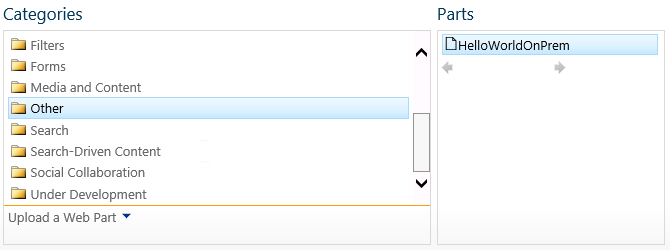
SharePoint Framework client-side web parts can be added to the page just like any classic web part.
The web part will then appear on the page.

SharePoint Framework client-side web part added to a SharePoint 2016 on-premises wiki page.
Other notes
– Remember that you cannot add an app to a site when logged in as the System Account. Ensure you are signed in as a different user when adding the app to your site.
– The web part file’s properties, including its group, title, and description, can be changed by updating the [web part name].manifest.json file in the src/webparts/[web part name] directory.
– There will always be some capability gap between SharePoint Online and on-premises. The SharePoint team has committed to merging new SharePoint Framework capabilities into future on-premises releases, but don’t expect to see support for things like SharePoint Framework Extensions on-premises anytime soon.
– There is no on-premises support for tenant/farm-scoped deployment of client-side web parts. You must upload the .sppkg file to your on-premises app catalog(s) and manually add the app on each site where you need to leverage your client-side web part.
– If you have completed all of the appropriate farm configuration to support the add-in model but users don’t see your SharePoint Framework solutions from the Add an app screen, ensure you have explicitly granted those users access to your app catalog.
It is so exciting to have the first set of SharePoint Framework capabilities now available to on-premises users. Happy coding!
Updating Legacy SharePoint Customizations to the Add-in Model
If you follow this blog, you have probably read many of my posts through the years dedicated to the Add-in (formerly app) model for SharePoint 2013, 2016, and SharePoint Online. Microsoft introduced the Add-in model in SharePoint 2013 to address the various shortcomings associated with running custom code on the SharePoint server — most notably, of course, that custom code cannot be deployed to SharePoint Online in Office 365. SharePoint-hosted Add-ins are great for simple functionality that can be achieved with 100% client-side solutions (HTML, CSS, and JavaScript), while provider-hosted Add-ins allow you to run custom server-side code in Azure or anywhere other than the SharePoint server.
Using the Add-in model is a no-brainer for most new development efforts, especially if you are developing for SharePoint Online and still need to write server-side code. (At the time of this writing, the new SharePoint Framework is still in Developer Preview but is definitely worth adding to your repertoire for client-side SharePoint development in the years to come!)
But what about your existing solutions? Many organizations using SharePoint maintain large portfolios of custom code solutions that leverage different legacy development approaches advocated by Microsoft through the years, and most of the custom code developed for earlier versions of SharePoint cannot be directly migrated to the cloud. If your organization decided to move to the cloud tomorrow, where would you begin?
Taking inventory of your customizations
I have found that most legacy SharePoint customizations can be placed into the following categories:
- User interface enhancements (master page, branding, themes, custom web parts)
- Declarative items (XML for custom site columns, list instances, and content types)
- Timer jobs (and other administrative extensions to the platform) running in SharePoint Central Administration on-premises
These customizations may take the form of farm or sandboxed solutions that depend on SharePoint’s legacy feature framework. In the case of some user interface customizations, custom HTML markup, CSS, or even JavaScript might be embedded directly within a site’s master page file. For the most part, these are situations we should try to avoid as much as possible when migrating our customizations to the cloud for the following reasons:
- Farm solutions cannot be deployed to SharePoint Online.
- Sandboxed solutions that contain managed code can no longer be deployed to SharePoint Online (note that sandboxed solutions contain a managed code assembly by default, even if the solution does not contain any managed code).
- Custom master pages, while still supported in SharePoint Online, should be avoided unless absolutely necessary. (Microsoft has a history of making significant changes to the default master page in SharePoint Online, such as the addition of the app launcher/waffle/Hollywood Squares in the upper left corner. Sites with heavily customized master pages may not always have access to these changes as they are introduced in the future.)
The role of the Add-in model
When migrating these customizations, keep in mind that you will not necessarily be building and deploying a SharePoint Add-in to replace each customization. In fact, in many cases, you will simply be leveraging techniques from the Add-in model. These include paradigms that were introduced and/or popularized with the introduction of the Add-in model:
- Using client-side script wherever possible
- Remote provisioning of assets (everything from CSS/JavaScript files to site columns, content types, etc.) using the .NET Managed client object model (CSOM) or PowerShell
- Running server-side code outside the SharePoint server that communicates with SharePoint via its APIs
In some cases, all you may need to do is build and deploy a “throwaway” provider-hosted Add-in within a local development environment that performs some one-time remote provisioning tasks, but is not intended to be accessed by end users and can be removed after its work is done.
Add-in model techniques enable us to make our SharePoint customizations with a “lighter touch.” By lighter touch, I am referring to a lighter footprint and/or impact on the SharePoint server. As we decrease the burden on the SharePoint server, we enable SharePoint to run more reliably and efficiently while also making it easier to administer and upgrade (at least on-premises…yes, these techniques all work on-prem as well!) To better explain this concept, I put together the table below contrasting legacy SharePoint development approaches with their modern lighter touch equivalents:
| Legacy Approach | Lighter Touch |
|---|---|
| Farm solutions with custom code running in the SharePoint IIS worker process | Provider-hosted Add-in with custom code running outside of SharePoint |
| Farm or sandboxed solutions that deploy declarative artifacts such as site columns, content types, and list instances | Remote provisioning these artifacts from a provider-hosted Add-in using CSOM |
| Custom master pages with embedded markup, styles, and script | Remote provisioning of branding assets, embedding of JavaScript UI customizations using ScriptLink custom actions |
| Custom timer jobs running in Central Administration using the SharePoint server object model | Remote timer jobs running as Windows scheduled tasks or Azure WebJobs using CSOM |
SharePoint Developer PnP: here to help!
Because the Add-in model represents such a strong departure from the way things were done in the past with full-trust code in SharePoint, Microsoft started the SharePoint Developer Patterns and Practices (or PnP) initiative to assist developers with transforming their existing solutions to be cloud-ready as they migrate to SharePoint Online in Office 365.
The PnP team maintains several Github repositories that include reusable, production-ready components, templates, and solution starters that demonstrate the preferred modern approach to SharePoint development — making customizations with a lighter touch wherever possible.
Eric Overfield just published a great blog post detailing the PnP initiative and how you can get involved.
My Pluralsight course
If you are interested in learning more, I recently published a Pluralsight course with lots of demos: Updating Legacy SharePoint Customizations to the Add-in Model. The course covers the process of migrating a heavily customized on-premises SharePoint site to SharePoint Online from start to finish. The clip below is a demo from the course showing how a legacy timer job customization can be made cloud-ready with the help of the PnP Timer Job Framework and Azure WebJobs.
In this course, you will see me leverage the PnP Core Component to drastically simplify writing .NET Managed CSOM code. I also use several great samples and solution starters from the PnP team, all with the objective of easing the pain associated with migrating legacy SharePoint customizations to the Add-in model.