Tagged: SharePoint Online

Speaking at SharePoint Fest Seattle 2017!
In just a few short weeks (August 8-11), I will be joining SharePoint experts from around the world at SharePoint Fest Seattle 2017! I am very excited to be debuting a new session that will take a lighthearted, but detailed look at how to attempt to achieve consistency when branding the mix of classic and modern page experiences within SharePoint Online sites, modern team sites, and recently unveiled communication sites using the SharePoint Framework along with techniques from the SharePoint add-in model:
DEV 206 – Apply Consistent UI Customizations Across Classic and Modern Pages in SharePoint Online
SharePoint Online sites are currently made up of a hodgepodge of classic and modern page experiences. A site’s home page is a classic page while the site contents page is a modern page. Page experiences may vary between pages, lists, and libraries as users navigate a site.
Although the SharePoint Framework allows you to build client-side web parts to customize both classic and modern pages, a combination of the add-in model and SharePoint Framework application customizers must be used to embed JavaScript-based UI customizations across both page types.
In this demo-intensive session, you will learn how to brand a SharePoint Online site with a customizable page header and footer that looks identical across classic and modern pages.
If you register now and use code JesseeSeattle100 at checkout, you can save $100!

My session is Friday, August 11th at 3:30 in Breakout 8. This will be my fourth SharePoint Fest and my second SharePoint Fest Seattle. I look forward to seeing you there!
SharePoint Framework page placeholders on new communication sites
UPDATE 8/13/2017: As of August 11, 2017, all modern site pages also contain the PageFooter placeholder.
The original post from July 1, 2017 appears below.
Earlier this month, Microsoft launched the developer preview of SharePoint Framework Extensions. I examined the available page placeholders on modern list and library pages, the modern Site Contents page, and modern site pages in this blog post.
With the rollout of SharePoint communication sites now underway, I thought I would take this opportunity to confirm the available page placeholders on each of the three new communication site designs:
– Topic
– Showcase
– Blank
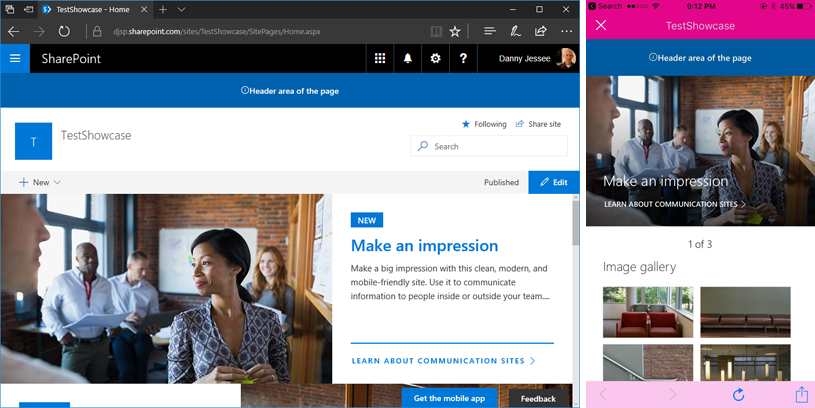
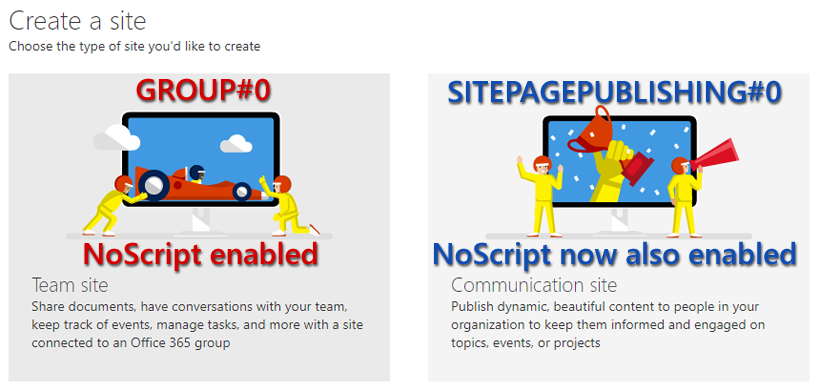
Communication sites are based on the SITEPAGEPUBLISHING#0 template and feature a new responsive modern site page for the site home page. Based on my previous research, it came as no surprise that all three modern communication site page designs contain the PageHeader placeholder but not the PageFooter placeholder.
Below are screenshots of all three communication site designs in Edge and the SharePoint mobile app, reflecting the custom content rendered in the PageHeader placeholder after deploying the SharePoint Framework Hello World Application Customizer Extension.
Topic
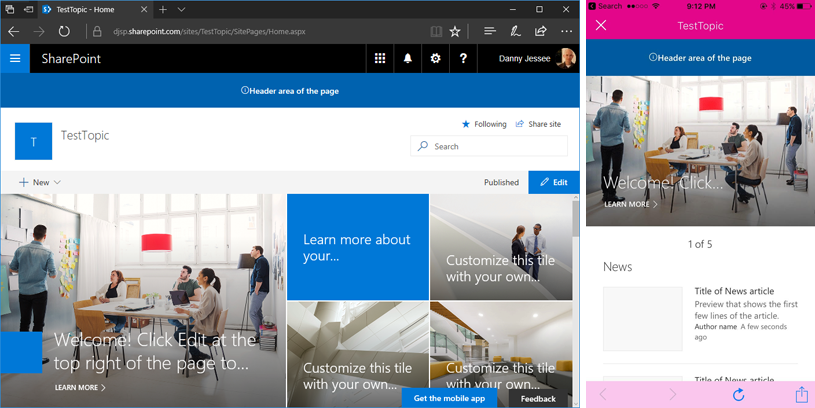
Showcase

Blank
![]()
(8/13/2017) NOTE: All three communication site designs–as well as all modern site pages in general–now also contain the PageFooter placeholder.
What if I also need a custom footer on these modern communication site pages?
I recently implemented a custom header and footer SharePoint Framework Application Customizer Extension that was based on a custom header and footer SharePoint-hosted add-in I developed back in 2015. This particular extension works great on the modern page experiences within my “classic” SharePoint Online site because I am able to leverage the SharePoint-hosted add-in part (on a classic wiki page) that maintains the custom header and footer configuration parameters in the site property bag.
In my next post, I will show you how to create a classic wiki page in a modern communication site (unlike in classic sites, you can’t just go to New > Wiki Page in the Site Pages library) to leverage the SharePoint-hosted add-in part to configure the custom header and footer configuration parameters in the site property bag. My SharePoint Framework Application Customizer Extension will then read these values from the property bag and render the custom header and footer.
As an added bonus, I will also show you the extra step necessary to accomplish this on a modern team site, a so-called “NoScript site” that does not allow custom script to access the site property bag by default.

SharePoint Online modern team sites and communication sites are NoScript sites
UPDATE 8/13/2017: As it now appears that communication sites will be NoScript sites by default, I have updated the title of this post and the image at the bottom of the original post to reflect this change and avoid any confusion.
See below for more history.
UPDATE 8/1/2017: Newly created communication sites are still NoScript sites by default; however, as of today I am again able to disable NoScript on them by running the Set-SPOSite cmdlet shown in the post below. See this Github issue for more information.
UPDATE 7/22/2017: It appears that newly created communication sites are also NoScript sites by default, and I am currently receiving an error when I try to disable NoScript on one:
I'm currently getting an error when trying to disable NoScript on a new #SharePoint Online communication site in my dev tenant. pic.twitter.com/yC3Mxymc1w
— Danny Jessee (@dannyjessee) July 22, 2017
However, I can still disable NoScript on a new #SharePoint Online modern team site without any issues in my dev tenant. pic.twitter.com/iAMhg5SvDb
— Danny Jessee (@dannyjessee) July 22, 2017
The original post from July 1, 2017 appears below.
While new SharePoint Online communication sites continue to roll out across First Release – Select Users tenants, I discovered an interesting difference between them and modern team sites. Modern team sites have been around since late 2016 and are connected to an Office 365 Group when they are created. They are also so-called “NoScript sites” by default, which affects the types of customizations that can be applied to them. They use the GROUP#0 template and not the STS#0 template used by “classic” team sites (which can still contain modern page experiences…confused yet?)
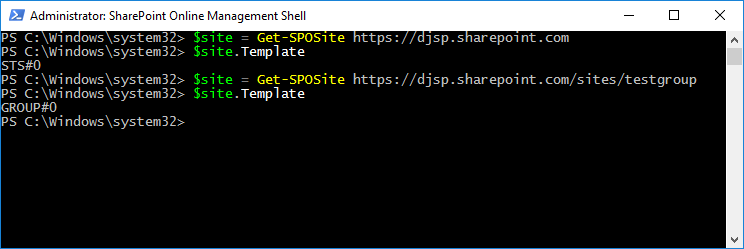
My “classic” team site uses the STS#0 template while my “modern” team site uses the GROUP#0 template.
Some of the original guidance suggested that NoScript could not be disabled on modern team sites, but earlier this week Microsoft decided to officially support disabling NoScript on modern team sites. The documentation on MSDN has been updated to reflect this as well.
Checking the NoScript status of a site
You can query a site’s DenyAddAndCustomizePages property via PowerShell:
$site = Get-SPOSite https://yoursite.sharepoint.com
$site.DenyAddAndCustomizePages
If the value is Enabled, your site is a NoScript site. To disable it, run the following cmdlet:
Set-SPOSite https://yoursite.sharepoint.com -DenyAddAndCustomizePages 0
Disabling NoScript allows users to run custom scripts on a site and allows custom script to do things such as access a site’s property bag. This may come in handy if you happen to have a solution that requires this. Stay tuned for more about that!
What about communication sites?
Since communication sites are new modern sites, you might expect them to be NoScript sites as well. However, this is not the case. Communication sites use the SITEPAGEPUBLISHING#0 template and come with the DenyAddAndCustomizePages property Disabled out of the box:
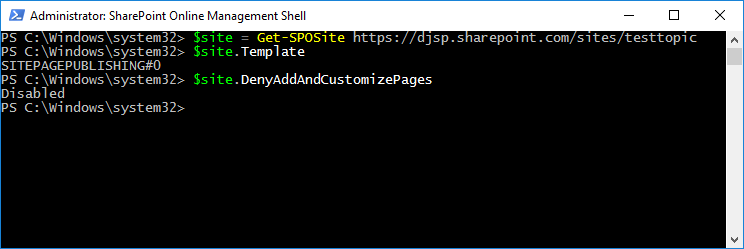
My communication site uses the SITEPAGEPUBLISHING#0 template and already has NoScript disabled.
In summary:
(8/13/2017) NOTE: Both modern team sites and communication sites now have NoScript enabled by default. In either case, NoScript can be disabled by running the appropriate Set-SPOSite cmdlet detailed above.
In an upcoming post, I will leverage this knowledge to apply my custom header and footer SharePoint Framework Application Customizer Extension to both modern team sites and communication sites.
The “opt out of modern experiences” (splnu) cookie applies to all sites in your tenant subdomain
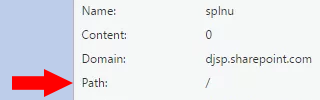
In my last post, I showed how you must click Return to classic SharePoint in order to remove an app from SharePoint Online’s modern Site Contents page. Clicking Return to classic SharePoint sets a session cookie named splnu with a Content attribute value of 0:
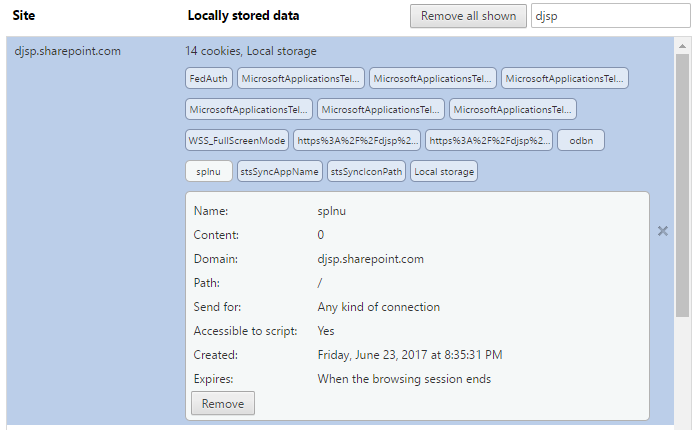
As long as this cookie is present, pages that would typically render using the modern page experience (such as the Site Contents page) will use the classic page experience instead. But did you catch something about that cookie in the screenshot above? It is set with a Path attribute value of /:

Based on this explanation of the purpose of a cookie’s Domain and Path attribute values as defined in RFC 6265, the value of the Path attribute can be used to scope the cookie to a particular URL (and its subdirectories). However, when it is set to /, the browser will use the cookie for any path within the cookie’s domain.
From any site, it affects every site
It turns out that the splnu cookie’s Path attribute is set to / no matter which site or subsite you choose to return to the classic page experience. I tested this by clicking Return to classic SharePoint from each of the following sites within my tenant (clearing my cookies between each test):
– https://djsp.sharepoint.com (root site collection)
– https://djsp.sharepoint.com/test (subsite of root site collection)
– https://djsp.sharepoint.com/sites/test (root of new private site collection)
In all of these scenarios, the same splnu cookie was created with the same Path attribute of /, no matter the subdirectory from which the request was initiated.
What does this mean?
For the duration of your session (splnu is a session cookie), you will be returned to the classic SharePoint page experience on ALL sites that share the same parent domain (in my example above, the root site collection, subsite, and private site collection underneath the /sites path all share the same parent domain–djsp.sharepoint.com–and are therefore all matches for the Path of /).
This may not be a major issue for you since the splnu cookie is only valid for the duration of your session, and as I suggest in my last post, the effects of this cookie can be mitigated by using your browser’s “private browsing” or “incognito” mode. However, this behavior may cause confusion since you might expect the Return to classic SharePoint link to only apply within the scope of the particular site where you selected it.
To that end, I have submitted this UserVoice request asking the product team to consider appropriately scoping the Path attribute value of the splnu session cookie based on where the user has asked to return to the classic page experience. Feel free to vote or comment on my request.
The easy way to remove an app from modern SharePoint Online
If you are using the modern page experiences in SharePoint Online, perhaps you’ve run into a moment of frustration when you go to the Site Contents screen to remove an installed app (err, add-in?) and discover you can’t.
Clicking the … brings up a context menu with only two options, Details and Monitor. Hmmm…no Remove here:
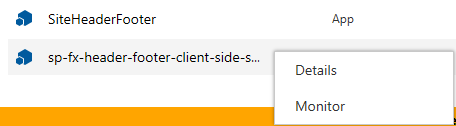
Uh oh, how do I remove this thing?
It turns out that you have to switch the Site Contents page back to the classic page experience in order to remove an app. This little nugget is buried in an Office support article:
![]()
Glad I scrolled all the way to the bottom of this article.
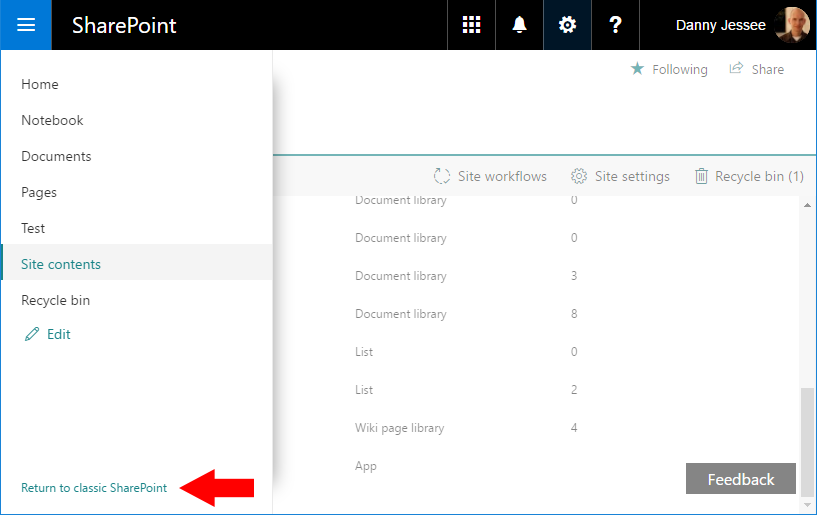
Sure enough, once you return to the classic page experience, the Remove link is there as you would expect.

You may need to expand the left navigation to see this link at the bottom.
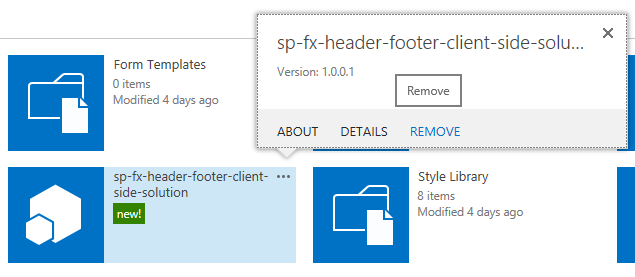
After clicking Return to classic SharePoint, apps can be removed from the classic Site Contents screen.
There was only one problem: despite the support article’s guidance to “use the Back button in the browser to return from classic view,” at least when I pressed my browser’s back button, my browser retained the classic page experience. I navigated away from the Site Contents page and back to it again…still classic. And when I went to a list view page that was formerly using the modern page experience, that page now had the classic experience as well. Only some document libraries and site pages were still using the modern page experience.
What’s going on here?
The good news is that clicking Return to classic SharePoint doesn’t actually change any SharePoint Online settings, nor does it change any user settings (not even your own). This is why you won’t find a link anywhere to “Return to modern SharePoint” after you’ve switched to classic view. Switching to classic view simply sets a session cookie that changes your default page experience. You can locate and remove this cookie to switch back immediately or just wait until your session expires. For the intellectually curious, the cookie is named splnu (anyone want to guess what that stands for?) and contains this information:
Removing this cookie will return you to the modern page experience. However, for the duration of your session, the presence of this cookie will cause pages to be rendered with the classic page experience on all sites within your tenant subdomain.
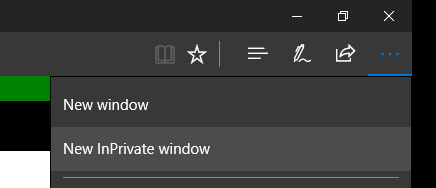
To avoid this problem altogether, I prefer to take advantage of my browser’s “private browsing” or “incognito” mode. This allows me to log in to my SharePoint Online site, go to my Site Contents page, switch to classic view, and remove the app, all without interfering with any existing cookies on my machine and eliminating the hassle of having to potentially locate and remove the splnu cookie after the fact.

Hopefully this will help the next time you need to remove an app from SharePoint Online!
Updating Legacy SharePoint Customizations to the Add-in Model
If you follow this blog, you have probably read many of my posts through the years dedicated to the Add-in (formerly app) model for SharePoint 2013, 2016, and SharePoint Online. Microsoft introduced the Add-in model in SharePoint 2013 to address the various shortcomings associated with running custom code on the SharePoint server — most notably, of course, that custom code cannot be deployed to SharePoint Online in Office 365. SharePoint-hosted Add-ins are great for simple functionality that can be achieved with 100% client-side solutions (HTML, CSS, and JavaScript), while provider-hosted Add-ins allow you to run custom server-side code in Azure or anywhere other than the SharePoint server.
Using the Add-in model is a no-brainer for most new development efforts, especially if you are developing for SharePoint Online and still need to write server-side code. (At the time of this writing, the new SharePoint Framework is still in Developer Preview but is definitely worth adding to your repertoire for client-side SharePoint development in the years to come!)
But what about your existing solutions? Many organizations using SharePoint maintain large portfolios of custom code solutions that leverage different legacy development approaches advocated by Microsoft through the years, and most of the custom code developed for earlier versions of SharePoint cannot be directly migrated to the cloud. If your organization decided to move to the cloud tomorrow, where would you begin?
Taking inventory of your customizations
I have found that most legacy SharePoint customizations can be placed into the following categories:
- User interface enhancements (master page, branding, themes, custom web parts)
- Declarative items (XML for custom site columns, list instances, and content types)
- Timer jobs (and other administrative extensions to the platform) running in SharePoint Central Administration on-premises
These customizations may take the form of farm or sandboxed solutions that depend on SharePoint’s legacy feature framework. In the case of some user interface customizations, custom HTML markup, CSS, or even JavaScript might be embedded directly within a site’s master page file. For the most part, these are situations we should try to avoid as much as possible when migrating our customizations to the cloud for the following reasons:
- Farm solutions cannot be deployed to SharePoint Online.
- Sandboxed solutions that contain managed code can no longer be deployed to SharePoint Online (note that sandboxed solutions contain a managed code assembly by default, even if the solution does not contain any managed code).
- Custom master pages, while still supported in SharePoint Online, should be avoided unless absolutely necessary. (Microsoft has a history of making significant changes to the default master page in SharePoint Online, such as the addition of the app launcher/waffle/Hollywood Squares in the upper left corner. Sites with heavily customized master pages may not always have access to these changes as they are introduced in the future.)
The role of the Add-in model
When migrating these customizations, keep in mind that you will not necessarily be building and deploying a SharePoint Add-in to replace each customization. In fact, in many cases, you will simply be leveraging techniques from the Add-in model. These include paradigms that were introduced and/or popularized with the introduction of the Add-in model:
- Using client-side script wherever possible
- Remote provisioning of assets (everything from CSS/JavaScript files to site columns, content types, etc.) using the .NET Managed client object model (CSOM) or PowerShell
- Running server-side code outside the SharePoint server that communicates with SharePoint via its APIs
In some cases, all you may need to do is build and deploy a “throwaway” provider-hosted Add-in within a local development environment that performs some one-time remote provisioning tasks, but is not intended to be accessed by end users and can be removed after its work is done.
Add-in model techniques enable us to make our SharePoint customizations with a “lighter touch.” By lighter touch, I am referring to a lighter footprint and/or impact on the SharePoint server. As we decrease the burden on the SharePoint server, we enable SharePoint to run more reliably and efficiently while also making it easier to administer and upgrade (at least on-premises…yes, these techniques all work on-prem as well!) To better explain this concept, I put together the table below contrasting legacy SharePoint development approaches with their modern lighter touch equivalents:
| Legacy Approach | Lighter Touch |
|---|---|
| Farm solutions with custom code running in the SharePoint IIS worker process | Provider-hosted Add-in with custom code running outside of SharePoint |
| Farm or sandboxed solutions that deploy declarative artifacts such as site columns, content types, and list instances | Remote provisioning these artifacts from a provider-hosted Add-in using CSOM |
| Custom master pages with embedded markup, styles, and script | Remote provisioning of branding assets, embedding of JavaScript UI customizations using ScriptLink custom actions |
| Custom timer jobs running in Central Administration using the SharePoint server object model | Remote timer jobs running as Windows scheduled tasks or Azure WebJobs using CSOM |
SharePoint Developer PnP: here to help!
Because the Add-in model represents such a strong departure from the way things were done in the past with full-trust code in SharePoint, Microsoft started the SharePoint Developer Patterns and Practices (or PnP) initiative to assist developers with transforming their existing solutions to be cloud-ready as they migrate to SharePoint Online in Office 365.
The PnP team maintains several Github repositories that include reusable, production-ready components, templates, and solution starters that demonstrate the preferred modern approach to SharePoint development — making customizations with a lighter touch wherever possible.
Eric Overfield just published a great blog post detailing the PnP initiative and how you can get involved.
My Pluralsight course
If you are interested in learning more, I recently published a Pluralsight course with lots of demos: Updating Legacy SharePoint Customizations to the Add-in Model. The course covers the process of migrating a heavily customized on-premises SharePoint site to SharePoint Online from start to finish. The clip below is a demo from the course showing how a legacy timer job customization can be made cloud-ready with the help of the PnP Timer Job Framework and Azure WebJobs.
In this course, you will see me leverage the PnP Core Component to drastically simplify writing .NET Managed CSOM code. I also use several great samples and solution starters from the PnP team, all with the objective of easing the pain associated with migrating legacy SharePoint customizations to the Add-in model.
Move list items with attachments between SharePoint farms: Access to the Rescue!
Update 8/27/2017: I updated the title of this post to avoid confusion about which versions of SharePoint and Access can be used. I also added a screenshot to this post showing where to find the option to import data from a SharePoint list using Access 2016 (it’s buried a little deeper in the UI than it was in Access 2013). I also verified that all the other steps in this article remain the same for Access 2016. One user posted an issue in the comments with the exported list displaying a “something went wrong” error in either classic or modern view, but I was unable to reproduce this with the list I was using to test. There are some documented issues (see section towards bottom of article) that will force a list to render using the classic experience, usually due to the data types of one or more fields in the list.
Original post appears below.
I was recently faced with the unenviable task of moving the full contents of a custom SharePoint list with about 60 columns (including attachments totaling about 400 MB) between a hosted instance of SharePoint 2007 and SharePoint Online. While there is no shortage of options for getting data from a list in one environment into another, I was constrained by the fact that this was a cloud-hosted instance of SharePoint 2007 where I had no server or administrator-level access. I went through a mental checklist of my options:
- Save the list as a template with contents – Nope. Way too big with those 400 MB worth of attachments.
- Export the list to Excel – Nope. Only includes the fields defined in the list view and does not include attachments.
- Create an empty version of the list in the destination environment, then use datasheet/quick view to copy data between the two lists – Nope. Again, the attachment problem (not to mention how tedious it would be to create identical views that would support datasheet/quick view in both environments).
- Write code to programmatically handle the export from SharePoint 2007 – Eh. With no server-level access in the cloud-hosted SharePoint 2007 environment, writing full trust code with the server object model was off the table. Theoretically I could have written code that leveraged SharePoint 2007’s .asmx web services, but I only wanted to go there as a last resort.
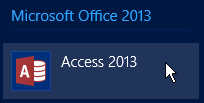
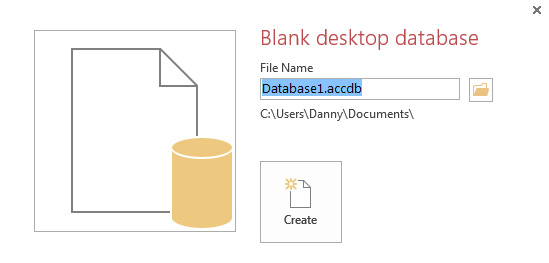
Then, as if by providence, I accidentally clicked to open Access 2013 when I actually meant to open Excel. I knew SharePoint 2013 had the hooks to import and export data using Access, but could I somehow use Access to pull the data out of SharePoint 2007? I clicked to create a new Blank Desktop Database and started my journey:
I gave the database a name and pressed Create:
Time to start poking around. I went to the External Data tab, and clicked More to reveal SharePoint List in the “Import & Link” section of the ribbon:
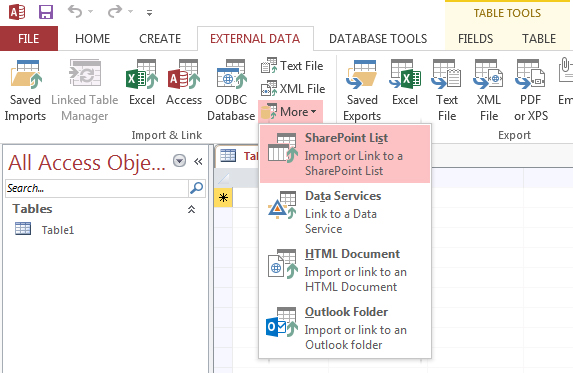
Importing a SharePoint list using Access 2013.
In Access 2016, select New Data Source from the Import section of the ribbon, then choose From Online Services and then SharePoint List:
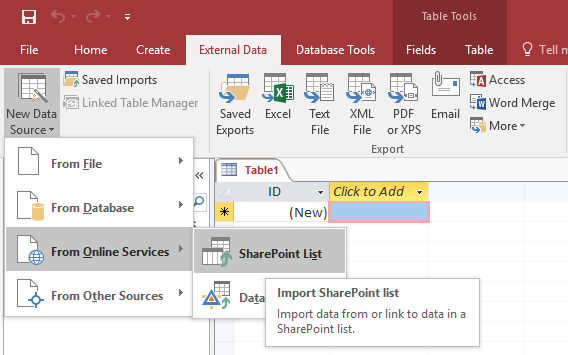
Importing a SharePoint list using Access 2016.
I entered the URL to my SharePoint 2007 site and chose to Import the source data into a new table in the current database.
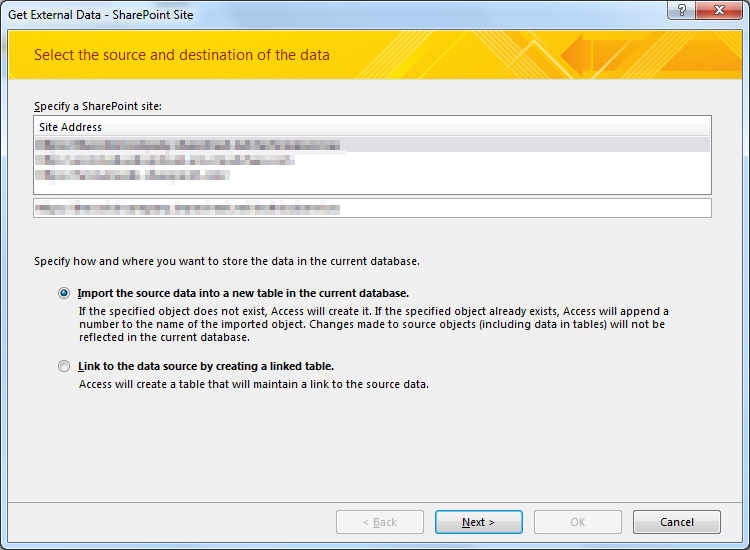
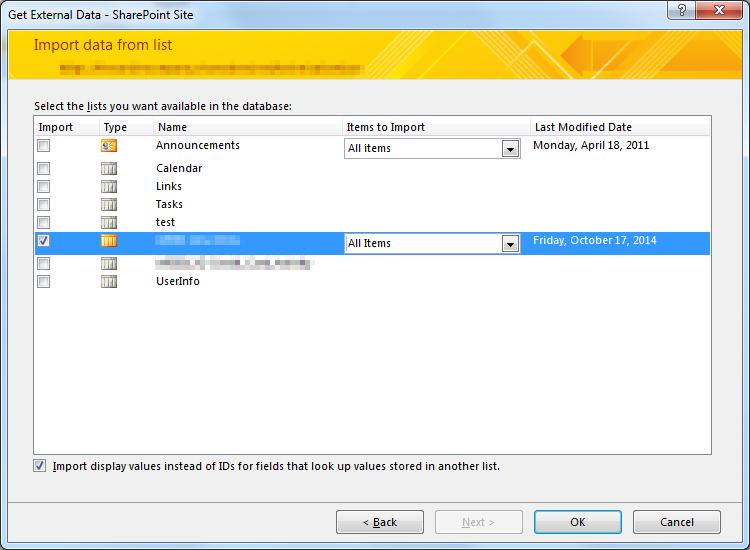
I selected the list I wanted to export and clicked OK.
Access then proceeded to lock up my computer for several minutes as it imported the data, but it was worth the wait. Keep in mind that although logically we are exporting the data from SharePoint 2007, from Access’ perspective we are importing this data into Access. From here, we will export this data to a list in our SharePoint Online site.
![]()
When the import completed, I clicked Close and noticed in the “All Access Objects” view in the left pane, my database now contained a table named after the SharePoint list I just brought over. I double-clicked it and sure enough, all the data was there including the list item attachments!
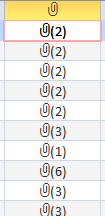
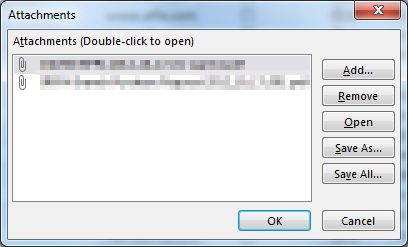
Stunned by my good fortune, I double-clicked some of these cells to confirm the attachments were actually there. They were!
Time to get this data into SharePoint 2013. I went back to the External Data tab, and clicked More to reveal SharePoint List in the “Export” section of the ribbon:
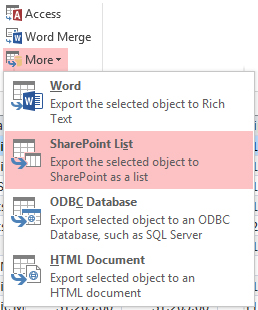
Much like the import wizard earlier, the export wizard allows me to connect to a SharePoint site (I chose my SharePoint Online site this time) and specify a name for the new list.
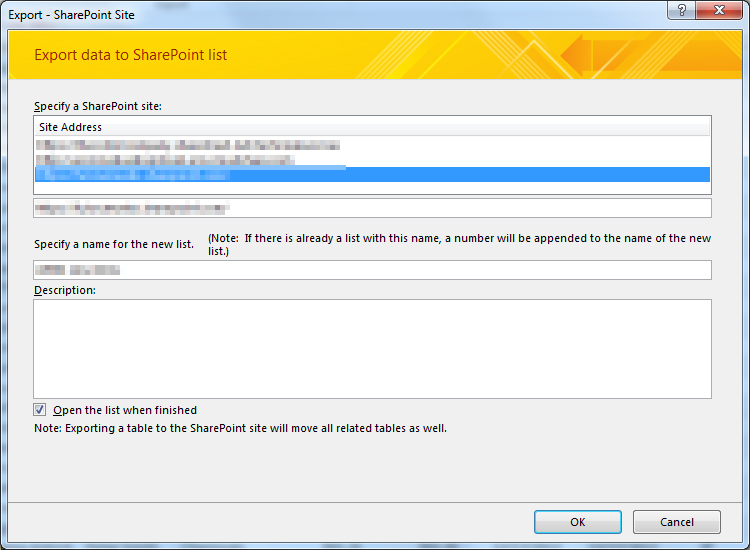
I pressed OK and allowed Access to do its thing (it took about 15 minutes). When it was done, my browser opened to the newly imported list in SharePoint Online. Not only was the list schema perfect (if you’ve ever imported a spreadsheet to create a new list, you know how frustrating it can be to have all of your Choice columns converted to Single line of text), but all the attachments to the list items were there as well!
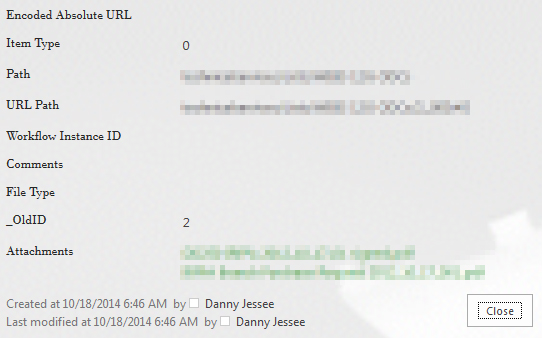
You will notice a few extra columns are created as part of the process:
- Encoded Absolute URL
- Item Type
- Path
- URL Path
- Workflow Instance ID
- Comments
- File Type
- _OldID
You can safely remove these from your new list if you do not want or need them.
Mission accomplished! Thanks, Access 2013!