Category: SharePoint
Beyond Authentication: Deeper Facebook Integration with SharePoint (with code!)
I had the privilege of speaking at SharePoint Saturday in Virginia Beach yesterday. This event is of particular significance each year within the community because the first ever SharePoint Saturday was held in Virginia Beach back in 2009 and SPSVB is seen as the “kickoff” for a new year of SharePoint Saturdays. As always, I learned so much at this event and had a great time meeting with and getting to know many of the speakers, volunteers, and attendees. I would like to thank each person who gave me 70 minutes of their time yesterday to learn more about Claims-based identity in SharePoint 2010 and see how we can do more than just log in to SharePoint with Facebook. I would especially like to thank those who provided me with feedback. I plan to refine and improve this presentation for future community events, so stay tuned!
Below is the slide deck I used in my session. In addition to introducing Claims-based identity in SharePoint 2010 and detailing some of the things to look out for when working with Claims, it illustrates how to configure Windows Azure AppFabric’s Access Control Services to support logging in to SharePoint with Facebook accounts. More detailed information about this process can be found here.
But we can do more than just log in…
Much of the feedback I received yesterday related to the various demonstrations of how I used the Facebook C# SDK to surface data from Facebook in SharePoint (and vice versa) using Facebook’s Graph API. When it comes to the potential of the integration of Facebook and SharePoint, the sky is truly the limit. The AccessToken claim that Facebook includes in the OAuth token it generates will provide your application with access to any data it requests (while still obeying the privacy settings you and everyone in your friends list have in place).
More about the Facebook C# SDK
You can download the Facebook C# SDK here. The “Assemblies only” version is all you need to get started, although it is interesting and informative to be able to see the source code. (Having access to the source code helped me troubleshoot this issue as well.) The SDK includes support for .NET Framework 3.5/4.0 and Silverlight. Obviously, we must use the .NET Framework 3.5 version in conjunction with our SharePoint development. The project is well documented and includes some great examples here and at Prabir’s blog here.
Data returned from the Facebook Graph API is in JSON format. To parse this data quickly and efficiently, my project includes the Json.NET framework.
If you download the source code for my demos here, you will see it includes a series of SharePoint project items. They include:
ClaimsWebPart

Largely based on this blog post, the Claims Web Part displays all of the claims included in the logged in user’s identity token in grid format. I added some Facebook-specific items in here for debugging purposes, such as displaying the user’s Facebook access token (parsed from the identity token), then using that token and the Facebook C# SDK to get the user’s current city, hometown, and Facebook user name.
The Claims Web Part is a great troubleshooting/debugging tool for developers and administrators who are new to working with Claims. It is a quick and easy way to verify the claim rules you configured when creating your Trusted Identity Provider are behaving the way they should.
SilverlightToFacebook
In my demo, a Silverlight application interfaces with the user’s webcam and saves snapshots to a SharePoint document library (hat tip to MossLover for that code). This class contains an event receiver that then takes those photos added to the SharePoint document library and uploads them to Facebook.
SPSVBDemos
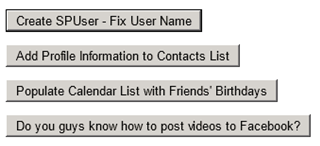
This web part is the “dashboard” I used to do a handful of quick proof-of-concept demos, including the following:
- Changing the display name of the currently logged in SPUser to match the name claim returned by Facebook (instead of the user’s email address or Claims-encoded username).
- Adding information from the user’s Facebook profile (name, city, birthday, employer, job title, etc.) to a contacts list.
- Populating a calendar list with recurring events for all of your friends’ birthdays (based on friends whose privacy settings allow sharing of this information).
- Uploading a video from the file system to the user’s Facebook profile.
StatusUpdateWebPart
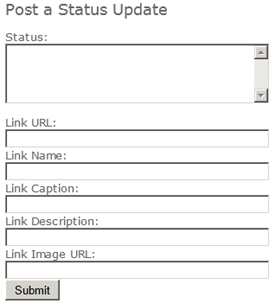
This web part allows the user to update his/her Facebook status directly from SharePoint. Optionally, the user may also include a link (with image, caption, description, etc.) with each status update.
WeatherWebPart

This web part determines the current user’s city from his/her Facebook profile, then constructs a request to the URL-driven Weather Underground API to retrieve the current weather conditions in that city. While many of these web parts may only have value in demos, I believe this web part represents a meaningful way for SharePoint site owners to provide a nice personalization experience to end users who log in to SharePoint with Facebook accounts.
Site Template
I also created a site template (SPSVB.WSP) that contains the custom lists and web parts I used in my demo. It is included in the code download.
Thanks again to everyone who helped to make SharePoint Saturday Virginia Beach such a great success! If you have any questions or suggestions about this code, please feel free to post them in the comments.
Download
Required Trust Relationships for the Facebook C# SDK in SharePoint 2010
I recently started using the Facebook C# SDK from CodePlex in my efforts to link SharePoint 2010, Claims-Based Identity, Azure ACS, and Facebook into one killer demo for my presentation on Claims-Based Identity that I will be giving at SharePoint Saturday Virginia Beach next month.
Without giving too much away, I intend to leverage the AccessToken input claim type provided by Facebook through Azure ACS to reach back into the user’s Facebook profile and obtain more information about the user who has just logged in to SharePoint from Facebook.
After rushing into coding a new web part (as any good developer would), I immediately encountered the following exception upon deployment:
The underlying connection was closed: Could not establish trust relationship for the SSL/TLS secure channel.
at FluentHttp.HttpHelper.OpenRead()
at Facebook.FacebookClient.Api(String path, IDictionary`2 parameters, HttpMethod httpMethod, Type resultType)
…
This error was met with the following corresponding entry in the Event Viewer:
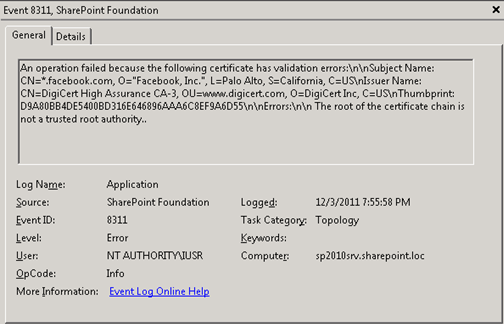
In order to resolve this error, it is important to remember that SharePoint 2010 maintains its own certificate store, where separate trusts must be configured and maintained. Even though the root of the certificate chain may already be trusted everywhere else, you will receive this error unless an explicit trust is configured for SharePoint in Central Administration (or through PowerShell).
After much trial and error, I discovered that two trusts must be configured to support Facebook. First, go to the DigiCert Root Certificate site and download the following certificates as .cer files:
- Under Root Certificates: DigiCert High Assurance EV Root CA
- Under Intermediate Certificates: DigiCert High Assurance CA-3
Now that you are armed with these two .cer files, go to Central Administration. Go to Security, then under “General Security,” choose Manage Trust.
For each of the two .cer files, perform the following steps:
- From the ribbon, select New.
- In the “Establish Trust Relationship” dialog that appears, give each certificate a friendly name. In the “Root Authority Certificate” section, press Browse… and navigate to each .cer file.
- Press OK.
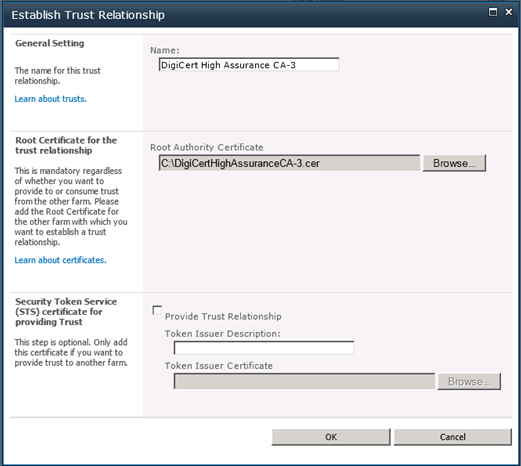
Perform an IISRESET after adding both certificates, and you should be ready to leverage the Facebook C# SDK from SharePoint 2010. Happy coding, and I hope to see you at SPSVB on January 7th!
Ensure an SPUser Exists in an Application Page Within an Anonymously Accessible Site
I was recently confronted with a requirement to develop an application page that could retrieve information about the currently logged in user from an external system based on that user’s email address. Piece of cake, I thought: I would just use the SPContext.Current.Web.CurrentUser object, which contains a string property called Email containing that SPUser‘s email address. I would take that string, pass it to the external system, get my information back, and call it a day. There was only one problem: the application page had to run within a site that had anonymous access enabled, and none of the users who would be accessing the page were explicitly assigned any permissions within the site.
A quick aside about anonymously accessible application pages
The default “Application Page” SPI within Visual Studio 2010 creates a page that inherits from the LayoutsPageBase class. A frequent complaint I hear is that an application page is prompting a user to log in even though that page is being accessed from within the context of an anonymously accessible site. If I had wanted my application page to be anonymously accessible, I would have to make the following tweaks to what Visual Studio 2010 gives me by default:
- First, ensure that anonymous access is enabled for the Entire Web Site. I would do this from Site Actions > Site Permissions in SharePoint.
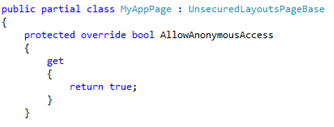
- Change the page inheritance so that it inherits from the UnsecuredLayoutsPageBase class (shown below).
- Explicitly override the AllowAnonymousAccess property and set its value to true (shown below).
But back to the problem at hand…
Since I want to force users to log in to access my application page (even with anonymous access enabled at the site level), I will leave the default base class of LayoutsPageBase. Can anyone see what problem might arise with my scenario?
It turns out that since none of the users accessing the page were explicitly assigned any permissions within the site (nor belonged to any site groups), SPContext.Current.Web.CurrentUser was returning null!
Fortunately, there is some good news here: even though the SPContext may not know who the current user is, the System.Web.HttpContext does! The property this.Context.User.Identity.Name contains the login name of the current user, which I can then pass to the SPWeb.EnsureUser() function to create the SPUser in the given SPWeb based on that login name. The EnsureUser() function returns an SPUser object that is populated with the email address of the user (along with the other properties of the SPUser object such as LoginName, Name, ID,
etc.)
NOTE: Do NOT try to call SPWeb.EnsureUser() in the context of the currently logged in user. It is important to run this code inside a RunWithElevatedPrivileges() delegate because the System Account will have the necessary permissions to add the specified user to the SPWeb. After all, if the specified user already had permission to do this, we wouldn’t need to be adding him or her in the first place!
The final code to accomplish everything (with proper error checking and handling omitted for brevity) looks like this:
Note that I don’t wrap the entire method with a RunWithElevatedPrivileges() delegate or web.CurrentUser would return the identity of the System Account, which is definitely not what I want.
Has anyone else encountered a similar scenario and solved the problem differently? Please feel free to discuss in the comments below!
Fun with BCS, External Lists, and PowerShell!
A recent question on SharePoint Stack Exchange inspired me to want to learn more about interacting with SharePoint lists using PowerShell, especially external lists created through Business Connectivity Services (BCS) in SharePoint 2010. With my background being more in .NET development using the object model, I was surprised to discover some of the inconsistencies one sees when interacting with an external list in PowerShell (compared with a standard out-of-the-box list).
For the purposes of this discussion, I will assume that you are familiar with how to use SharePoint Designer to create an external content type mapped to a SQL Server data source. From there, I created an external list for this external content type.
What initially made my learning journey such a confusing one was that the SQL Server table I used as the data source for my external content type contained a column named ID of type integer. It is possible that any external line-of-business (LOB) data source you consume through BCS may have a similar column as well. The values I initially inserted into the database table had auto-increment values of 1, 2, 3, etc. This enabled me to interact with the items in my external list using the following PowerShell syntax:
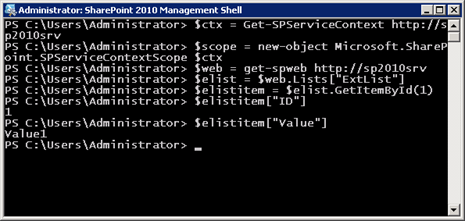
The first two lines may be unfamiliar to those of you who have not programmed with BCS before. With BCS, it is necessary to establish an SPServiceContext within an SPServiceContextScope that represents the HTTP context of the Business Data Connectivity Service.
If you ever see the following error:
“The shim execution failed unexpectedly – Proxy creation failed. Default context not found.”
Make sure you instantiate an SPServiceContext within an SPServiceContextScope as I have above.
It appears that there are some things you can do without properly obtaining the SPServiceContext within an SPServiceContextScope (such as enumerating the Fields collection of the external list). That said, the safest approach appears to be to always instantiate the SPServiceContextScope as shown above. If anyone can shed any additional light on why this is, please feel free to share in the comments below!
Fun Fact: An ID is not always an ID!
Here is my external list, viewed through the browser:
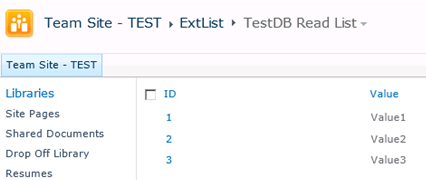
As you can see, the list contains an ID column with integer values, mapped directly to the similarly configured column in my SQL Server database table:
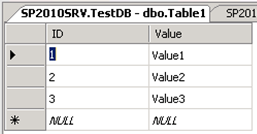
This allows me to run the following script to obtain access to the item with an ID value of 2:

Seems reasonable, right? After all, the second item we insert into a new out-of-the-box SharePoint list would be assigned an ID value of 2 as well (without us having to do anything to make it happen). And since I was able to call GetItemById(2), that must mean the ID property of the list item is 2, right?
Wrong!

Well, this is interesting. It turns out that my call to GetItemById(2) only works for the following reasons:
- My external list contains a column named ID.
- That column is of data type integer.
For instance, I cannot create another external list mapped to a data source with a column named ID but of a different type (i.e., nchar(10)), even if that column only contains integer values. Here’s what happens in that case:
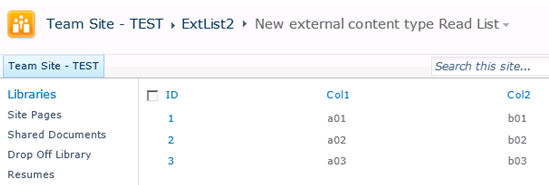
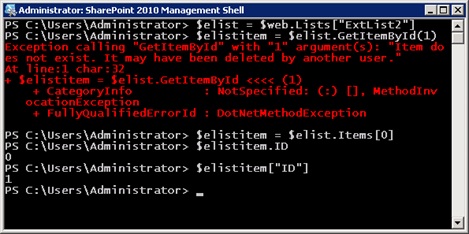
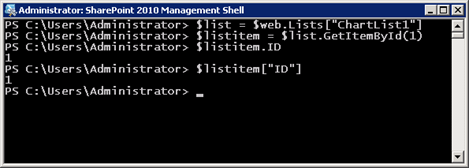
Of course, it goes without saying that for an out-of-the-box list, the behavior is as you would expect:
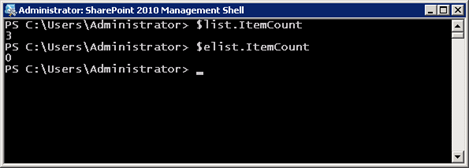
Another item of interest is that the ItemCount property of external lists always returns 0, no matter how many items are in the list:
If you have any fun stories or observations about dealing with external lists in PowerShell, please feel free to share them in the comments below!
Using Claims Authentication to Configure Multiple Authentication Providers in a CloudShare Environment
This post originally appeared in the CloudShare Community Blog on October 25th.
CloudShare’s very own Chris Riley recently shared an environment of mine in a blog post about network orchestration. This environment leverages some exciting new capabilities in SharePoint 2010: namely Claims Authentication in a SharePoint 2010 web application and the ability to configure multiple authentication providers in a single zone. These technologies offer exciting prospects to anyone who previously had to configure separate host headers and URLs for different extranet customers, depending on the mechanism required for each subset of users to log in.
How does this look to end users? To see Claims in action, fire up the “SharePoint 2010 (Clean Installation)” image from the shared environment, open Internet Explorer and navigate to http://intranet.contoso.com.
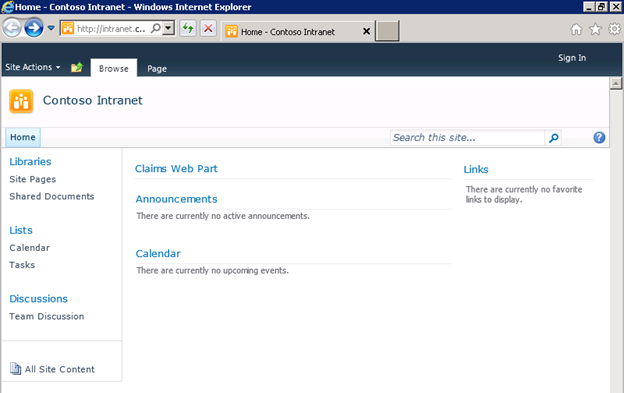
You’ll see an empty Team Site with a “Claims Web Part” at the top. Since anonymous access to the site is enabled, the Claims Web Part will initially be empty.

Press the “Sign In” link at the top right of the page. The page that appears, http://intranet.contoso.com/_login/default.aspx, is new in SharePoint 2010 and allows users to choose from all the different authentication providers configured for that web application. (As a side note, there are some exciting opportunities for custom code development here, including the ability to automatically redirect users to a specific authentication provider based on parameters such as their IP address, bypassing this page of options entirely! After all, not all end users are going to appreciate the distinction between “Windows Authentication” and “Forms Authentication.”)
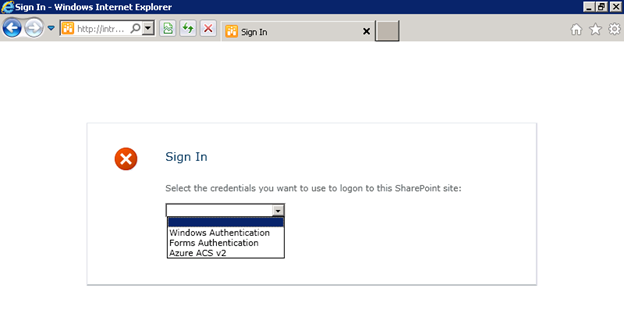
In this web application, I have configured the following providers:
- Windows Authentication – standard NTLM credentials.
- Forms-Based Authentication (FBA) – you may remember this option from MOSS. In this environment, I have created a custom membership provider that validates inputted credentials against a SQL Server database. In practice, FBA can be used to authenticate external users against Active Directory or any other account database.
- Azure Access Control Services (ACS) v2 – allows users to log in with credentials from Open ID providers such as Windows Live ID and Facebook.
For a more in-depth read about how to configure Azure ACS v2 as an authentication provider in SharePoint, including adding other Open ID providers such as Google and Yahoo, check out this blog post by Travis Nielsen.
If I choose Azure ACS v2 (this can be given a friendlier name when you set it up as a Trusted Identity Provider through PowerShell), I will see the following screen. Claims Authentication relies on a series of HTTP redirects to seamlessly direct users between SharePoint and external trusted identity providers such as Azure ACS to log them in. This page is hosted completely outside of my SharePoint environment:
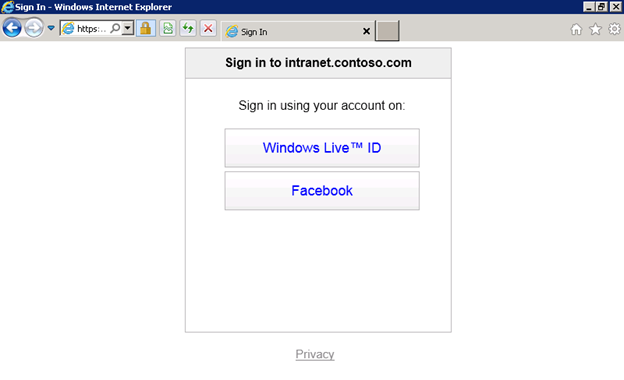
By choosing “Windows Live ID,” I will be redirected to https://login.live.com, where I will be prompted to enter my Windows Live ID credentials. (Similarly, you will be redirected to any of the other Open ID providers’ sites should you choose them instead.) After I sign in, another series of HTTP redirects takes place that eventually lands me back in my SharePoint environment, all logged in. The Claims web part on the page shows the various Claims that were sent by the Trusted Identity Provider in an XML-based Security Assertion Markup Language (SAML) token back to SharePoint:
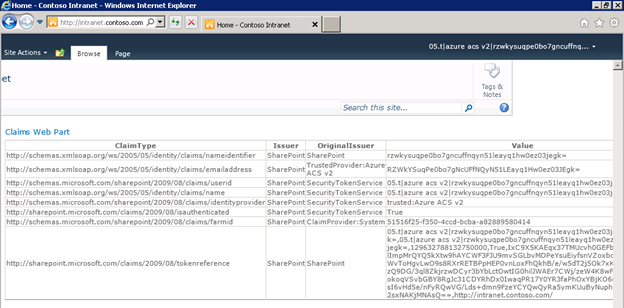
As an application developer, I can leverage these Claims (you see some examples of Claims in the screenshot above include nameidentifier, emailaddress, userid, name, etc.) to make various authorization (what resources may this authenticated user access) and personalization (how is this particular user or class of user’s experience customized) decisions about how to handle this user.
Claims-based authentication and Azure ACS offer exciting possibilities to application developers who are liberated from having to maintain (or even worse, design and develop!) a user management system and all the nightmares that go along with it (think about password resets, forgotten passwords, security requirements for maintaining account information, etc.) As Chris mentions in his blog post, the same paradigm can be applied using Active Directory Federation Services (AD FS v2) to support users logging in to a SharePoint environment using credentials from a trusted external domain.
That said, Claims-based authentication is not always as easy to set up and work with as it may seem. Using CloudShare, developers and IT professionals can focus their valuable time and energy on solving the issues surrounding the implementation of Claims-based identity in SharePoint 2010 and not be concerned with software licensing, hardware, or other infrastructure concerns.
SPSTCDC 2011 Recap
It was a privilege to attend and be part of SharePoint Saturday-The Conference last week. I am always humbled by how much I have yet to learn about this dynamic and exciting platform. As a developer by trade, I made a point to branch out and try to learn as much as I possibly could on the administrative side of things (while staying true to my developer roots and attending a few developer sessions as well). I also got to take part in a blogging project in conjunction with the conference for Engage in SharePoint. I have listed the sessions I attended during the conference with some brief thoughts on each below. Where I contributed a blog post for Engage in SharePoint for a particular session, I have linked to that post as well.
Day 1 – Thursday, August 11
On Thursday, I attended the all-day workshop on SharePoint and Windows Azure Development. Sahil Malik and Girish Raja really know their stuff and deliver their knowledge in a very compelling manner. Although I don’t currently get to do much “in the cloud” for my current job, I am hopeful to leverage this platform a lot more in the future.
SUGDC – Thursday night
Thursday evening, I presented a session on Claims-Based Identity in SharePoint 2010 at the SharePoint Users Group of Washington, DC, which held their August meeting at the conference venue. I want to extend my sincere thanks to everyone who stayed around to watch and ask questions during my presentation. For those who were unable to attend, here are my slides:
Day 2 – Friday, August 12
Session 1 – My first session was Setting up Kerberos configuration in a SharePoint farm with L. Carlos Rodriguez. Carlos really knows his stuff and delivered an energetic, knowledgeable, and lively discussion of the trials and tribulations of setting up Kerberos. I really enjoyed this session and wish it could have been a half or full-day workshop to give this subject the depth of attention it deserves.
Session 2 – The second session I attended was Accelerate Your SharePoint Development & Testing, led by my good friends Chris Riley and Zvi Guterman at CloudShare. I have been a fan of CloudShare for a couple months now, and after this presentation, I’m even more psyched about what the future holds. I’m sure there will be many more posts on this blog showing off the cool new things I can do with CloudShare in the future.
Session 3 – After lunch, I attended Mike Oryszak’s session on Getting the Most from User Profiles. Mike provided some great information about user profiles in SharePoint 2010 along with some valuable tips on how best to manage custom attributes and the synchronization of profile attributes with other line-of-business systems.
Session 4 – The next session I attended was Liam Cleary’s Are you who you say you are? SharePoint Authentication and Authorization. Liam is a rock star who really knows his stuff. The knowledge I gained about Claims-Based Identity and Trusted Identity Providers will greatly improve any future presentations I give on the subject.
Session 5 – My final session of the day was Beyond Approval: Intro to Creating Custom Workflow Actions with Ben Jones. Ben showed us just how easy it really is to define, implement, and deploy custom workflow actions that can be leveraged by end users in defining SharePoint Designer workflows. This is sure to be a time saver for a lot of developers out there!
Of course, no discussion of Friday would be complete without a discussion of SharePoint Got Talent. A big thank you to my friends who stuck around to watch me perform, and thanks to everyone who voted for me. A big congratulations to Marcy Kellar, the winner, and Tiffany Songvilay, the runner-up. Videos of most of the evening’s thoroughly entertaining performances (including my own) can be found here.
Day 3 – Saturday, August 13
Session 1 – My first session was Business Connectivity Services Explained by Example with Kirk Evans. Kirk blew our collective minds when he told us that using the native SQL Server method of connecting to SQL Server data was not the best approach. I will be following Kirk’s advice and using WCF services or .NET types from now on!
Session 2 – The next session I attended was Integrating SSRS 2008R2 with SharePoint 2010 with Kevin S. Goff. Kevin provided a lot of great insight on how to set up and configure SQL Server Reporting Services 2008 R2 with SharePoint 2010 and gave some very cool demos. I will definitely be setting this up in my development environment soon.
Session 3 – After lunch, I attended a great deep dive session called SharePoint Federation: Leveraging ADFSv2 and Claims Based Authentication to integrate with Partners with Pirooz Javan. Pirooz led a great discussion with a very engaged audience. I gained a lot of valuable real-world perspective from the many relevant questions asked by folks who are leveraging these technologies in the real world every day.
Session 4 – The next session I attended was Becky Isserman’s Epic SharePoint Battle: HTML 5 vs. Silverlight 5. Besides the awesome free mustache and candy, I learned a lot about the state-of-the-art with current browsers and two emerging technologies: HTML 5 and Silverlight 5 (currently in beta). Walking in to this session, I would have thought Silverlight stood no chance, but after seeing Becky’s demos and hearing her perspective, I’m not ready to write Silverlight off just yet.
Session 5 – The final session I attended was Johnathan Lightfoot’s So You Want Your Name in Print. I have gone back and forth in my own mind about whether I would ever want to invest the time and effort to become a published author in the SharePoint world. Johnathan provided tons of valuable advice from his own experiences as an author that has given me a lot more insight into the process of writing and publishing a book. It will certainly help influence any decisions I make about becoming an author in the future.
Summary
The conference was an outstanding experience overall. I cannot say enough great things about all the volunteers who worked to make my experience such a great one. As I tweeted on Saturday morning, I got a $1,300 conference experience for 3% of the price.
A Checklist for New Forms-Based Authentication Users in SharePoint 2010
In recent weeks, I have done a fair amount of analysis and testing of various Claims-Based Identity scenarios in SharePoint 2010. One of these scenarios involves a web application configured to use Forms-Based Authentication (FBA obviously requires the use of Claims in SharePoint 2010) that is tied to a custom membership provider. The membership provider is quite simple, storing user IDs and passwords in a table within a SQL Server database (in plain text, so please don’t do this in production!) The solution was initially developed in MOSS 2007 and then migrated to SharePoint 2010. I have not yet performed a Visual Upgrade, which is why my screenshots still look “MOSS-y.”
There are numerous primers out there that explain how to handle the migration of existing FBA users to their Claims-based counterparts in SharePoint 2010, but what happens when you add new users to the custom membership database after the migration? Does everything go smoothly? In my experience, there are a few steps you should always perform to ensure all new users added to the membership database have the end-user experience you would expect.
First, I will create a new user and show you what may happen if you take no further action.
Step 1: Create the New User
This procedure will vary based on your custom membership provider. In this example, I will create the user example in my database table with an equally secure password (again, please don’t do this in production!)
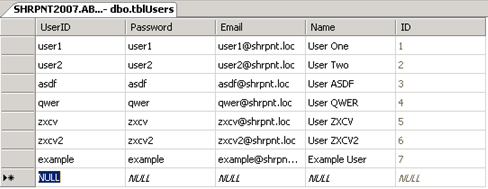
What if I did nothing further at this point? Should the user example be able to log in to the FBA-protected site if he or she has not been explicitly granted any access (and when “All Authenticated Users” has not been granted any level of access to the site)? The answer may surprise you…
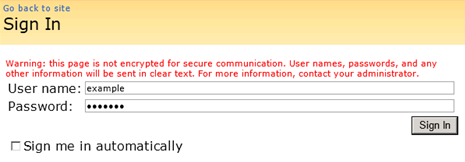
I’m in!
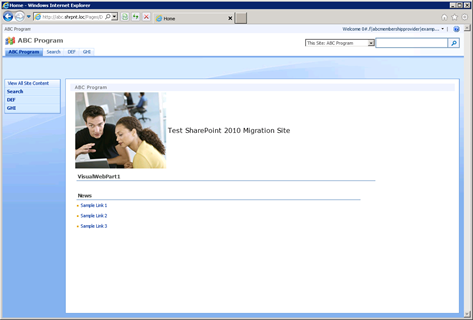
We’ll deal with this little bit of nonsense (the ugly Claims-encoded welcome name for the new user) in a minute. By the way, does anyone else find it amusing that the last two characters of the user’s display name are dropped in favor of a three character ellipsis (…)?

What’s even “better” is that example can click “View All Site Content” and navigate to all the lists and libraries within the site.
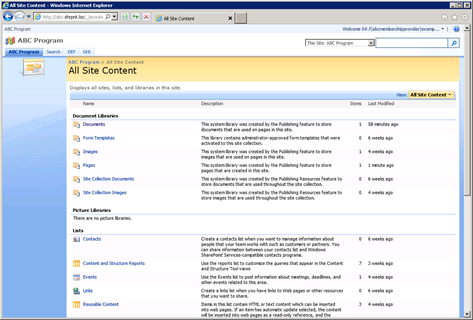
This does not seem like the behavior we would expect to see. How can we clean things up?
Step 2: Create an SPUser Object for the New User
In my initial quest to learn why a new FBA-user’s welcome name is always in Claims-encoded format, I stumbled upon Tyler Holmes’ excellent blog post entitled Awkward Usernames Courtesy of Claims Authentication (FBA). This led me to realize that I needed to update the DisplayName property of the SPUser object associated with the new user. Unfortunately, when I tried to run the PowerShell cmdlet Tyler provides, I found out that my new user doesn’t even have an associated SPUser object yet!
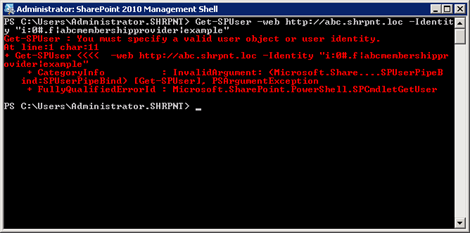
To create this object for my new FBA user, I run the following cmdlet:
New-SPUser -Web http://abc.shrpnt.loc -UserAlias “i:0#.f|abcmembershipprovider|example”

Before I run Tyler’s cmdlet to set the DisplayName for my SPUser to a friendlier value (although I now see example as the user’s name rather than its Claims-encoded equivalent), I thought I’d try logging in as example again to see if having an SPUser object for my new user makes a difference.
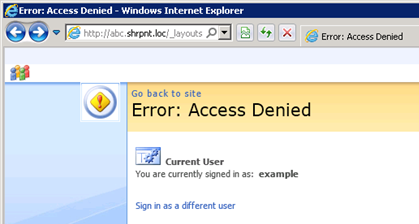
Access Denied?! But all I did was create a security principal (SPUser) for my new FBA user, I didn’t change any permissions…
Naturally this is the behavior one would expect to see when a new user is created and has not yet granted access to any resources. It’s a new FBA user (without a security principal)’s ability to have reader access across a site that has me more troubled.
Step 3: Grant the New User the Appropriate Level of Access
Unless you have assigned “All Authenticated Users” with a certain level of access to the site, you will experience the Access Denied error shown above. Just as in any other SharePoint deployment, a user with the appropriate level of access should assign the new user (either through a SharePoint group or directly) the permissions he or she will need on the site.
After this has been done, example is able to log in to the site once again. As an added bonus, example‘s welcome name at the top right of the page is no longer in Claims-encoded format.
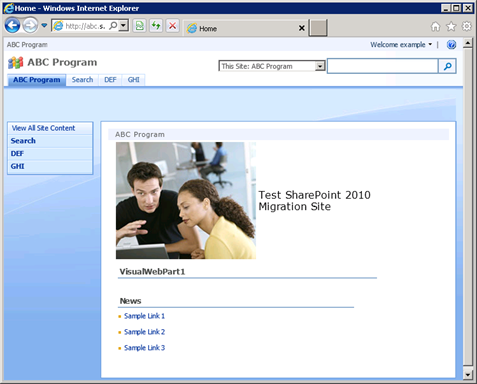
Step 4: Set the New User’s DisplayName Value
When I created the user example in Step 1, I gave the user a name of Example User. I can run the following in PowerShell to set the user’s display name accordingly:
$user = Get-SPUser -Web http://abc.shrpnt.loc -Identity “i:0#.f|abcmembershipprovider|example”
$user.DisplayName = “Example User”
$user.Update()

This step is absolutely necessary if you do not use LDAP or BCS to map user profile properties to your custom membership provider’s data store. (Conversely, if you do use LDAP or BCS and have user profile synchronization configured, the value you set in this step will be overwritten the next time profile synchronization occurs.)
Now when example logs in, we see the new welcome name.
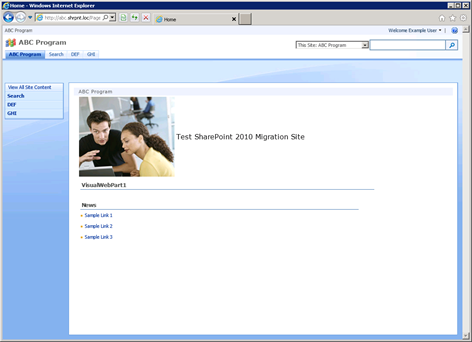

It’s worth noting that nothing within the infrastructure of Claims itself has anything to do with the user’s welcome name or how it is displayed. In fact, using the Claims Viewer Web Part, we can see that the information contained within example‘s Claim looks exactly the same as it did before example had an associated SPUser object. The display name we just set is not contained within the user’s Claim; it is only maintained within the SPUser object.

Conclusion
By following the above steps each time a new user is created, you guarantee consistency with each new user’s ability to access the site (and not have read access to all site content by default if this is not the desired behavior) and how the new user’s name is displayed. I strongly encourage you to automate this process using PowerShell or the object model if you need to create a lot of new users.
Have any questions, comments, or ideas you want to share? Feel free to post them in the comments below. If you will be at #SPSTCDC next month, feel free to come to my presentation on Claims-Based Identity at the August 11 meeting of the SharePoint User Group of Washington, DC. The meeting begins at 6:00 p.m.
Which SharePoint Front End Server Am I Hitting?
If you have ever worked in a network load balanced (NLB) environment with multiple SharePoint front end servers, you have no doubt had at least one occasion where only some of your users were seeing some sort of strange behavior. Perhaps some users receive a generic error message when accessing a page and others do not. Whatever the reason, it never hurts to be able to have users give you just a little bit more information to help you in the troubleshooting process.
Of course, you can always dig through the ULS log files on each front end server to look for any anomalies or to match up correlation ID values associated with generic error messages. But wouldn’t it be great if your end user could tell you that he or she is hitting front end #3 so you don’t have to waste time searching through the logs on front ends #1 and #2 first?
One potential solution to this problem (and there are no doubt more elegant ways to solve it) are to create multiple images such as the ones below:


Save each image with exactly the same name (such as frontend.jpg) and place it in the TEMPLATE\IMAGES directory of the SharePoint root on each front end (make sure you match up the correct image with each front end server!) Then, when something goes wrong for one user but not another, you can ask him/her to visit the following URL:
http://yourcompany.com/_layouts/images/frontend.jpg
Based on the number that appears, you will know exactly which front end that user is hitting!
I hope this information is useful to you. You could extend this by creating a custom URL action called “Front End Check” that allows certain users to hit the front end image link directly without having to remember it. Feel free to leave your thoughts and suggestions in the comments!
Using CloudShare to Set Up a MOSS to SharePoint 2010 Migration Environment
I have been using CloudShare for a little over a week now and have found it to be a convenient, cost-effective way to provision virtual environments to suit my development and testing needs. The time and money CloudShare saves me over having to procure the necessary hardware and software and install operating systems and applications myself has been HUGE. I can have a brand new server up and running, pre-configured with all the applications I need in a matter of minutes. I have also been very impressed with how quickly the machines come back up after a reboot. In spite of all these great things, CloudShare is a little light in the area of “how-to” documentation and their user support forums do not appear to be very active.
My primary objective at the moment is to use CloudShare to test various MOSS to SharePoint 2010 migration scenarios, particularly with respect to Claims authentication and the numerous problems users have encountered upgrading to Claims-based web applications in SharePoint 2010 (stay tuned for some blog posts about these problems in the future). In order to adequately test these out, I need a single domain with the same set of users and groups to test various pre- and post-upgrade scenarios.
In order to create this environment, I knew I needed to follow these basic steps:
- Provision and configure a MOSS environment. For this, I set up a “SharePoint 2007” CloudShare machine which in addition to giving me MOSS, also took care of creating the domain shrpnt.loc on which I will ultimately be configuring a new SharePoint 2010 instance. On this machine, I have set up a number of different web applications including one with Forms-Based Authentication (FBA) tied to a custom authentication provider. I will also create a new SQL Server instance on this machine to host my SharePoint 2010 configuration and content databases.
- Once the MOSS environment was complete, detach my MOSS content databases. To fully replicate the issues I have seen in various production environments, I wanted to use the “database attach” upgrade method described in detail here.
- Create a new SharePoint 2010 farm on a new server on the same domain. Here is where things with CloudShare get tricky. They have plenty of pre-configured SharePoint 2010 virtual machines available, but all of them are already joined to a domain (obviously a different domain than the one that would be set up in my initial MOSS environment). I’ll describe how I work around this shortly.
- Attach the new content databases in the SharePoint 2010 farm. After running the Mount-SPContentDatabase PowerShell command, this will automatically upgrade them to SharePoint 2010. From here, I am good to go and can continue with my testing.
As much as I would have loved to see a “Windows Server 2008 R2 Enterprise 64-bit with SQL Server and SharePoint 2010 install media available” option, CloudShare has no such offering. The next best thing, I assumed, was to take their “SharePoint 2010 (Clean Install)” VM and do the following:
- Run dcpromo to remove Active Directory Domain Services from the machine, effectively un-joining it from its domain. After restarting, I also removed the “Active Directory Domain Services” and “DNS Server” roles from the server.
-
Join the machine to the existing shrpnt.loc domain by performing the following steps:
- Add the IP address of the shrpnt.loc domain controller as the primary DNS server on the VM I want to join to that domain.
- On the new VM, join it to the shrpnt.loc domain using the domain administrator credentials from the shrpnt.loc domain.
- Restart the new VM and enjoy being able to leverage the users and groups defined on the shrpnt.loc domain.
NOTE: After doing this, CloudShare needs you to hold its hand a little bit to let it know about the “new” domain to which you just joined the SharePoint 2010 VM. If you use the browser-based client to access your servers and do not make this change, it will attempt to log you in with an account that is no longer valid. This value can be set by going to “Edit domains” under “Edit Environment.”
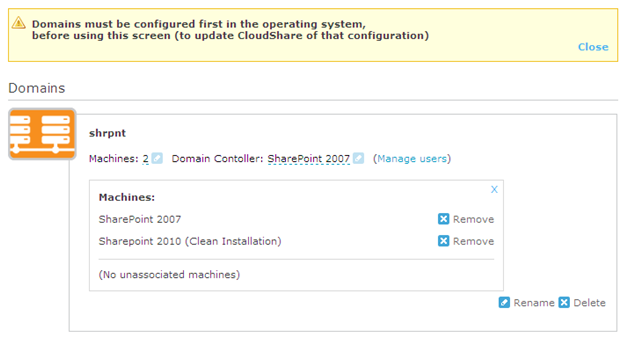
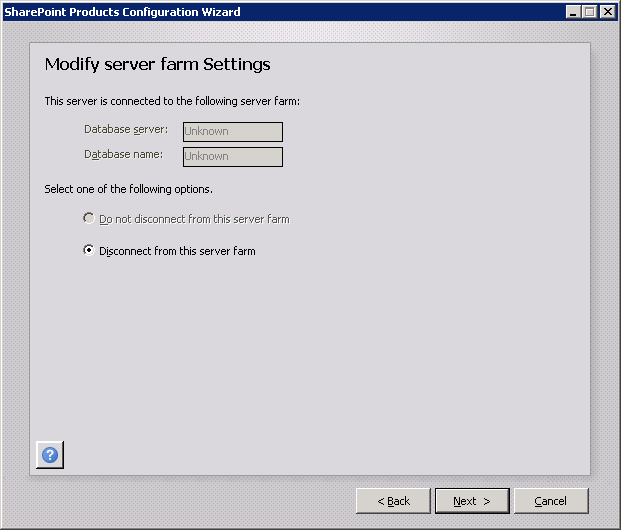
- After another restart, run the SharePoint 2010 Products Configuration Wizard. When it errors out trying to find the original farm, choose to disconnect the server from the existing farm.
- Re-run the SharePoint 2010 Products Configuration Wizard, this time telling it to create a new server farm.
After completing this step, I now have a fresh SharePoint 2010 farm from which I can begin my migration testing. I wish CloudShare had some way to allow users to perform fresh installs of SQL Server and SharePoint 2010 on a Windows Server box without a pre-configured domain VM, but until they do, I believe this is an adequate workaround.
Please post any suggestions for improvements or enhancements to this process in the comments. Thanks!
No Inline Editing on a Styled List View? Say it ain’t so!
Most everyone is aware of the new inline editing capabilities offered by SharePoint 2010 in list views. If not, just know that in the Edit View page for a given list, you can expand the “Inline Editing” section and check a box to enable it:
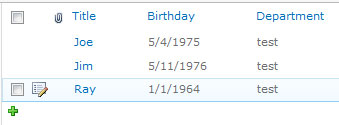
Checking this box will provide a streamlined list editing experience. Simply hover over a row in the list and an “Edit” icon will appear to the left of the row:
Clicking the “Edit” icon will allow you to modify values for any editable field in the list item (e.g., NOT “Created By” or “Modified” if they are in your list view, but most everything else):
You can click the “Save” icon to update your changes to the item, or the “Close” icon to discard your changes. Pretty neat, huh?
Well, what if you are like me (or my friend Laura Rogers of SharePoint911) and you like your list views styled a little bit? Perhaps just a little alternate row shading to break up the monotony of a white canvas filled with gray text? Sadly, there is a cautionary note at the end of the description of Inline Editing that will break your heart (especially if you didn’t take the time to read it when you enabled the setting): “Inline editing is only available on views that have their Style set to Default.”
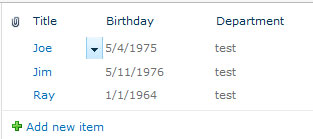
This makes no sense to me, but if you apply any other style to the list (even when that style makes the simplest of cosmetic changes, as is the case with “Basic Table” or “Shaded”), you really do lose the ability to perform inline editing on the list. Here is the full list of style options and some proof that the ability to perform inline editing with those styles applied is gone:
Shaded:
Basic Table:
I don’t think I’m quite done with this one yet. In a future post, I will explore ways that we can (hopefully) take advantage of CSS to style our list views in such a way that we can keep the list view style as “Default” as far as SharePoint is concerned, but give our lists a little more style and flavor while preserving the ability to do inline editing.
Stay tuned!


