Category: SharePoint Online
Managing concurrent tenant-wide and site collection-scoped SharePoint Framework deployments
I was recently asked a question on the discussion forum for my Pluralsight course “Creating Deployment Packages for SharePoint Framework Projects” about how to manage concurrent tenant-wide and site collection-scoped deployments for SharePoint Framework projects, specifically web parts. As you may know, SharePoint offers site collection app catalogs as a way to decentralize the management of SharePoint Framework solutions (as well as Add-ins built using the Add-in model…is anyone out there still building these?) and scope the deployment of a solution to a single site. This may be useful if you want to leverage separate site collections for staging and testing before deploying a solution to your tenant’s production app catalog. But what if your staging and testing site collections reside within the same production tenant? Will there be duplicate entries for your web part — one for the site collection-scoped deployment and another for the tenant-wide deployment? How does SharePoint manage this?
The site collection-scoped deployment always takes precedence
As long as a version of your solution package’s .sppkg file is uploaded to a site collection’s app catalog, the assets associated with that version will be the only version available to you within that site collection, regardless of whether or not a newer version is deployed tenant-wide. This is true even if you do not currently have the app associated with your solution package installed in that site collection. To demonstrate this, I created a simple web part project based on the Yeoman generator’s HelloWorldWebPart that simply renders TEST. I packaged and deployed this solution to a site collection app catalog, installed it within my TEST site collection using the “Add an app” link, then added my web part to a page:


After that, I created a new version of the solution that updates the web part to render PROD instead. I packaged and deployed this new version tenant-wide from my tenant’s app catalog and added it to a page outside my TEST site collection:


I then went back to my TEST site collection and confirmed that I could still only see one instance of the “ScopeTest” web part in that site:

Adding it to the page again confirmed that this was indeed still my TEST web part:

How can I access the version that is deployed tenant-wide from this site?
One might assume that in order to have access to the tenant deployed PROD version of my web part from my TEST site collection, all I would need to do is remove the installed app instance associated with my TEST web part from that site. However, after I did this, I went to add my “ScopeTest” web part to the page again (expecting the tenant deployed version to be available) and found that it wasn’t there for me to add at all:

It turns out that I had to first delete my TEST web part solution’s .sppkg file from my site collection app catalog. After I did that, I returned to the home page of the site and noticed my TEST web part instances had been replaced with PROD instances automatically:

Application customizer extensions behave a little differently
I performed the same steps with an application customizer extension that renders a simple TEST or PROD header in the “Top” placeholder on the page. I began by deploying the TEST version to my TEST site collection. After installing the app to the site, I saw the TEST header I expected to see:

After that, I created a new version of the solution and updated the extension to render PROD on a red background instead. I packaged and deployed this new version tenant-wide from my tenant app catalog and it appeared on this page outside my TEST site collection:

But when I went back to my TEST site collection, I saw something different:

It appears that in addition to the initial site collection-scoped deployment, the site also picks up the reference to the tenant deployed extension from the Tenant Wide Extensions list in the tenant’s app catalog site, which causes it to render the version of the extension from the site collection app catalog again.
And similar to the behavior I saw after removing the installed app instance associated with my TEST web part from that site collection, uninstalling the app instance associated with my TEST extension (but leaving the .sppkg file in the site collection app catalog) caused no extensions to be rendered on the page — neither the site collection-scoped version nor the tenant deployed version:

Once again, I had to delete my TEST extension solution’s .sppkg file from the site collection app catalog. After I did that, I returned to the home page of the site and saw the PROD extension was now being rendered:

Final thoughts
Once you learn the nuances of how SharePoint deconflicts site collection-scoped and tenant-wide deployments for SharePoint Framework solution packages, you can determine which approach works best for you when managing the two types of deployments concurrently for a solution package within a single tenant. If possible, you might consider configuring tasks in your CI/CD pipeline to uninstall and remove any solution packages from site collection app catalogs before they are deployed tenant-wide. You can learn more about CI/CD pipelines for enterprise SharePoint Framework development in my Pluralsight course “Scaling up SharePoint Framework Development for Enterprises.”

Speaking at SharePoint Fest Seattle 2017!
In just a few short weeks (August 8-11), I will be joining SharePoint experts from around the world at SharePoint Fest Seattle 2017! I am very excited to be debuting a new session that will take a lighthearted, but detailed look at how to attempt to achieve consistency when branding the mix of classic and modern page experiences within SharePoint Online sites, modern team sites, and recently unveiled communication sites using the SharePoint Framework along with techniques from the SharePoint add-in model:
DEV 206 – Apply Consistent UI Customizations Across Classic and Modern Pages in SharePoint Online
SharePoint Online sites are currently made up of a hodgepodge of classic and modern page experiences. A site’s home page is a classic page while the site contents page is a modern page. Page experiences may vary between pages, lists, and libraries as users navigate a site.
Although the SharePoint Framework allows you to build client-side web parts to customize both classic and modern pages, a combination of the add-in model and SharePoint Framework application customizers must be used to embed JavaScript-based UI customizations across both page types.
In this demo-intensive session, you will learn how to brand a SharePoint Online site with a customizable page header and footer that looks identical across classic and modern pages.
If you register now and use code JesseeSeattle100 at checkout, you can save $100!

My session is Friday, August 11th at 3:30 in Breakout 8. This will be my fourth SharePoint Fest and my second SharePoint Fest Seattle. I look forward to seeing you there!
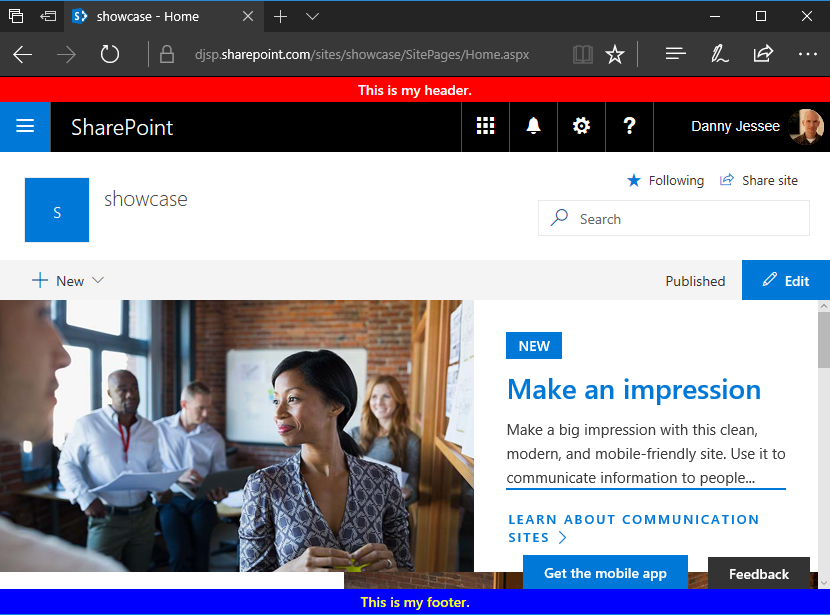
Applying a custom header and footer on communication sites and modern team sites
Although the title of this post indicates the particular objective I achieved, this post walks through the steps that are necessary for any scenario that requires you to have access to the classic page experience on a communication site or modern team site in SharePoint Online. In my case, the reason for this is to leverage a “legacy” app part on a classic wiki page that allows users to configure settings for a custom page header and footer. Unlike “classic” SharePoint Online sites, communication sites and modern team sites do not give you the ability to create a new wiki page in the Site Pages library that allows you to add “legacy” web parts. SharePoint Framework client-side web parts are the only custom web parts supported on modern page experiences.
Microsoft didn’t necessarily make it “easy” to do all of this, but it is possible and the process is simple if you follow the steps below.
Step 1 (modern team sites only): Disable NoScript
This step is required because my app part uses custom script to access and manipulate values stored in the site property bag. In this post, I explain the differences between modern team sites and communication sites when it comes to the default NoScript setting and show how you can query a site’s NoScript status and change it if necessary.
Because communication sites are not NoScript sites (apologies for the double negative), you do not need to perform this step on them.
Step 2: Install the SharePoint-hosted add-in
My SharePoint-hosted add-in surfaces an app part that reads configuration settings for the custom header and footer from the site property bag and allows users to update them. I built the .app package for the add-in and deployed it to my tenant’s app catalog site. This made it available to install in my communication site and modern team site:

After installing my SharePoint-hosted add-in’s SiteHeaderFooter.app file and my SharePoint Framework Application Customizer Extension’s sp-fx-header-footer.sppkg file to my tenant’s app catalog site, both are available to install on my new communication site. We will install the SharePoint Framework Application Customizer Extension in step 4 below. Notice how the addanapp.aspx page retains the “classic” page experience. This was my first clue that it would still be possible to unlock other classic page experiences–such as a classic wiki page–within these modern sites.
Step 3: Create the classic wiki page and add the “legacy” app part
If you navigate to the Site Pages library in a “classic” site, you will see the option to create a new Wiki Page within that library:
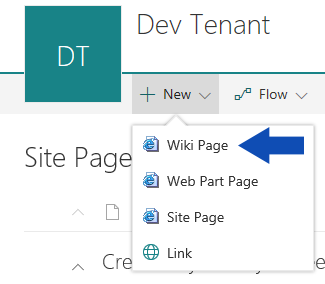
The Site Pages library within “classic” sites still allows you to create Wiki Pages with the classic page experience.
However, if you navigate to the Site Pages library in a communication site or modern team site, this option does not exist:
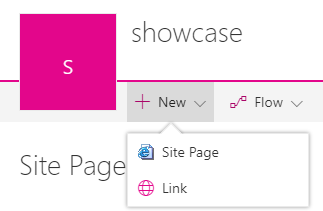
The Site Pages libraries within communication sites and modern team sites do not expose the option to create new Wiki Pages.
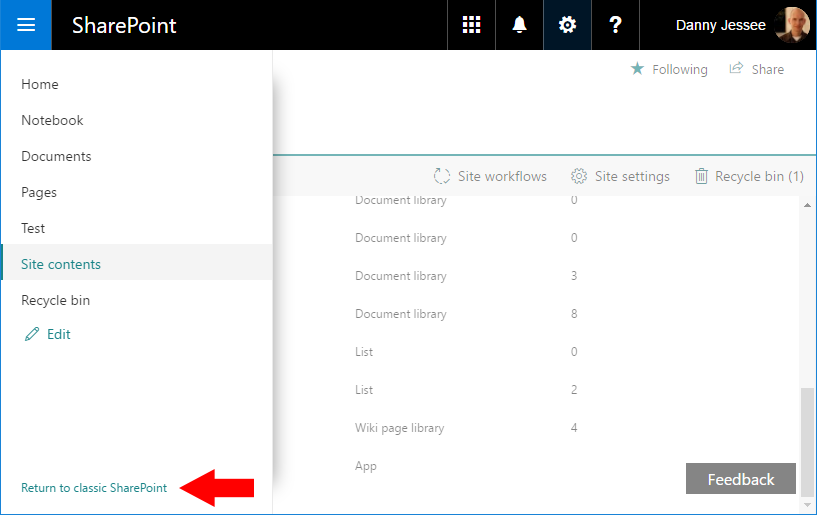
How can we add a new wiki page to the Site Pages library if the option isn’t there? By clicking the “Return to classic SharePoint” link that appears in the lower left corner of the screen:
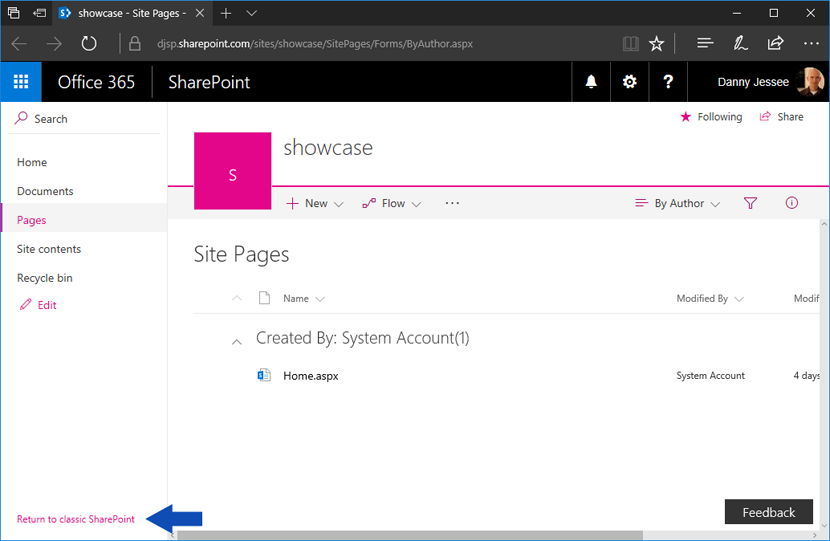
There is much to be said about what happens when you click that link, but for our purposes it does exactly what we need (at least for the duration of our session). When viewing the same Site Pages library returned to the classic page experience, clicking the New link now prompts you for a new page name:

Specifying the page name and pressing Create gives us a new “classic” wiki page to which we can add the app part from the SharePoint-hosted add-in. Once that is done, I can configure the custom header and footer parameters and press Set Values:
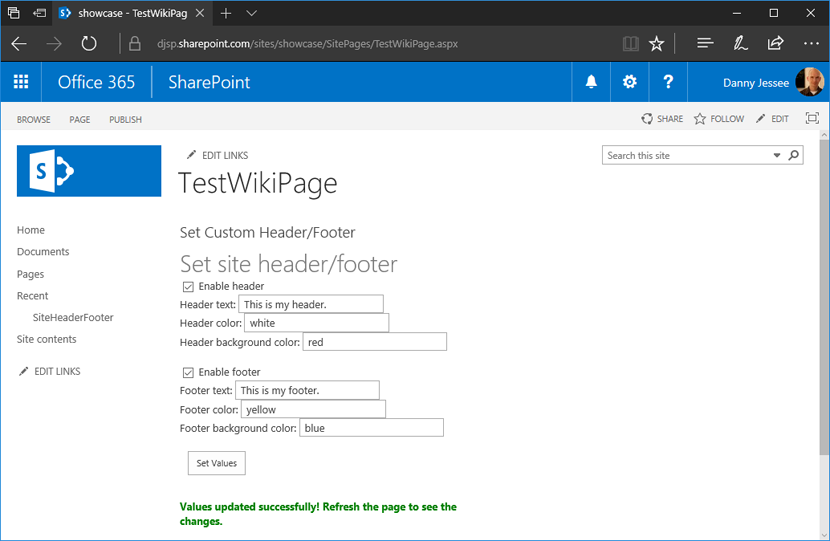
Refreshing the page will display the header and footer, since this is a classic page experience that supports the user custom actions used by the add-in to embed the JavaScript responsible for rendering the header and footer:
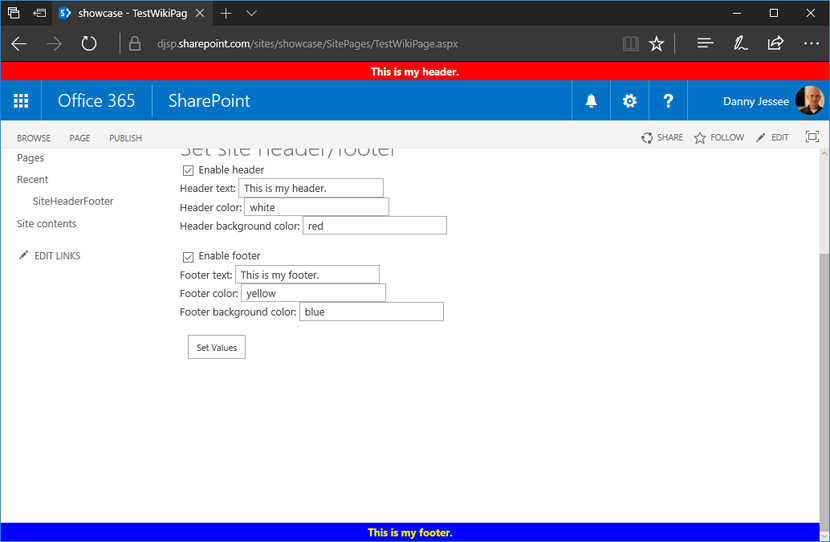
Installing and configuring the SharePoint-hosted add-in handles the rendering of the header and footer on all classic page experiences within a site.
However, the site home page will still not display the header and footer because modern page experiences do not support user custom actions. That’s where the SharePoint Framework Application Customizer Extension comes into play.
Step 4: Install the SharePoint Framework Application Customizer Extension
Return to the addanapp.aspx page we visited earlier when installing the SharePoint-hosted add-in to our site. This time, choose to add the sp-fx-header-footer-client-side-solution. You can read all about this SharePoint Framework Application Customizer Extension and how it works in this blog post. This will activate the associated site-scoped feature that renders the header and footer on modern page experiences. You can confirm this by going to Site Settings and ensuring the SPFx HeaderFooter Application Extension – Deployment of custom action feature is Active:

When this feature is Active, the JavaScript associated with our SharePoint Framework Application Customizer Extension will execute on all modern page experiences.
Step 5: Enjoy the results
Below you can see my custom header and footer applied on both a new communication site and a modern team site:
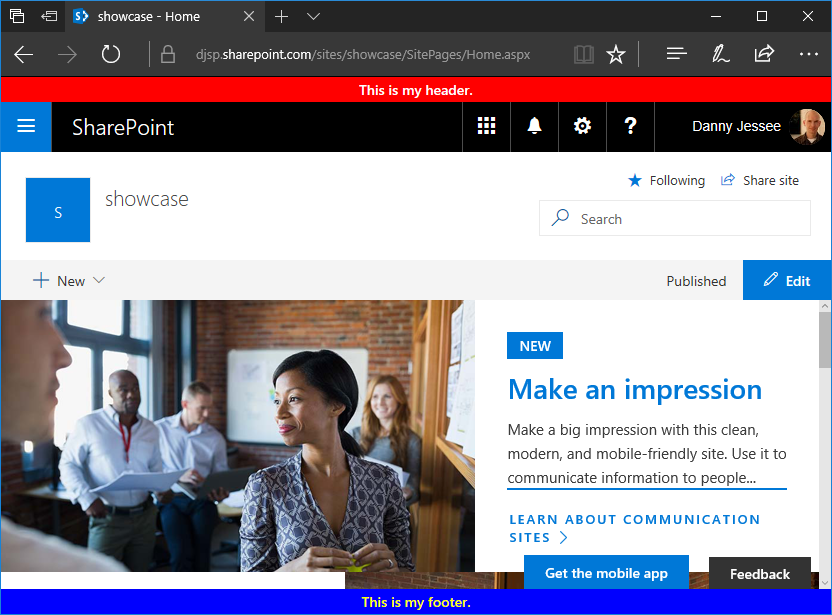
Custom header and footer rendered on a communication site.
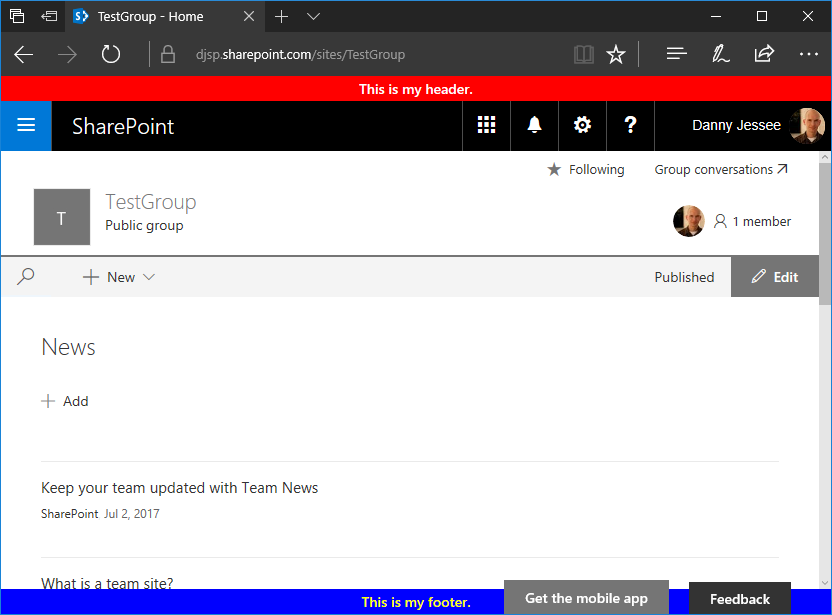
Custom header and footer rendered on a modern team site where I followed the same steps performed on the communication site in the steps above.
Key takeaways
– By returning to classic SharePoint, it is still possible to add new wiki pages to the Site Pages library in communication sites and modern team sites in SharePoint Online (where the option to create them is not shown by default).
– Restoring this classic page experience to modern sites allows you to leverage “legacy” app parts that were built using the add-in model without having to rebuild the functionality using a SharePoint Framework client-side web part (NOTE: this is probably something you will still want to do in most cases).
– Even when your “Return to classic SharePoint” session cookie expires, your classic wiki page will remain in the Site Pages library and is still completely accessible.
– Applying branding such as a custom header and footer to modern sites–especially those that contain a combination of classic and modern page experiences–will require a multifaceted approach that may include capabilities from the SharePoint add-in model as well as SharePoint Framework.
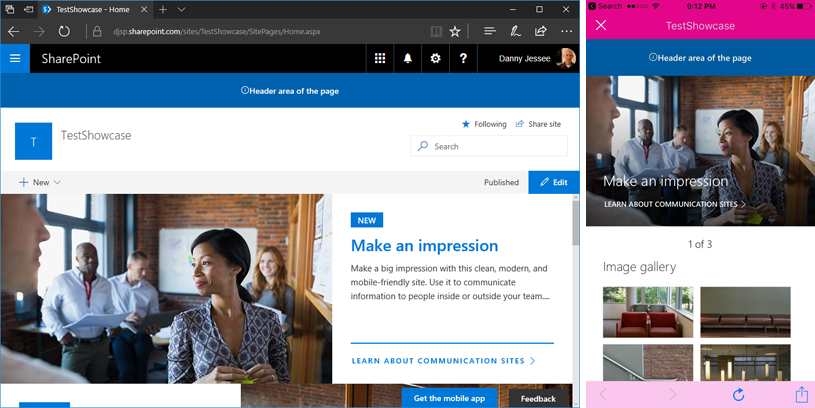
SharePoint Framework page placeholders on new communication sites
UPDATE 8/13/2017: As of August 11, 2017, all modern site pages also contain the PageFooter placeholder.
The original post from July 1, 2017 appears below.
Earlier this month, Microsoft launched the developer preview of SharePoint Framework Extensions. I examined the available page placeholders on modern list and library pages, the modern Site Contents page, and modern site pages in this blog post.
With the rollout of SharePoint communication sites now underway, I thought I would take this opportunity to confirm the available page placeholders on each of the three new communication site designs:
– Topic
– Showcase
– Blank
Communication sites are based on the SITEPAGEPUBLISHING#0 template and feature a new responsive modern site page for the site home page. Based on my previous research, it came as no surprise that all three modern communication site page designs contain the PageHeader placeholder but not the PageFooter placeholder.
Below are screenshots of all three communication site designs in Edge and the SharePoint mobile app, reflecting the custom content rendered in the PageHeader placeholder after deploying the SharePoint Framework Hello World Application Customizer Extension.
Topic

Showcase

Blank

(8/13/2017) NOTE: All three communication site designs–as well as all modern site pages in general–now also contain the PageFooter placeholder.
What if I also need a custom footer on these modern communication site pages?
I recently implemented a custom header and footer SharePoint Framework Application Customizer Extension that was based on a custom header and footer SharePoint-hosted add-in I developed back in 2015. This particular extension works great on the modern page experiences within my “classic” SharePoint Online site because I am able to leverage the SharePoint-hosted add-in part (on a classic wiki page) that maintains the custom header and footer configuration parameters in the site property bag.
In my next post, I will show you how to create a classic wiki page in a modern communication site (unlike in classic sites, you can’t just go to New > Wiki Page in the Site Pages library) to leverage the SharePoint-hosted add-in part to configure the custom header and footer configuration parameters in the site property bag. My SharePoint Framework Application Customizer Extension will then read these values from the property bag and render the custom header and footer.
As an added bonus, I will also show you the extra step necessary to accomplish this on a modern team site, a so-called “NoScript site” that does not allow custom script to access the site property bag by default.
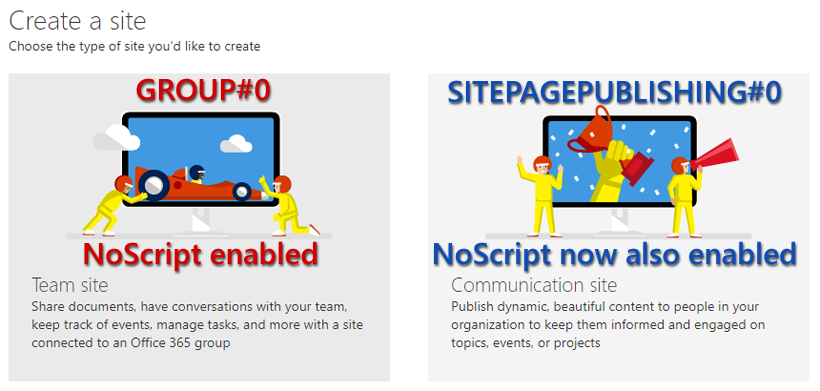
SharePoint Online modern team sites and communication sites are NoScript sites
UPDATE 8/13/2017: As it now appears that communication sites will be NoScript sites by default, I have updated the title of this post and the image at the bottom of the original post to reflect this change and avoid any confusion.
See below for more history.
UPDATE 8/1/2017: Newly created communication sites are still NoScript sites by default; however, as of today I am again able to disable NoScript on them by running the Set-SPOSite cmdlet shown in the post below. See this Github issue for more information.
UPDATE 7/22/2017: It appears that newly created communication sites are also NoScript sites by default, and I am currently receiving an error when I try to disable NoScript on one:
I'm currently getting an error when trying to disable NoScript on a new #SharePoint Online communication site in my dev tenant. pic.twitter.com/yC3Mxymc1w
— Danny Jessee (@dannyjessee) July 22, 2017
However, I can still disable NoScript on a new #SharePoint Online modern team site without any issues in my dev tenant. pic.twitter.com/iAMhg5SvDb
— Danny Jessee (@dannyjessee) July 22, 2017
The original post from July 1, 2017 appears below.
While new SharePoint Online communication sites continue to roll out across First Release – Select Users tenants, I discovered an interesting difference between them and modern team sites. Modern team sites have been around since late 2016 and are connected to an Office 365 Group when they are created. They are also so-called “NoScript sites” by default, which affects the types of customizations that can be applied to them. They use the GROUP#0 template and not the STS#0 template used by “classic” team sites (which can still contain modern page experiences…confused yet?)
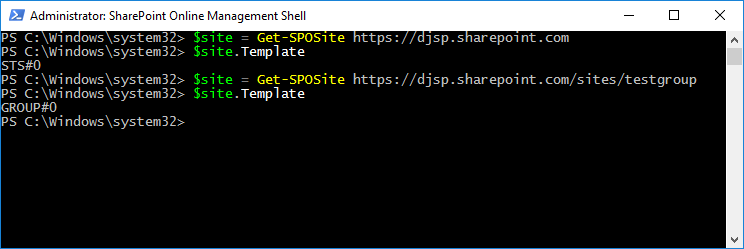
My “classic” team site uses the STS#0 template while my “modern” team site uses the GROUP#0 template.
Some of the original guidance suggested that NoScript could not be disabled on modern team sites, but earlier this week Microsoft decided to officially support disabling NoScript on modern team sites. The documentation on MSDN has been updated to reflect this as well.
Checking the NoScript status of a site
You can query a site’s DenyAddAndCustomizePages property via PowerShell:
$site = Get-SPOSite https://yoursite.sharepoint.com
$site.DenyAddAndCustomizePages
If the value is Enabled, your site is a NoScript site. To disable it, run the following cmdlet:
Set-SPOSite https://yoursite.sharepoint.com -DenyAddAndCustomizePages 0
Disabling NoScript allows users to run custom scripts on a site and allows custom script to do things such as access a site’s property bag. This may come in handy if you happen to have a solution that requires this. Stay tuned for more about that!
What about communication sites?
Since communication sites are new modern sites, you might expect them to be NoScript sites as well. However, this is not the case. Communication sites use the SITEPAGEPUBLISHING#0 template and come with the DenyAddAndCustomizePages property Disabled out of the box:
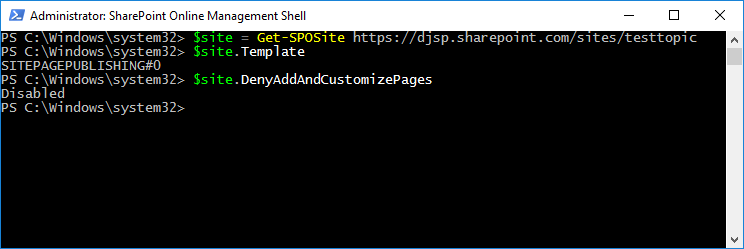
My communication site uses the SITEPAGEPUBLISHING#0 template and already has NoScript disabled.
In summary:

(8/13/2017) NOTE: Both modern team sites and communication sites now have NoScript enabled by default. In either case, NoScript can be disabled by running the appropriate Set-SPOSite cmdlet detailed above.
In an upcoming post, I will leverage this knowledge to apply my custom header and footer SharePoint Framework Application Customizer Extension to both modern team sites and communication sites.

The “opt out of modern experiences” (splnu) cookie applies to all sites in your tenant subdomain
In my last post, I showed how you must click Return to classic SharePoint in order to remove an app from SharePoint Online’s modern Site Contents page. Clicking Return to classic SharePoint sets a session cookie named splnu with a Content attribute value of 0:
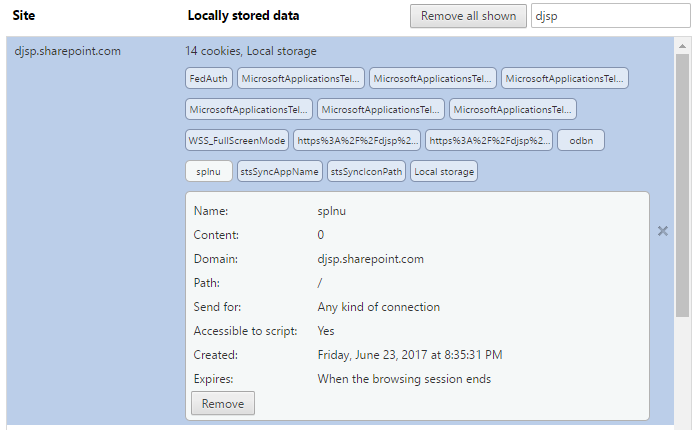
As long as this cookie is present, pages that would typically render using the modern page experience (such as the Site Contents page) will use the classic page experience instead. But did you catch something about that cookie in the screenshot above? It is set with a Path attribute value of /:

Based on this explanation of the purpose of a cookie’s Domain and Path attribute values as defined in RFC 6265, the value of the Path attribute can be used to scope the cookie to a particular URL (and its subdirectories). However, when it is set to /, the browser will use the cookie for any path within the cookie’s domain.
From any site, it affects every site
It turns out that the splnu cookie’s Path attribute is set to / no matter which site or subsite you choose to return to the classic page experience. I tested this by clicking Return to classic SharePoint from each of the following sites within my tenant (clearing my cookies between each test):
– https://djsp.sharepoint.com (root site collection)
– https://djsp.sharepoint.com/test (subsite of root site collection)
– https://djsp.sharepoint.com/sites/test (root of new private site collection)
In all of these scenarios, the same splnu cookie was created with the same Path attribute of /, no matter the subdirectory from which the request was initiated.
What does this mean?
For the duration of your session (splnu is a session cookie), you will be returned to the classic SharePoint page experience on ALL sites that share the same parent domain (in my example above, the root site collection, subsite, and private site collection underneath the /sites path all share the same parent domain–djsp.sharepoint.com–and are therefore all matches for the Path of /).
This may not be a major issue for you since the splnu cookie is only valid for the duration of your session, and as I suggest in my last post, the effects of this cookie can be mitigated by using your browser’s “private browsing” or “incognito” mode. However, this behavior may cause confusion since you might expect the Return to classic SharePoint link to only apply within the scope of the particular site where you selected it.
To that end, I have submitted this UserVoice request asking the product team to consider appropriately scoping the Path attribute value of the splnu session cookie based on where the user has asked to return to the classic page experience. Feel free to vote or comment on my request.
The easy way to remove an app from modern SharePoint Online
If you are using the modern page experiences in SharePoint Online, perhaps you’ve run into a moment of frustration when you go to the Site Contents screen to remove an installed app (err, add-in?) and discover you can’t.
Clicking the … brings up a context menu with only two options, Details and Monitor. Hmmm…no Remove here:

Uh oh, how do I remove this thing?
It turns out that you have to switch the Site Contents page back to the classic page experience in order to remove an app. This little nugget is buried in an Office support article:
![]()
Glad I scrolled all the way to the bottom of this article.
Sure enough, once you return to the classic page experience, the Remove link is there as you would expect.

You may need to expand the left navigation to see this link at the bottom.
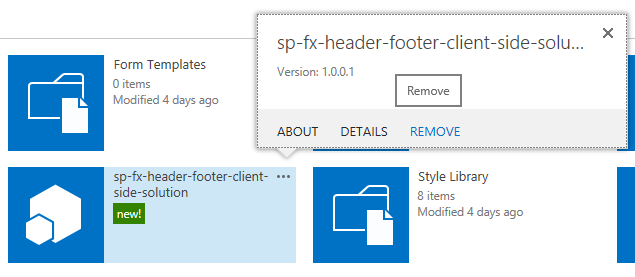
After clicking Return to classic SharePoint, apps can be removed from the classic Site Contents screen.
There was only one problem: despite the support article’s guidance to “use the Back button in the browser to return from classic view,” at least when I pressed my browser’s back button, my browser retained the classic page experience. I navigated away from the Site Contents page and back to it again…still classic. And when I went to a list view page that was formerly using the modern page experience, that page now had the classic experience as well. Only some document libraries and site pages were still using the modern page experience.
What’s going on here?
The good news is that clicking Return to classic SharePoint doesn’t actually change any SharePoint Online settings, nor does it change any user settings (not even your own). This is why you won’t find a link anywhere to “Return to modern SharePoint” after you’ve switched to classic view. Switching to classic view simply sets a session cookie that changes your default page experience. You can locate and remove this cookie to switch back immediately or just wait until your session expires. For the intellectually curious, the cookie is named splnu (anyone want to guess what that stands for?) and contains this information:

Removing this cookie will return you to the modern page experience. However, for the duration of your session, the presence of this cookie will cause pages to be rendered with the classic page experience on all sites within your tenant subdomain.
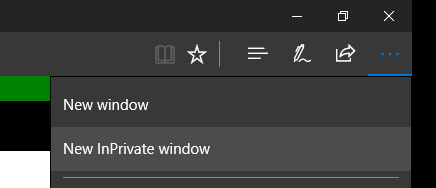
To avoid this problem altogether, I prefer to take advantage of my browser’s “private browsing” or “incognito” mode. This allows me to log in to my SharePoint Online site, go to my Site Contents page, switch to classic view, and remove the app, all without interfering with any existing cookies on my machine and eliminating the hassle of having to potentially locate and remove the splnu cookie after the fact.

Hopefully this will help the next time you need to remove an app from SharePoint Online!