Tagged: MOSS
Which SharePoint Front End Server Am I Hitting?
If you have ever worked in a network load balanced (NLB) environment with multiple SharePoint front end servers, you have no doubt had at least one occasion where only some of your users were seeing some sort of strange behavior. Perhaps some users receive a generic error message when accessing a page and others do not. Whatever the reason, it never hurts to be able to have users give you just a little bit more information to help you in the troubleshooting process.
Of course, you can always dig through the ULS log files on each front end server to look for any anomalies or to match up correlation ID values associated with generic error messages. But wouldn’t it be great if your end user could tell you that he or she is hitting front end #3 so you don’t have to waste time searching through the logs on front ends #1 and #2 first?
One potential solution to this problem (and there are no doubt more elegant ways to solve it) are to create multiple images such as the ones below:


Save each image with exactly the same name (such as frontend.jpg) and place it in the TEMPLATE\IMAGES directory of the SharePoint root on each front end (make sure you match up the correct image with each front end server!) Then, when something goes wrong for one user but not another, you can ask him/her to visit the following URL:
http://yourcompany.com/_layouts/images/frontend.jpg
Based on the number that appears, you will know exactly which front end that user is hitting!
I hope this information is useful to you. You could extend this by creating a custom URL action called “Front End Check” that allows certain users to hit the front end image link directly without having to remember it. Feel free to leave your thoughts and suggestions in the comments!
Using CloudShare to Set Up a MOSS to SharePoint 2010 Migration Environment
I have been using CloudShare for a little over a week now and have found it to be a convenient, cost-effective way to provision virtual environments to suit my development and testing needs. The time and money CloudShare saves me over having to procure the necessary hardware and software and install operating systems and applications myself has been HUGE. I can have a brand new server up and running, pre-configured with all the applications I need in a matter of minutes. I have also been very impressed with how quickly the machines come back up after a reboot. In spite of all these great things, CloudShare is a little light in the area of “how-to” documentation and their user support forums do not appear to be very active.
My primary objective at the moment is to use CloudShare to test various MOSS to SharePoint 2010 migration scenarios, particularly with respect to Claims authentication and the numerous problems users have encountered upgrading to Claims-based web applications in SharePoint 2010 (stay tuned for some blog posts about these problems in the future). In order to adequately test these out, I need a single domain with the same set of users and groups to test various pre- and post-upgrade scenarios.
In order to create this environment, I knew I needed to follow these basic steps:
- Provision and configure a MOSS environment. For this, I set up a “SharePoint 2007” CloudShare machine which in addition to giving me MOSS, also took care of creating the domain shrpnt.loc on which I will ultimately be configuring a new SharePoint 2010 instance. On this machine, I have set up a number of different web applications including one with Forms-Based Authentication (FBA) tied to a custom authentication provider. I will also create a new SQL Server instance on this machine to host my SharePoint 2010 configuration and content databases.
- Once the MOSS environment was complete, detach my MOSS content databases. To fully replicate the issues I have seen in various production environments, I wanted to use the “database attach” upgrade method described in detail here.
- Create a new SharePoint 2010 farm on a new server on the same domain. Here is where things with CloudShare get tricky. They have plenty of pre-configured SharePoint 2010 virtual machines available, but all of them are already joined to a domain (obviously a different domain than the one that would be set up in my initial MOSS environment). I’ll describe how I work around this shortly.
- Attach the new content databases in the SharePoint 2010 farm. After running the Mount-SPContentDatabase PowerShell command, this will automatically upgrade them to SharePoint 2010. From here, I am good to go and can continue with my testing.
As much as I would have loved to see a “Windows Server 2008 R2 Enterprise 64-bit with SQL Server and SharePoint 2010 install media available” option, CloudShare has no such offering. The next best thing, I assumed, was to take their “SharePoint 2010 (Clean Install)” VM and do the following:
- Run dcpromo to remove Active Directory Domain Services from the machine, effectively un-joining it from its domain. After restarting, I also removed the “Active Directory Domain Services” and “DNS Server” roles from the server.
-
Join the machine to the existing shrpnt.loc domain by performing the following steps:
- Add the IP address of the shrpnt.loc domain controller as the primary DNS server on the VM I want to join to that domain.
- On the new VM, join it to the shrpnt.loc domain using the domain administrator credentials from the shrpnt.loc domain.
- Restart the new VM and enjoy being able to leverage the users and groups defined on the shrpnt.loc domain.
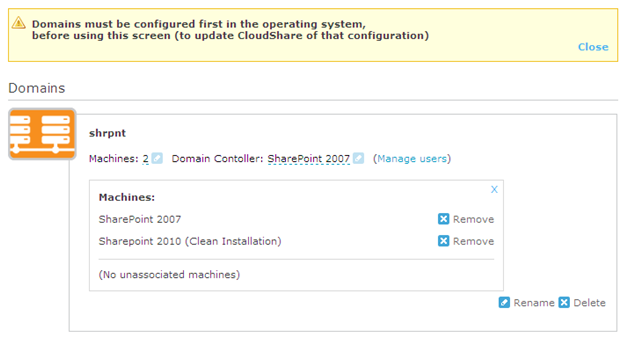
NOTE: After doing this, CloudShare needs you to hold its hand a little bit to let it know about the “new” domain to which you just joined the SharePoint 2010 VM. If you use the browser-based client to access your servers and do not make this change, it will attempt to log you in with an account that is no longer valid. This value can be set by going to “Edit domains” under “Edit Environment.”
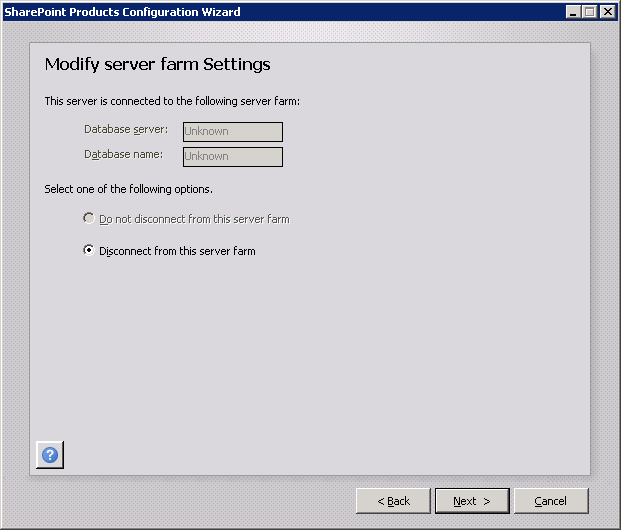
- After another restart, run the SharePoint 2010 Products Configuration Wizard. When it errors out trying to find the original farm, choose to disconnect the server from the existing farm.
- Re-run the SharePoint 2010 Products Configuration Wizard, this time telling it to create a new server farm.
After completing this step, I now have a fresh SharePoint 2010 farm from which I can begin my migration testing. I wish CloudShare had some way to allow users to perform fresh installs of SQL Server and SharePoint 2010 on a Windows Server box without a pre-configured domain VM, but until they do, I believe this is an adequate workaround.
Please post any suggestions for improvements or enhancements to this process in the comments. Thanks!