Tagged: SharePoint 2010
Customize the Default #WIF ASP.NET #STS to Support Multiple #SharePoint Web Applications
Thanks to Claims-based identity in SharePoint 2010 and 2013, we have the ability to develop our own trusted login providers. These providers take the form of a Security Token Service (STS), an ASP.NET web site that packages and signs SAML tokens containing claims. SharePoint is then configured to trust this STS. In this blog post, I walk through the steps required to develop a custom STS using the Windows Identity Foundation (WIF) SDK 4.0 that supports LinkedIn as an identity provider for SharePoint. However, there is one significant shortcoming with the approach I use in that post: it can only be used for a single SharePoint web application, intranet.contoso.com. This is due to two factors:
- The realm used by the SPTrustedIdentityTokenIssuer is configured as the URL of SharePoint’s STS within that web application (e.g., intranet.contoso.com/_trust).
- The default behavior of the WIF STS web site is to forward tokens for authenticated users to the specified realm URL. From there, SharePoint’s STS will forward the logged in user back to the page he or she was trying to access.
If you tried to use this trusted identity provider on another web application (such as hr.contoso.com or finance.contoso.com), you would end up disappointed as your users would be forwarded back to the intranet.contoso.com web application no matter which site they were actually trying to access!
In this blog post, I will make some slight modifications to the out-of-the-box WIF STS web site so that:
- The same trusted identity provider may be used across multiple different web applications, each with different host header URLs.
- The SPTrustedIdentityTokenIssuer does not need to be updated and can leverage the same realm value no matter how many web applications make use of it.
- The WIF STS web site I build and customize does not need to be updated and can leverage the same realm value no matter how many web applications make use of it.
What is a realm?
The default behavior of the WIF STS web site is to forward an authenticated user back to the URL specified as the realm. According to MSDN, the realm value is “used by the STS to identify the relying party instance and to select the corresponding token issuance policy and encryption certificate.” The realm is specified as a URI (which can actually be a URL or a URN), but in many walkthroughs (mine included), we specify a value for the realm that is tied to a specific host header URL (e.g., intranet.contoso.com/_trust).
Decoupling the realm from a specific host header URL
In an environment where only one web application needs to use a trusted identity provider, it may make sense to associate the realm with the URL of that web application. But in an environment where multiple claims web applications in a SharePoint farm need to use that same trusted identity provider, a different approach must be taken. As Steve Peschka describes in this post, we can use a URN (e.g., urn:linkedin:sts) instead of a URL to work around this limitation. In the case of ADFS v2 (disclaimer: I have not worked with ADFS v2), you can define mappings between these URNs and their associated web applications as Steve describes in the blog post linked above.
Updating the default WIF STS web site
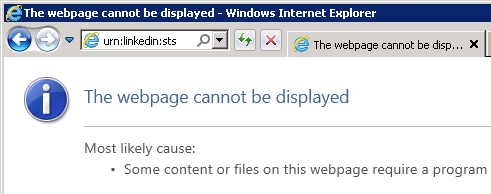
If I change my SPTrustedIdentityTokenIssuer to use the generic realm urn:linkedin:sts, but make no changes to my STS web site, what will happen? As it turns out, I will be redirected to this URN, which of course is not the URL I want my logged in users to visit. Hilarity ensues:
As you can see, the STS redirects the logged in user to urn:linkedin:sts, which of course produces a 404 error.
The key to having the STS redirect logged in users to the proper URL is in the CustomSecurityTokenService class, which contains a function GetScope() that sets the ReplyToAddress of the SecurityTokenService.Scope object. The default STS web site implementation uses the following code:
// Set the ReplyTo address for the WS-Federation passive protocol (wreply). This is the address to which responses will be directed.
// In this template, we have chosen to set this to the AppliesToAddress.
scope.ReplyToAddress = scope.AppliesToAddress;
The AppliesToAddress value is determined from the wtrealm parameter specified as the “OAuth Accept Redirect URL” in our LinkedIn application configuration. Remember that we had previously set this value to intranet.contoso.com/_trust (which would work as a URL), but have since updated it to urn:linkedin:sts.
How can I fix this?
The way you choose to work around this behavior depends on your requirements. If you need to use different token encrypting certificates based on the relying party (RP) application, or if you want to potentially execute any custom business logic specific to some (but not all) of your RP applications, you may choose to update the code in the GetScope() function to look more like the following:
if (scope.AppliesToAddress == "urn:linkedin:sts")
{
    scope.EncryptingCredentials = new X509EncryptingCredentials(CertificateUtil.GetCertificate(StoreName.My, StoreLocation.LocalMachine, "EncryptingCert1"));
    scope.ReplyToAddress = "http://intranet.contoso.com/_trust";
    // More things specific to the intranet web application and the urn:linkedin:sts realm...
}
else if (scope.AppliesToAddress == "urn:someother:sts")
{
    scope.EncryptingCredentials = new X509EncryptingCredentials(CertificateUtil.GetCertificate(StoreName.My, StoreLocation.LocalMachine, "EncryptingCert2"));
    scope.ReplyToAddress = "http://extranet.contoso.com/_trust";
    // More things specific to the extranet web application and the urn:someother:sts realm...
}
This approach carries the following “baggage” (which may be completely necessary based on your requirements):
- The STS has to be recompiled and redeployed anytime a new web application needs to be supported.
- It still cannot be reused across any host-header named web applications.
But what if I don’t have any special requirements? What if I just want my STS to redirect authenticated users back to whichever web application referred them, even new web applications that I don’t know about yet? We can do this! The way I chose to accomplish this is as follows:
- In Login.aspx.cs of my STS web site (which is the first page a user will hit prior to being authenticated), I can grab the host header from the UrlReferrer property of HttpContext.Current.Request and store it in a session variable with /_trust appended. This will serve as the realm value I want my STS to use and will contain the value of the referring SharePoint web application.
- In Default.aspx.cs of my STS web site, see if the session variable I created above exists. If it does, pass it in to the constructor for my CustomSecurityTokenService class.
- In App_Code/CustomSecurityTokenService.cs, store the updated realm value in a member variable. If the STS was called with a realm value of urn:linkedin:sts (some minimal validation of the RP), redirect the user to the appropriate realm URL in the GetScope() function.
Here are the relevant code snippets required to accomplish this:
Login.aspx.cs:
Uri referrer = HttpContext.Current.Request.UrlReferrer;
if (referrer != null)
{
    string defaultRealm = referrer.ToString();
    // From SharePoint, this value will be:
    defaultRealm = defaultRealm.Substring(0, defaultRealm.IndexOf("_login")).TrimEnd('/') + "/_trust/";
    Session["defaultRealm"] = defaultRealm;
}
Default.aspx.cs:
// Process signin request.
SignInRequestMessage requestMessage = (SignInRequestMessage)WSFederationMessage.CreateFromUri( Request.Url );

string defaultRealm = "";
if (Session["defaultRealm"] != null)
{
    defaultRealm = Session["defaultRealm"] as string;
}

if ( User != null && User.Identity != null && User.Identity.IsAuthenticated )
{
    SecurityTokenService sts = new CustomSecurityTokenService( CustomSecurityTokenServiceConfiguration.Current, defaultRealm );
    SignInResponseMessage responseMessage = FederatedPassiveSecurityTokenServiceOperations.ProcessSignInRequest( requestMessage, User, sts );
    FederatedPassiveSecurityTokenServiceOperations.ProcessSignInResponse( responseMessage, Response );
}
App_Code/CustomSecurityTokenService.cs:
private string defaultRealm = string.Empty;

public CustomSecurityTokenService( SecurityTokenServiceConfiguration configuration, string realm = "" )
    : base( configuration )
{
    defaultRealm = realm;
}

protected override Scope GetScope( IClaimsPrincipal principal, RequestSecurityToken request )
{
    ValidateAppliesTo( request.AppliesTo );

    Scope scope = new Scope( request.AppliesTo.Uri.OriginalString, SecurityTokenServiceConfiguration.SigningCredentials );

    string encryptingCertificateName = WebConfigurationManager.AppSettings[ "EncryptingCertificateName" ];
    if ( !string.IsNullOrEmpty( encryptingCertificateName ) )
    {
        // Important note on setting the encrypting credentials.
        // In a production deployment, you would need to select a certificate that is specific to the RP that is requesting the token.
        // You can examine the 'request' to obtain information to determine the certificate to use.
        scope.EncryptingCredentials = new X509EncryptingCredentials( CertificateUtil.GetCertificate( StoreName.My, StoreLocation.LocalMachine, encryptingCertificateName ) );
    }
    else
    {
        // If there is no encryption certificate specified, the STS will not perform encryption.
        // This will succeed for tokens that are created without keys (BearerTokens) or asymmetric keys.
        scope.TokenEncryptionRequired = false;
    }

    // Set the ReplyTo address for the WS-Federation passive protocol (wreply). This is the address to which responses will be directed.
    // In this template, we have chosen to set this to the AppliesToAddress.
    if (scope.AppliesToAddress == "urn:linkedin:sts")
    {
        scope.ReplyToAddress = defaultRealm;
    }
    else
    {
        scope.ReplyToAddress = scope.AppliesToAddress;
    }

    return scope;
}
Putting it all together
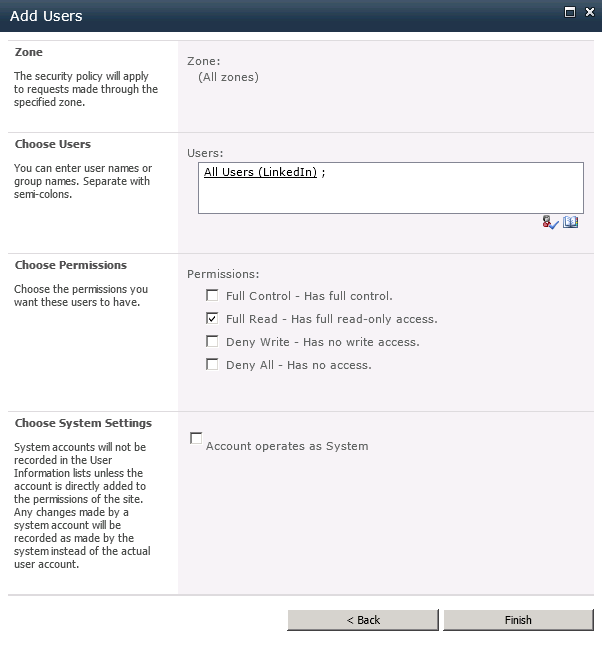
After deploying this updated STS, any new SharePoint web application I create that leverages the LinkedIn trusted identity provider will redirect users back to the appropriate URL after they are authenticated, regardless of whether the new web applications use a different host header, port, or both. To prove this, I created a new web application on port 39668 and set a “Full Read” user policy for all LinkedIn users. Upon accessing the site, I choose to sign in using my LinkedIn identity provider:
After supplying my credentials, LinkedIn will redirect me back to my STS. My STS will then determine where to redirect me based on the code above, and voila, I will be taken to my new SharePoint site, authenticated and signed in!
Slides and Code for my #SPSCincinnati Session
A huge thank you to all the organizers, volunteers, speakers, sponsors, and attendees who made SharePoint Saturday Cincinnati 2012 (also known as “ScarePoint Saturday Spookinnati”) such a huge success! I had a great time making new friends and catching up with old ones.
I especially wanted to thank everyone who came out early on a rainy, cold Saturday morning to attend my session “SharePoint 2010, Claims-based Identity, Facebook, and the Cloud.” The audience was very engaged and we had some of the best discussions and questions of any time I have ever given this session.
One question I received that I wanted to address specifically here was about how to integrate a Facebook application with a Facebook Page. Unfortunately, you can’t create a Facebook application using the identity of your Facebook Page. You MUST use your “authentic personal Facebook account” to create the application that is required to set up Facebook as an identity provider in the Azure ACS management portal (note that this is not a limitation of Azure ACS; it would apply whether you were writing a custom STS to support Facebook login, or even if you were using Facebook to log in to a web site that had nothing to do with SharePoint or IIS). That said, this restriction is something organizations need to keep in mind as they plan the management and governance of the Facebook application required to support logging in to their web site—SharePoint or otherwise.
Note that it IS possible to post things like status updates from SharePoint to a Facebook Page’s wall, as long as you request the manage_pages permission from users who log in using your application. Note that you would have to write additional code to retrieve a separate access_token for the Page (which would require the logged in user to be an administrator of that Page). If anyone out there tries this approach, please let me know how it works for you!
Here are the slides from my presentation:
Source code and/or a WSP for the web parts I demonstrated can be downloaded from CodePlex.
To learn more about Azure ACS, check out this page and sign up for your free Windows Azure trial.
Thanks again to everyone for such a great event!
Programmatically Updating SharePoint User Profiles with Facebook Data
While giving my demo at SharePoint Saturday Boston last weekend, I showed how to populate a Contacts list in SharePoint with data from the currently logged in user’s Facebook profile. An audience member posed a question about user profiles in SharePoint and how data from Facebook could also be used to populate them. Though I had never considered the potential applications of doing this (one might not think to leverage SharePoint user profiles in a public-facing scenario), it is technically straightforward to do.
Prerequisites
In order to surface Facebook profile information in a SharePoint user profile, you should have the following in place:
- A My Site Host site collection deployed on the same web application where Facebook is configured as an identity provider.
- User Profile properties configured to allow the user to edit values for the properties you wish to set/update programmatically.
Objective
In our scenario, we will take the following information from a user’s Facebook profile and use it to populate his/her SharePoint user profile:
- Given name
- Job title
- Location
- “About me” bio
- Birthday
- Profile picture
Our Starting Point
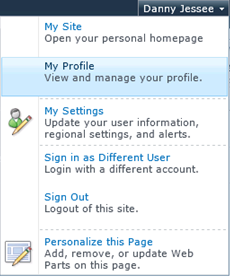
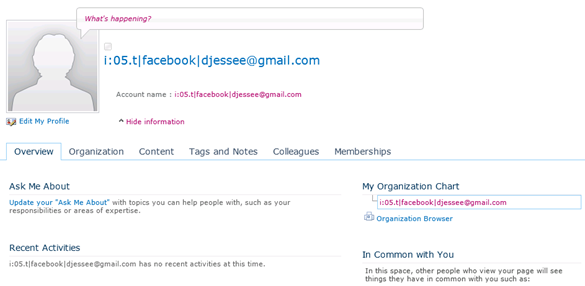
Upon initially configuring Facebook as an identity provider for SharePoint, a very bare bones user profile will appear when selecting “My Profile” from the welcome menu.
The profile page (person.aspx) shows the claims-encoded name for the user, and that’s about it:
The Code
The algorithm required to update a user profile for a user logged in via Facebook is the same as it is for any other SPUser; however, we will utilize the Facebook C# SDK to encapsulate calls to the Facebook Graph API to get the information we need. For demonstration purposes, I have this code wired up to a button click event handler in a SharePoint web part.
This code leverages JSON.NET to parse the JSON-formatted values returned by calls to the Facebook Graph API.
// Iterate through the Claims we are presented until we find the Facebook AccessToken
// and given name
IClaimsPrincipal claimsPrincipal = Page.User as IClaimsPrincipal;
claimsIdentity = (IClaimsIdentity)claimsPrincipal.Identity;
foreach (Claim c in claimsIdentity.Claims)
{
    if (c.ClaimType.Equals("http://www.facebook.com/claims/AccessToken"))
    {
        // We will use this Claim to make all calls to the Facebook Graph API
        token = c.Value;
    }
    else if (c.ClaimType.Equals("http://schemas.xmlsoap.org/ws/2005/05/identity/claims/givenname"))
    {
        // We will use this Claim to set the proper display name for the user
        givenName = c.Value;
    }
}

// Assuming we have the AccessToken, use it to access the user's Facebook profile
if (!string.IsNullOrEmpty(token))
{
    var client = new Facebook.FacebookClient(token);
    var me = (IDictionary)client.Get("me");

    Guid siteId = SPContext.Current.Site.ID;
    Guid webId = SPContext.Current.Web.ID;

    // Assume the identity of the application pool - this account is configured as an
    // Administrator of my User Profile Service Application in Central Administration
    SPSecurity.RunWithElevatedPrivileges(delegate()
    {
        using (SPSite site = new SPSite(siteId))
        {
            try
            {
                // Obtain a reference to the UserProfileManager for this SPSite
                SPServiceContext sc = SPServiceContext.GetContext(site);
                UserProfileManager userProfileMangager = new UserProfileManager(sc);

                SPUser currentUser = SPContext.Current.Web.CurrentUser;
                if (currentUser != null)
                {
                    // Get the current user's SharePoint profile
                    UserProfile profile = userProfileMangager.GetUserProfile(true);

                    // Update the display name and preferred name to match given name
                    profile.DisplayName = givenName;
                    profile[PropertyConstants.PreferredName].Value = givenName;
                    profile[PropertyConstants.Birthday].Value = (string)me["birthday"];
                    profile[PropertyConstants.AboutMe].Value = (string)me["bio"];

                    // Get the current job title
                    JsonArray work = me["work"] as JsonArray;
                    // Most recent/current employer stored in work[0]
                    JsonObject company = work[0] as JsonObject;
                    if (company.ContainsKey("position"))
                    {
                        JsonObject position = company["position"] as JsonObject;
                        profile[PropertyConstants.JobTitle].Value = (string)position["name"];
                        profile[PropertyConstants.Title].Value = (string)position["name"];
                    }

                    // Get the current location
                    JsonObject location = me["location"] as JsonObject;
                    string cityState = (string)location["name"];
                    profile[PropertyConstants.Location].Value = cityState;

                    // Get the user's current Facebook profile picture
                    // https://graph.facebook.com/[Facebook Profile ID]/picture?type=large
                    profile[PropertyConstants.PictureUrl].Value = "https://graph.facebook.com/" + (string)me["id"] + "/picture?type=large";

                    // Commit all changes to the user's profile
                    profile.Commit();
                }

                lblOutput.Text = "User profile successfully updated.";
            }
            catch (Exception ex)
            {
                lblOutput.Text = "" + ex.Message + "
" + ex.StackTrace + "";
            }
        }
    });
}
The Outcome
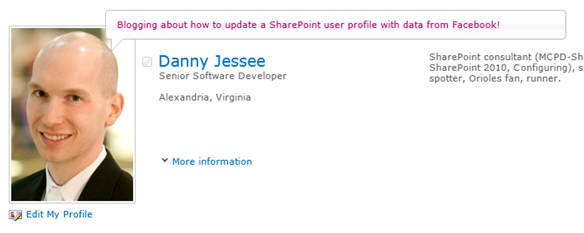
After executing this code, the user’s SharePoint profile looks a lot more complete!
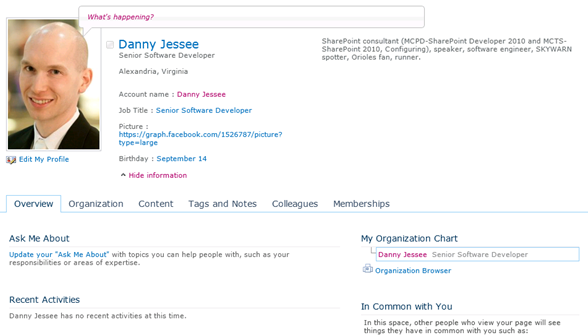
One Final Thing
My demos include a basic “status update” web part that allows a user to type a status message in a SharePoint web part. With a few additional lines of code, we can update the “What’s happening?” text bubble to include the text of this status update as well:
SPServiceContext sc = SPServiceContext.GetContext(site);
UserProfileManager userProfileMangager = new UserProfileManager(sc);
UserProfile profile = userProfileMangager.GetUserProfile(true);
profile[PropertyConstants.StatusNotes].Value = txtStatus.Text;
profile.Commit();
Now whenever I post a status update, it will update both my Facebook profile and my SharePoint profile!

Slides, Code, and More for my SPSBOS Session
Thanks to everyone who came out to SharePoint Saturday Boston yesterday! Once again, the organizers put together an outstanding event with well over 300 developers, administrators, and end users in attendance. Thanks, also, to all the sponsors who help to make such great events possible.
I had the great privilege of being able to speak at this event. I would like to extend a special thank you to everyone who attended my session on Claims-Based Identity, Facebook, and the Cloud yesterday morning. There were lots of great questions and discussions! Thanks to all of you for your participation. I hope you enjoyed the session and found the information presented to be valuable.
Below are links to my presentation, code, PowerShell script, and CloudShare environment. Additional background information can be found in my blog post Beyond Authentication: Deeper Facebook Integration with SharePoint.
Download presentation as .pptx
Web parts, source code, site template, and required certificates
PowerShell script to configure Azure ACS trusted identity provider
If you would like a copy of the CloudShare virtual machine I used for my demos, follow this link to obtain a 14-day free trial of CloudShare (if you don’t already have an account) and access a copy of the environment. I used the VM called SharePoint 2010 Enterprise SP1 for my demos. If you would like to know more about CloudShare (I love CloudShare!), please contact me.
Also, to take full advantage of the functionality shown in this demo, I strongly encourage you to sign up for a 90-day free trial of Windows Azure. This will give you access to the AppFabric Access Control Service (ACS) capabilities I demonstrated. If you already have a Windows Azure account, or if you choose to convert your trial to a full-blown account, the ACS features are free through December 1, 2012 (after this date, the charge will be $1.99 for every 100,000 transactions).
If you have any questions or issues deploying or running the code and/or scripts above, feel free to leave a comment below. Thanks again to everyone for such a fantastic event!
Using jQuery to Build a More Intuitive Advanced Search Experience in SharePoint 2010 – Part 2: Advanced.aspx
Update 3/28/12: If you have already downloaded the code for this solution, please download it again! Several bugs were fixed in this latest release.
This entry is part 2 of a multi-part blog series on enhancing the advanced search experience for SharePoint 2010 end users using jQuery. Part 1 may be found here. I will link to subsequent entries in this series from here once they have been written.
In part 1 of this series, I wrote about what I believe are some serious flaws with the way advanced searches are handled out of the box in SharePoint 2010. If you so much as follow one navigational link from the search results page after performing an advanced search, then decide you wish to change your advanced search parameters in any way, you are forced to re-enter all your search parameters on an empty advanced search page, even though the page URL contains a query string parameter that includes everything you searched for!
Enter jQuery
I know I can use JavaScript to parse parameters from a query string. This post details one of the most elegant ways I have seen to do this. Since the advanced.aspx URL already includes all of my advanced search criteria (in the k query string parameter), I will use this method to parse that value. Once I have that value, through a combination of jQuery and JavaScript RegExp (regular expression) parsing, I can take all of my search criteria and repopulate the appropriate text boxes, check boxes, and dropdowns so that the end user doesn’t have to needlessly re-enter this information.
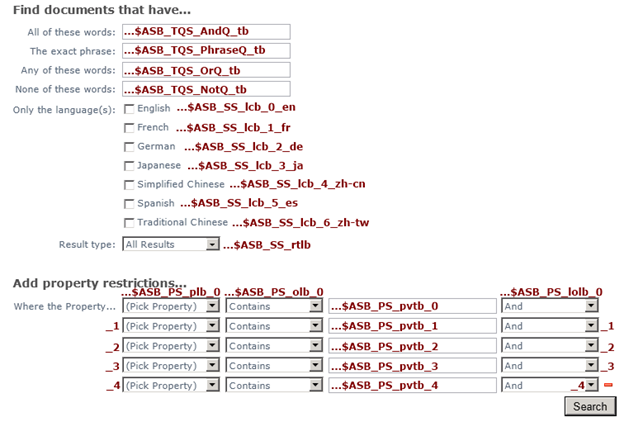
The key to being able to populate the appropriate controls is knowing the IDs of each of the controls on the advanced search page. I can then use jQuery to set the values of the respective text boxes and dropdowns using the .val() method for text boxes and the .prop() method for check boxes and dropdowns (although .val() can also be used for setting the selected value in a dropdown, I encountered a problem with the dynamically populated dropdowns in the property restrictions area that required me to set the selectedIndex property of those dropdowns instead). Using my trusty F12 developer tools, I was able to determine how the controls on the advanced search page are named. The image below displays the last part of the “name” value associated with each of these controls. I can then use attribute selectors to choose each specific element (based on the name of that element ending with the given string) and set its value accordingly.
Deploying jQuery and this Script
A thorough discussion of how best to deploy jQuery in a given site collection is beyond the scope of this blog post. Suffice it to say, my preferred approach for deploying jQuery is as a sandboxed solution that includes a jQuery module. Jan Tielens outlines this solution in greater detail here. Keep in mind that you can use any method you would like to deploy jQuery on your Search Center site as long as you properly reference the location of your jQuery script on the advanced.aspx page. The functionality I have created for this blog post requires jQuery 1.6 or above.
Keep in mind that the advanced.aspx page in a SharePoint Search Center is a fully customizable web part page. With that in mind, once you have deployed jQuery in your site collection and referenced it from this page, you can deploy this script in a Content Editor Web Part and be good to go. The general algorithm followed by this script is:
- Store the k query string parameter in a variable, k.
- Look for regular expression matches in k for the various keyword searches (ALL(), ANY(), “”, and NONE()). Populate the appropriate text boxes with the words found.
- Look for regular expression matches in k for the various language filters (DetectedLanguage).
- Look for regular expression matches in k for the result type (IsDocument=True or FileExtension=).
- Parse out any property restrictions (property, type of match, the text itself, and the and/or operand associated with it). This script should handle the out of the box properties without any issue. It also properly handled the custom mapped properties I had previously configured in my environment (but please feel free to let me know if you run into any specific issues with this script in your environment).
The Solution in Action
Download the script here (it is available as both a standalone text file or an exported Content Editor Web Part) and try it out for yourself. Again, the steps to deploy it are as follows:
- Download jQuery 1.6 or greater and deploy it in your environment.
- Ensure jQuery is referenced from your advanced search page, advanced.aspx.
- Add a Content Editor Web Part to advanced.aspx and reference this script. Alternately, you could import and add the .dwp file that can also be downloaded from the link above.
Let’s try it out!
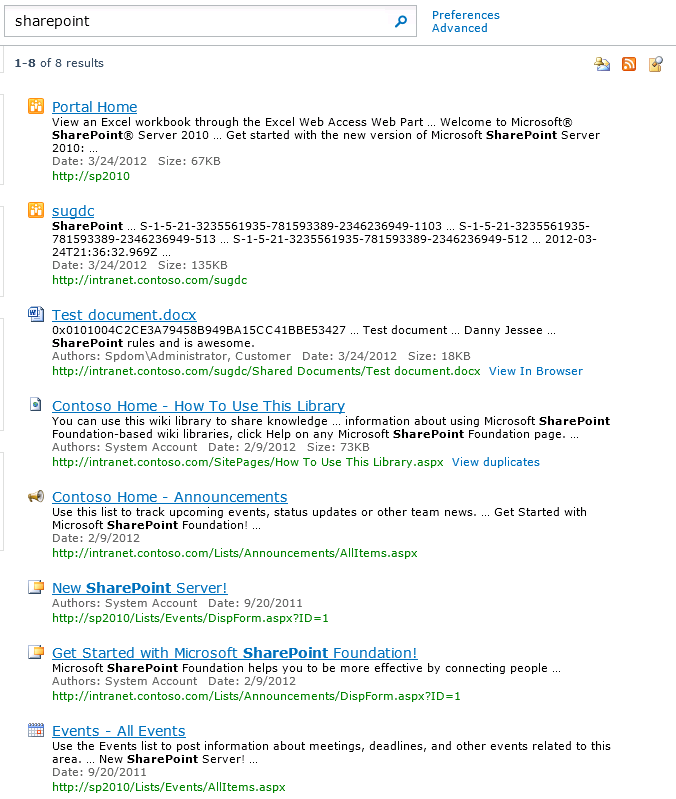
I’ll start by doing a basic search on my favorite subject, SharePoint!

Here are my results:
Now let’s say I want to filter these results by date. I’ll click the Advanced link.
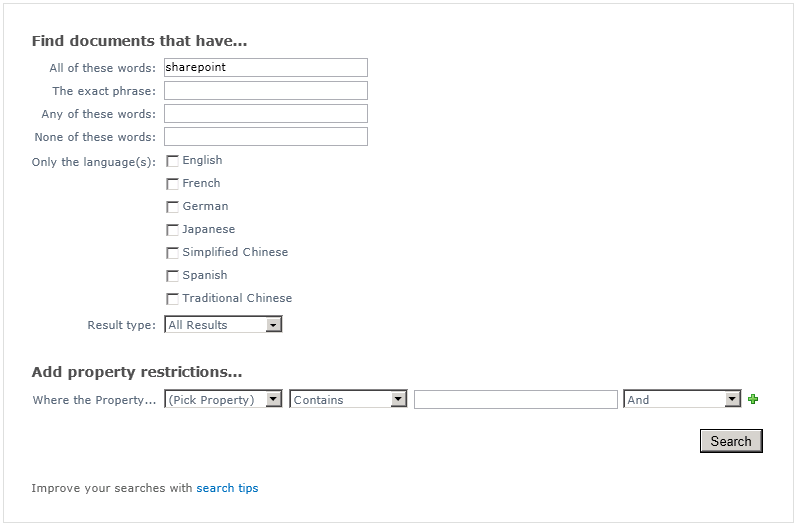
Nothing special here (yet). The advanced search page knows how to put a simple keyword query’s terms in the “All of these words” text box. Now let’s enhance our search by adding some keyword, language, type, author, and date range restrictions:
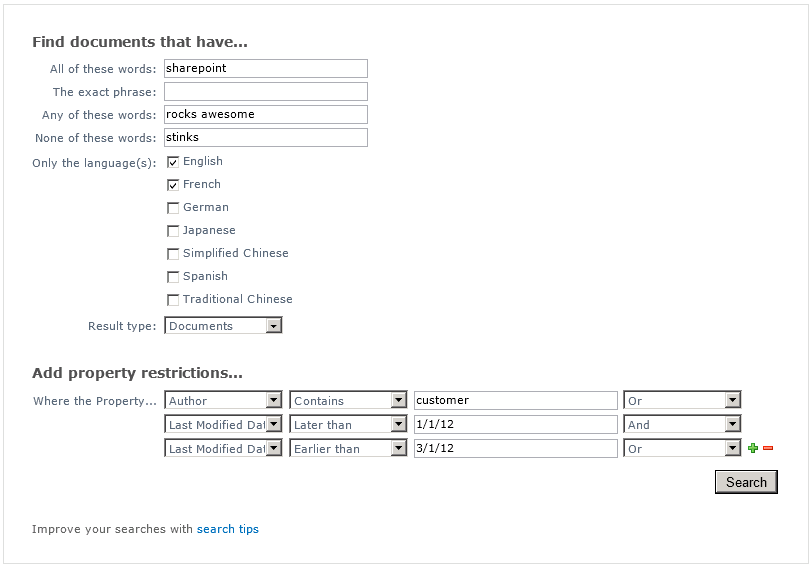
Pressing Search yields a new set of search results:
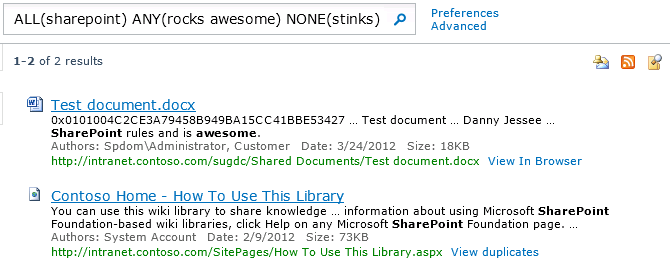
The entire string in the search text box reads:
ALL(sharepoint) ANY(rocks awesome) NONE(stinks) (DetectedLanguage=”en” OR DetectedLanguage=”fr”) (IsDocument=”True”) (Author:customer OR Write>=1/1/12 AND Write<=3/1/12)
At this point, the Advanced link points to javascript:history.back(), so clicking it would bring up the advanced search page just as it was when I submitted my query.
Let’s say I want to change the date range being searched, remove one of the selected languages, and put size and URL restrictions in place. I can manually change the search string to read:
ALL(sharepoint) ANY(rocks awesome) NONE(stinks) (DetectedLanguage=”en”) (IsDocument=”True”) (-Path:SitePages AND Path:contoso OR Write>=3/1/12 AND Write<=3/27/12 AND Size>17000)
Pressing the search button yields the following results:

At this point, the Advanced link now points to advanced.aspx with a messy query string parameter called k. Without this script in place, clicking that link would yield a woefully empty advanced search page:
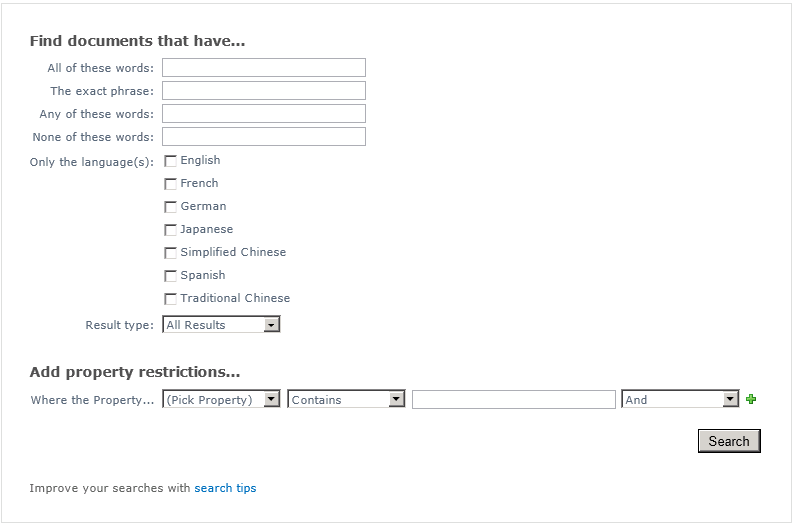
(As an aside, I find it strange that SharePoint has somehow forgotten how to even parse the “All of these words” keywords!)
But with this script installed, the page “magically” reflects all the parameters of my updated query automatically!
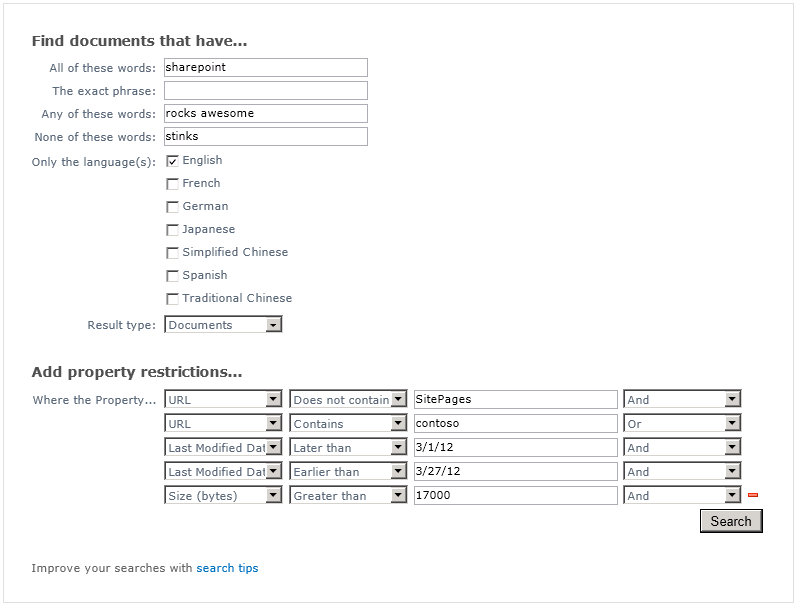
Pretty cool, huh? Try it out (you can download the code in a standalone text file or as an exported Content Editor Web Part) and let me know what you think. Feel free to leave any comments, concerns, or ideas for improvement in the comments. Stay tuned for part 3, where I will use jQuery to enhance the advanced search interface directly on the search results page!
Using jQuery to Build a More Intuitive Advanced Search Experience in SharePoint 2010 – Part 1: Introduction
This entry is part 1 of a multi-part blog series on enhancing the advanced search experience for SharePoint 2010 end users using jQuery. Part 2, using jQuery to enhance the advanced search page advanced.aspx can be found here. I will link to subsequent entries in this series from here once they have been written.
The default advanced search experience in a SharePoint 2010 Search Center (basic or enterprise) has always disappointed me. The interface is clean enough, but the execution and navigation leave a lot to be desired, particularly when end users wish to make changes to the search string from the search results page. Out of the box, performing the different types of keyword searches (ALL of these words, ANY of these words, the exact phrase, etc.) displays the combined SharePoint search syntax for that query in the search box. For instance, if I wanted to find documents that contained ALL of the words SharePoint and awesome, the exact phrase Danny Jessee, ANY of the words rocks or rules, and NONE of the words sad or sorry, I would enter the following in the advanced search page:
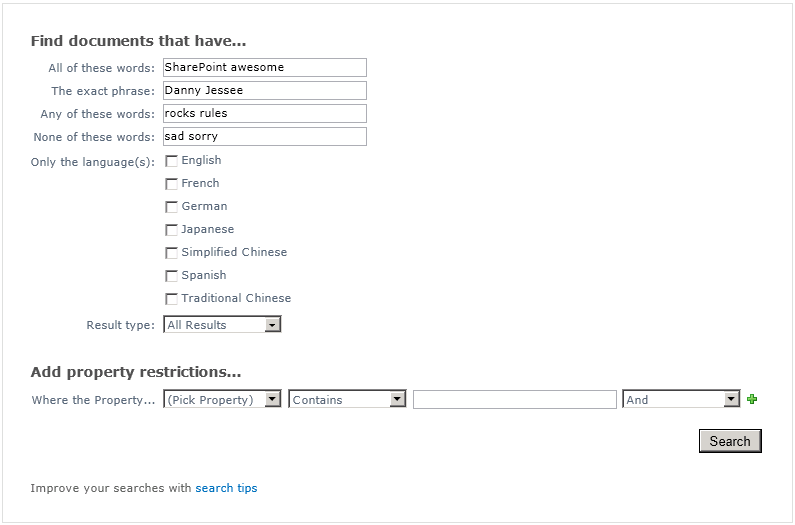
And the results (if any) appear on the results page, results.aspx:

As you can see, my advanced query was converted to a single search string where the words I entered in the All of these words: were surrounded with ALL(), the words I entered in The exact phrase: were surrounded with quotation marks, and so on with ANY() and NONE(). The entire string that appears in the search box looks like this:
ALL(SharePoint awesome) “Danny Jessee” ANY(rocks rules) NONE(sad sorry)
This (URL-encoded) string also appears as the k query string parameter in the search results page URL:
results.aspx?k=ALL(SharePoint%20awesome)%20%22Danny%20Jessee%22%20ANY(rocks%20rules)%20NONE(sad%20sorry)
This is intuitive enough for most users to follow, and in fact gives users the opportunity to understand some basic SharePoint search syntax. There’s certainly nothing wrong with that. Things start to get more complex, however, when you start to add property restrictions into the mix. What if, in addition to my search query above, I only wanted to return results that were either modified between March 1 and March 10, or were less than 18000 bytes in size? My advanced search page would now look like this:
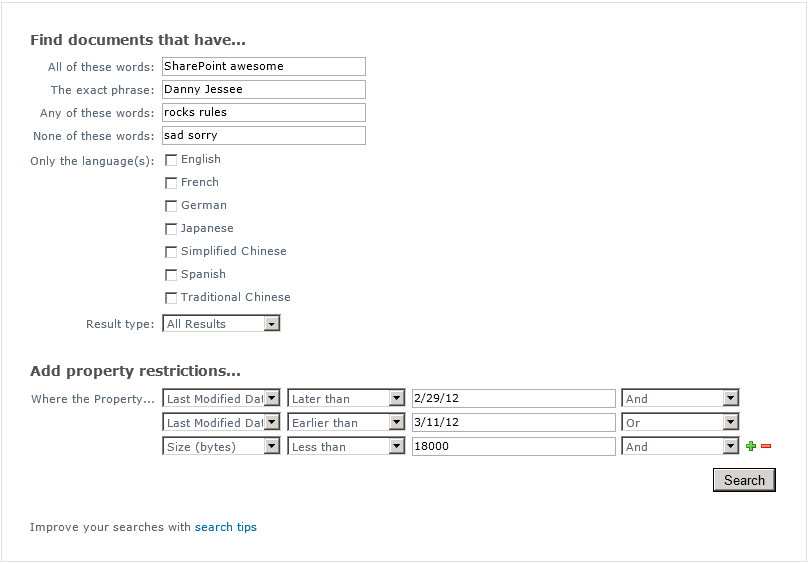
And the entire string that appears in the search box on the search results page now looks like this:
ALL(SharePoint awesome) “Danny Jessee” ANY(rocks rules) NONE(sad sorry) (Write>=2/29/12 AND Write<=3/11/12 OR Size<18000)
The URL to my results page now looks like this:
results.aspx?k=ALL(SharePoint%20awesome)%20%22Danny%20Jessee%22%20ANY(rocks%20rules)%20NONE(sad%20sorry)%20(Write%3E%3D2%2F29%2F12%20AND%20Write%3C%3D3%2F11%2F12%20OR%20Size%3C18000)
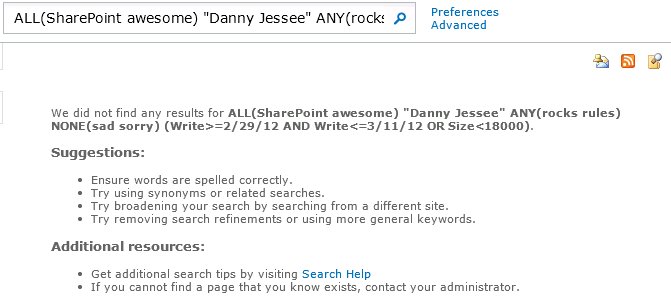
Although this syntax is still fairly intuitive, I have found that some end users begin to feel intimidated (or at least uncomfortable) as the size of this search string grows (especially when you start nesting clauses in parentheses or have to enclose property values that include spaces in quotation marks).
It gets better!
Did you know that if you include enough advanced search parameters in your query, the string that SharePoint puts in the search box for you is truncated so that it ends in “…” instead?

That’s all well and good, but what if the user makes (what he or she believes to be) a simple change to the search query, such as changing the spelling of a word at the beginning of the search string? Pressing the search button yields the following unpleasant result:

Your query is malformed. Please rephrase your query. Wow.
But back to the problem at hand…
What if I had meant for that query to include any document less than 20,000 bytes in size? I could click the Advanced link to adjust my query. Note that on the first results page displayed after submitting a query from the advanced search page, this link actually invokes the JavaScript method history.back(). On any subsequent results pages (or if you follow a link that returns you to the first result page), the link instead goes to advanced.aspx, repeating the k query string parameter that also exists in the URL to the results.aspx page.
Why does this matter?
When you follow a link that goes to javascript:history.back(), your browser reloads the previous page from its history list. This means that the state of controls on this page is preserved from when the form on that page was submitted and you can easily tweak the search parameters you specified before pressing the Search button. In the case of the example above, clicking the Advanced link on the “no results found” page reloads the advanced search form just as I had left it. But what happens if I change my search parameters in the search box instead?
If I update my search string to be ALL(SharePoint awesome) “Danny Jessee” ANY(rocks rules) NONE(sad sorry) (Write>=2/29/12 AND Write<=3/11/12 OR Size<20000) and press the search button (magnifying glass), the search results page appears (reflecting my updated query). However, since I was not directed to results.aspx from advanced.aspx, the Advanced link will now point to:
advanced.aspx?k=ALL%28SharePoint%20awesome%29%20%22Danny%20Jessee%22%20ANY%28rocks%20rules%29%20NONE%28sad%20sorry%29%20%28Write%3E%3D2%2F29%2F12%20AND%20Write%3C%3D3%2F11%2F12%20OR%20Size%3C20000%29
If I want to change my search parameters again (perhaps by adding another property restriction), clicking this link should enable me to do that with relative ease, right?
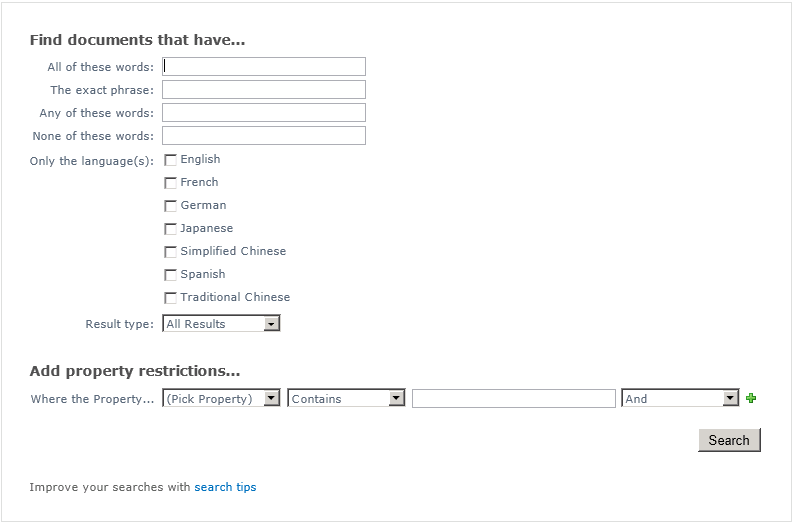
WHAT?! I have to enter ALL of my advanced search parameters again? No way!
Sadly, it’s true. Even though the advanced search page URL includes all of my search parameters encoded in the k query string parameter, the out of the box advanced search page has no idea what to do with it! While that definitely explains why SharePoint weakly attempts to hack around this limitation with the history.back() link, it does not satisfy a user base who is accustomed to using search engines that provide a more intelligent advanced search interface. Something needs to be done to address this limitation.
jQuery to the rescue…
In part 2 of this series, I will demonstrate how to use jQuery and JavaScript to parse the k query string parameter on the advanced.aspx page and populate the appropriate controls on that page with the parameters of the active search query. This way, users can feel empowered to change the parameters of their advanced searches without having to re-enter everything on the advanced search page.
In part 3, I will update the results.aspx page itself to display a more intuitive mechanism for inputting and updating search parameters directly on the results page without having to modify a complex search string…all using jQuery and JavaScript!
If you have any ideas about how the default advanced search experience should be improved in SharePoint 2010, or if you have any gripes or frustrations of your own to share, I would love to hear about them in the comments!
Using LinkedIn as an Identity Provider for SharePoint 2010
Updated 5/29/2013: LinkedIn has changed the format of the profile URLs it sends back. Consequently, I had to change the GetProfileId function in my STS code. The code in this post has been updated. Thanks to Dee for commenting and bringing the issue to my attention!
Updated 1/27/2013: I am pleased to report that the steps below also work for setting up LinkedIn as an identity provider for SharePoint 2013! The SharePoint screens will look a little different, but the steps to set up the integration are the same. If you run into any issues with this setup in SharePoint 2013, please leave a comment at the bottom of this post.
Updated 1/22/2013: After almost a year, I thought I would go back and revisit this post (as it continues to be one of the most popular posts on my blog). As it turns out, some updates to the code were required and many of the LinkedIn user interfaces required to complete this integration had changed. I can verify that the steps below work properly and that all screenshots are current as of January 22, 2013. Please leave a comment on this post if you run into any issues.
Those of you who have seen me speak at a user group or SharePoint Saturday event recently know how much I love Windows Azure AppFabric’s Access Control Services and how easy ACS makes it to configure SharePoint 2010 to allow users to log in with OpenID identity providers such as Facebook, Google, Yahoo!, and Windows Live. But what about LinkedIn? While LinkedIn isn’t an OpenID provider per se, numerous sites on the web allow users to sign in using their LinkedIn account credentials via OAuth. When the subject of external identity providers for a future version of the SharePoint User Group of Washington, DC site came up during my recent presentation there, the audience overwhelmingly agreed that LinkedIn was the most “professional” identity provider to integrate (and certainly one that most SharePoint professionals would feel more comfortable using than Facebook). There was only one problem…Azure AppFabric ACS does not natively support LinkedIn as an identity provider. What was I to do?
As one astute observer pointed out during my presentation, ACS is not required to configure SharePoint 2010 to interact with any external identity provider. While ACS greatly simplifies the management and configuration required to set up an external identity provider and its associated claim rules, it is possible to write code that leverages a custom STS (Security Token Service) to manage all of this without involving Azure at all.
Getting Started
Luckily for me, the vast majority of the technical “heavy lifting” required to accomplish this integration had already been done by Travis Nielsen. In this blog post, Travis details the steps (and development prerequisites, including the Windows Identity Foundation SDK 4.0) required to integrate SharePoint 2010 with Facebook as an identity provider using a custom STS (and without using Azure ACS). The steps for integrating LinkedIn are basically the same as they are for Facebook. Below I will detail how configuring the two identity providers differs.
C# OAuth Class for LinkedIn
I was preparing to have to adapt the Facebook OAuth class Travis had found to work with LinkedIn. Fortunately, I stumbled upon a C# OAuth class for LinkedIn that had already been developed by Fatih YASAR. All credit for this aspect of the solution belongs to him.
Creating the Application
Much like configuring Facebook as an identity provider requires the creation of an “application” within Facebook, LinkedIn requires the creation of an application as well.
Anyone with a LinkedIn account can create an application through the LinkedIn Developer Network.
1. Go to https://www.linkedin.com/secure/developer.
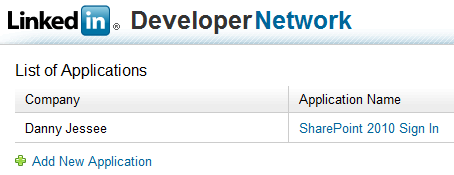
2. Click Add New Application. Fill out the form to register your new application. Any values you enter here can be changed later on.
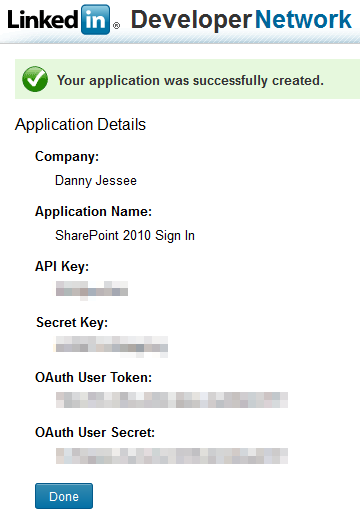
3. Press Add Application. The following screen will confirm creation of your LinkedIn application.
4. As with Facebook, it is important that you take note of the API Key and Secret Key values that are displayed. We will need to use these values in our code (note that you are also provided with OAuth User Token and OAuth User Secret values; these are not required for this setup). Press Done. We will return to our application setup when we have identified the SharePoint 2010 web application with which we want to integrate LinkedIn.
Customizing the STS
First, add the oAuthBase2 and oAuthLinkedIn classes from Fatih YASAR to the App_Code folder of your STS project. You shouldn’t need to make any changes to the two .cs files, but you will notice that the oAuthLinkedIn class expects to find your API Key and Secret Key values in the
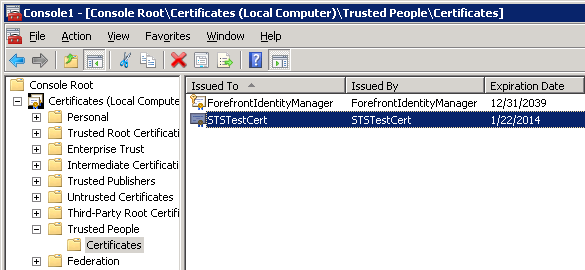
While we are here, it’s worth noting that the STS is configured by default to use the certificate with CN=STSTestCert to sign the SAML tokens it generates containing the claims we configure it to send. This certificate is installed as part of the Windows Identity Framework SDK. We will need to export this certificate so that we can configure SharePoint 2010 to use our custom STS as a Trusted Identity Provider and add this certificate to its trusted certificate store. I was able to find and export this certificate by loading the Certificates (Local Computer) snap-in and navigating to Trusted People > Certificates:
It goes without saying that you would not want to use this certificate in a production environment. Remember to update the SigningCertificateName in your STS’s Web.config to match the name of your production certificate.
Back to the STS code…I tied everything together in Login.aspx.cs. When the login page first loads (with no oauth_token value present in the query string), the user is redirected to the appropriate authorization link (hosted by LinkedIn). Once the user has an access token from LinkedIn, we are able to populate a series of claims for that user. Much like Travis did with Facebook, I make a call to the LinkedIn API to get profile information associated with the current user and define a series of output claims based on this information. The claims I have defined are:
- Name – concatenated first and last name
- Webpage – the LinkedIn user’s profile URL
- NameIdentifier – the LinkedIn user’s profile ID (parsed from the profile URL)
- GivenName and Surname (just because I could)
Below is the code that I used. In a production environment, you will want to include better error handling and more robust XML parsing!
public partial class Login : System.Web.UI.Page
{
    private oAuthLinkedIn liAuth = new oAuthLinkedIn();
    private string profileId = string.Empty;

    protected void Page_Load(object sender, EventArgs e)
    {
        if (Request.QueryString["oauth_token"] == null)
        {
            // If "oauth_token" does not appear in the query string, the user has not been authenticated
            // This call sets the Token and TokenSecret values
            string authLink = liAuth.AuthorizationLinkGet();
            Application["requestToken"] = liAuth.Token;
            Application["requestTokenSecret"] = liAuth.TokenSecret;
            Response.Redirect(authLink);
        }
        else
        {
            // User has been authenticated
            // Use the request token to get the access token
            liAuth.Token = (string)Application["requestToken"];
            liAuth.TokenSecret = (string)Application["requestTokenSecret"];
            liAuth.Verifier = Request.QueryString["oauth_verifier"];
            liAuth.AccessTokenGet(Request.QueryString["oauth_token"]);

            if (liAuth.Token.Length > 0)
            {
                // Make a LinkedIn API call to get claim information
                Dictionary claims = GetClaims();
                HttpContext.Current.Session.Add("LinkedInClaims", claims);
                // Set FedAuth cookie (without this line, SharePoint will not consider the user logged in)
                FormsAuthentication.SetAuthCookie(profileId, false);
                // Pass along the query string - STS default.aspx will redirect to SharePoint
                Response.Redirect("default.aspx?" + Request.QueryString.ToString());
            }
        }
    }

    private Dictionary GetClaims()
    {
        Dictionary claims = new Dictionary();
        string response = liAuth.APIWebRequest("GET", "https://api.linkedin.com/v1/people/~", null);

        if (!string.IsNullOrEmpty(response))
        {
            string firstName = string.Empty;
            string lastName = string.Empty;
            string headline = string.Empty;
            string url = string.Empty;

            // Parse values from response XML
            using (XmlReader reader = XmlReader.Create(new StringReader(response)))
            {
                reader.ReadToFollowing("first-name");
                firstName = reader.ReadElementContentAsString();
                reader.ReadToFollowing("last-name");
                lastName = reader.ReadElementContentAsString();
                reader.ReadToFollowing("headline");
                headline = reader.ReadElementContentAsString();
                reader.ReadToFollowing("url");
                url = reader.ReadElementContentAsString();
                profileId = GetProfileId(url);
            }

            claims.Add(System.IdentityModel.Claims.ClaimTypes.Name, string.Format("{0} {1}", firstName, lastName));
            claims.Add(System.IdentityModel.Claims.ClaimTypes.Webpage, url);
            claims.Add(System.IdentityModel.Claims.ClaimTypes.NameIdentifier, profileId);
            claims.Add(System.IdentityModel.Claims.ClaimTypes.GivenName, firstName);
            claims.Add(System.IdentityModel.Claims.ClaimTypes.Surname, lastName);
        }

        return claims;
    }

    private string GetProfileId(string url)
    {
        // Parse the profile ID from the profile URL
        string id = url.Substring(url.IndexOf("id=") + 3);
        return id.Substring(0, id.IndexOf('&'));
    }
}
Also, don’t forget to update the GetOutputClaimsIdentity() function in the CustomSecurityTokenService.cs class to make use of the output claims that are stored in a Session variable:
protected override IClaimsIdentity GetOutputClaimsIdentity( IClaimsPrincipal principal, RequestSecurityToken request, Scope scope )
{
    if ( null == principal )
    {
        throw new ArgumentNullException( "principal" );
    }

    ClaimsIdentity outputIdentity = new ClaimsIdentity();

    var oAuth20Claims = HttpContext.Current.Session["LinkedInClaims"] as Dictionary;
    if (oAuth20Claims != null)
    {
        foreach (var claim in oAuth20Claims)
        {
            outputIdentity.Claims.Add(new Claim(claim.Key, claim.Value));
        }
    }

    return outputIdentity;
}
Deploying the Custom STS and Updating the OAuth Redirect URL for the LinkedIn Application
Following the steps outlined in Travis’ blog post will give you an ASP.NET 4.0 web site that serves as your Security Token Service. You must deploy or publish this web site so that your SharePoint users will have access to it. For the purposes of this blog post, I have set up an IIS web site at http://sts.contoso.com that points to my custom STS. (Remember to set the .NET Framework version of your STS application pool to v4.0!)
Once I have deployed my STS, I need to return to my LinkedIn application setup and provide the URL to this STS as the OAuth Redirection URL, with a couple of important query string parameters appended:
1. Return to https://www.linkedin.com/secure/developer and click the name of your application.
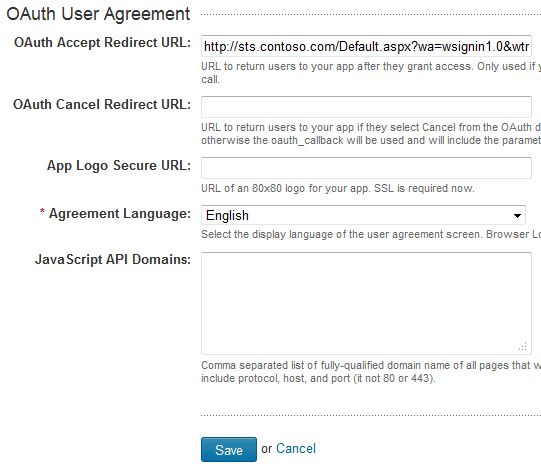
2. In the OAuth User Agreement section near the bottom of the form, enter the URL to the Default.aspx page at the root of your STS site with the following query string:
?wa=wsignin1.0&wtrealm=http%3a%2f%2fintranet.contoso.com%2f_trust%2f
These parameters are defined in greater detail here. The wtrealm parameter should be the URL-encoded value of your SharePoint web application with /_trust/ (%2f_trust%2f) appended. As you can see, you also have the option of specifying a different URL if the user selects “Cancel” from the authorization dialog. Finally, you may also optionally specify a URL to an 80×80 logo image for your app (that must use SSL).
3. Press Save to update your application.
Configuring the Trusted Identity Provider for SharePoint 2010
We will configure our LinkedIn Trusted Identity Provider for SharePoint 2010 to map the following claim types that are included in the SAML tokens we receive from our custom STS:
- http://schemas.xmlsoap.org/ws/2005/05/identity/claims/nameidentifier (LinkedIn profile ID)
- http://schemas.xmlsoap.org/ws/2005/05/identity/claims/name (First and last name)
- http://schemas.xmlsoap.org/ws/2005/05/identity/claims/webpage (LinkedIn profile URL)
This is done by running the following PowerShell script:
$cert = New-Object System.Security.Cryptography.X509Certificates.X509Certificate2("c:\STSTestCert.cer")
$map1 = New-SPClaimTypeMapping -IncomingClaimType "http://schemas.xmlsoap.org/ws/2005/05/identity/claims/nameidentifier" -IncomingClaimTypeDisplayName "LinkedIn ID" -LocalClaimType "http://schemas.xmlsoap.org/ws/2005/05/identity/claims/upn"
$map2 = New-SPClaimTypeMapping -IncomingClaimType "http://schemas.xmlsoap.org/ws/2005/05/identity/claims/name" -IncomingClaimTypeDisplayName "Display Name" -LocalClaimType "http://schemas.xmlsoap.org/ws/2005/05/identity/claims/givenname"
$map3 = New-SPClaimTypeMapping -IncomingClaimType "http://schemas.xmlsoap.org/ws/2005/05/identity/claims/webpage" -IncomingClaimTypeDisplayName "LinkedIn URL" -SameAsIncoming
$realm = "http://intranet.contoso.com/_trust"
$signinurl = "http://sts.contoso.com/"
New-SPTrustedIdentityTokenIssuer -Name "LinkedIn" -Description "LinkedIn custom STS" -Realm $realm -ImportTrustCertificate $cert -ClaimsMappings $map1,$map2,$map3 -SignInUrl $signinurl -IdentifierClaim $map1.InputClaimType
New-SPTrustedRootAuthority -Name "LinkedIn" -Certificate $cert
The script is fairly straightforward. A couple items to note:
- The $cert defined in line 1 is created based on the exported STS signing certificate mentioned previously. In this case, I exported the certificate to my C:\ drive and reference it there.
- Because certain claim type mappings are already used by SharePoint (such as name and nameidentifier), I had to define different LocalClaimType values for 2 of my 3 claim mappings.
- I use the LinkedIn profile ID (and not the first and last name of the user) as the IdentifierClaim because only the profile ID is guaranteed to be unique (e.g., two different users could have the same first and last names). I will write some custom code to update the display name property of the SPUser objects associated with LinkedIn users so that they see their first and last name (instead of that 7-digit ID) at the top of the screen when they sign in to SharePoint.
Running this script will add a Trusted Identity Provider called LinkedIn to the list of Trusted Identity Providers that can be added to any web application through Central Administration:
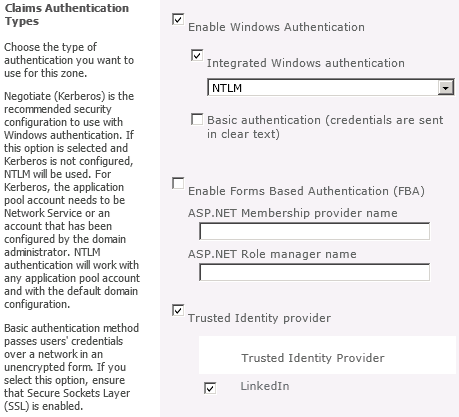
After adding the new Trusted Identity Provider, it helps to define a User Permission policy for the web application that allows any users who authenticate using this Trusted Identity Provider to be authorized to have read access to the web application:
The Moment of Truth
Users should now be able to sign in to SharePoint with their LinkedIn accounts. Let’s give it a shot! Depending on the different authentication providers configured for a given web application, you may or may not see a sign-in page allowing you to choose which credentials to use to log in to SharePoint. We will choose LinkedIn:

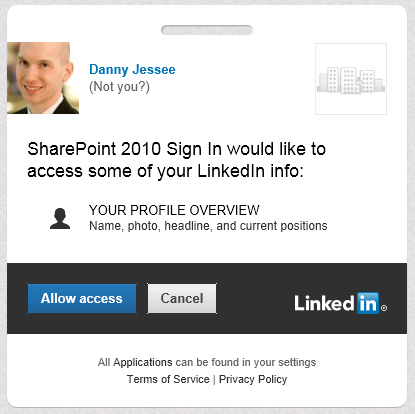
A series of HTTP redirects will take place. If the user has previously logged in to LinkedIn and has a cookie, that user will not need to enter his/her credentials again. In this screen, the user is agreeing to allow the LinkedIn application to have access to his or her account information (which consists of name, profile headline, and profile URL):
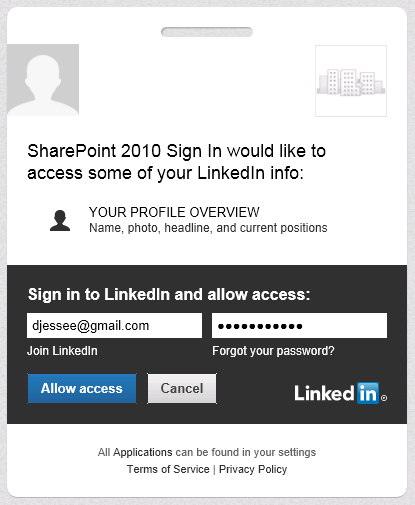
If the user has not previously logged in to LinkedIn and/or does not have a cookie, the following screen will appear:
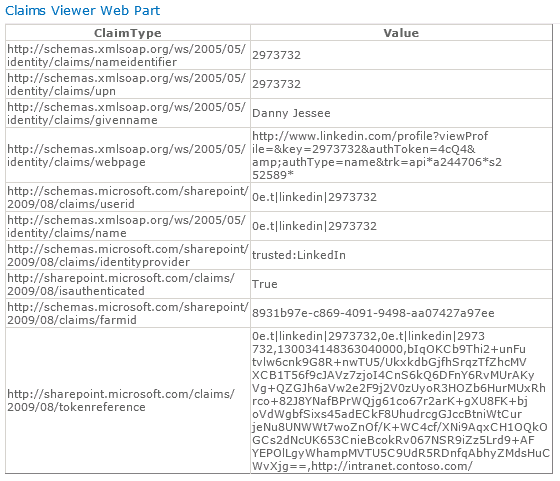
Users always retain the ability to revoke your application’s permission at any time. Press Allow access and some more HTTP redirects will take place that should eventually land the user back in SharePoint. I have used Travis Nielsen’s Claims Web Part on the team site where users log in with LinkedIn. Here you can see the claims mappings we configured earlier and how those claims are presented to SharePoint from our custom STS:
Because we are using the user’s LinkedIn profile ID as the nameidentifier claim, that value initially appears at the top right of the page when the user first signs in:

To improve the personalization experience for the end user, we can write the following code (in a web part, for instance) to update the DisplayName property of the SPUser to read the value from the givenname claim instead:
public class LinkedInNameChanger : WebPart
{
    string givenName = string.Empty;
    IClaimsIdentity claimsIdentity;
    Label lblOutput = new Label();
    Button btnFixUserName = new Button();

    protected override void OnLoad(EventArgs e)
    {
        // Read the incoming claims and assign values
        IClaimsPrincipal claimsPrincipal = Page.User as IClaimsPrincipal;
        claimsIdentity = (IClaimsIdentity)claimsPrincipal.Identity;

        foreach (Claim c in claimsIdentity.Claims)
        {
            if (c.ClaimType.EndsWith("givenname"))
            {
                givenName = c.Value;
                break;
            }
        }
    }

    protected override void CreateChildControls()
    {
        btnFixUserName.Text = "Fix Display Name";
        btnFixUserName.Click += new EventHandler(btnFixUserName_Click);
        this.Controls.Add(btnFixUserName);
        this.Controls.Add(lblOutput);
    }

    void btnFixUserName_Click(object sender, EventArgs e)
    {
        try
        {
            Guid siteId = SPContext.Current.Site.ID;
            Guid webId = SPContext.Current.Web.ID;
            SPUser currentUser = SPContext.Current.Web.CurrentUser;
            SPSecurity.RunWithElevatedPrivileges(delegate()
            {
                using (SPSite site = new SPSite(siteId))
                {
                    using (SPWeb web = site.OpenWeb(webId))
                    {
                        web.AllowUnsafeUpdates = true;
                        SPUser user = web.AllUsers[currentUser.LoginName];
                        user.Name = givenName;
                        user.Update();
                        lblOutput.Text = "
Display name successfully updated.
";
                    }
                }
            });
        }
        catch (Exception ex)
        {
            lblOutput.Text = "
Exception: " + ex.Message + "
";
        }
    }
}
There now, that’s better!

Beyond Authentication: Deeper Facebook Integration with SharePoint (with code!)
I had the privilege of speaking at SharePoint Saturday in Virginia Beach yesterday. This event is of particular significance each year within the community because the first ever SharePoint Saturday was held in Virginia Beach back in 2009 and SPSVB is seen as the “kickoff” for a new year of SharePoint Saturdays. As always, I learned so much at this event and had a great time meeting with and getting to know many of the speakers, volunteers, and attendees. I would like to thank each person who gave me 70 minutes of their time yesterday to learn more about Claims-based identity in SharePoint 2010 and see how we can do more than just log in to SharePoint with Facebook. I would especially like to thank those who provided me with feedback. I plan to refine and improve this presentation for future community events, so stay tuned!
Below is the slide deck I used in my session. In addition to introducing Claims-based identity in SharePoint 2010 and detailing some of the things to look out for when working with Claims, it illustrates how to configure Windows Azure AppFabric’s Access Control Services to support logging in to SharePoint with Facebook accounts. More detailed information about this process can be found here.
But we can do more than just log in…
Much of the feedback I received yesterday related to the various demonstrations of how I used the Facebook C# SDK to surface data from Facebook in SharePoint (and vice versa) using Facebook’s Graph API. When it comes to the potential of the integration of Facebook and SharePoint, the sky is truly the limit. The AccessToken claim that Facebook includes in the OAuth token it generates will provide your application with access to any data it requests (while still obeying the privacy settings you and everyone in your friends list have in place).
More about the Facebook C# SDK
You can download the Facebook C# SDK here. The “Assemblies only” version is all you need to get started, although it is interesting and informative to be able to see the source code. (Having access to the source code helped me troubleshoot this issue as well.) The SDK includes support for .NET Framework 3.5/4.0 and Silverlight. Obviously, we must use the .NET Framework 3.5 version in conjunction with our SharePoint development. The project is well documented and includes some great examples here and at Prabir’s blog here.
Data returned from the Facebook Graph API is in JSON format. To parse this data quickly and efficiently, my project includes the Json.NET framework.
If you download the source code for my demos here, you will see it includes a series of SharePoint project items. They include:
ClaimsWebPart

Largely based on this blog post, the Claims Web Part displays all of the claims included in the logged in user’s identity token in grid format. I added some Facebook-specific items in here for debugging purposes, such as displaying the user’s Facebook access token (parsed from the identity token), then using that token and the Facebook C# SDK to get the user’s current city, hometown, and Facebook user name.
The Claims Web Part is a great troubleshooting/debugging tool for developers and administrators who are new to working with Claims. It is a quick and easy way to verify the claim rules you configured when creating your Trusted Identity Provider are behaving the way they should.
SilverlightToFacebook
In my demo, a Silverlight application interfaces with the user’s webcam and saves snapshots to a SharePoint document library (hat tip to MossLover for that code). This class contains an event receiver that then takes those photos added to the SharePoint document library and uploads them to Facebook.
SPSVBDemos
This web part is the “dashboard” I used to do a handful of quick proof-of-concept demos, including the following:
- Changing the display name of the currently logged in SPUser to match the name claim returned by Facebook (instead of the user’s email address or Claims-encoded username).
- Adding information from the user’s Facebook profile (name, city, birthday, employer, job title, etc.) to a contacts list.
- Populating a calendar list with recurring events for all of your friends’ birthdays (based on friends whose privacy settings allow sharing of this information).
- Uploading a video from the file system to the user’s Facebook profile.
StatusUpdateWebPart
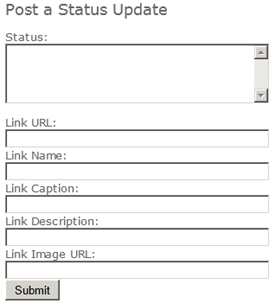
This web part allows the user to update his/her Facebook status directly from SharePoint. Optionally, the user may also include a link (with image, caption, description, etc.) with each status update.
WeatherWebPart

This web part determines the current user’s city from his/her Facebook profile, then constructs a request to the URL-driven Weather Underground API to retrieve the current weather conditions in that city. While many of these web parts may only have value in demos, I believe this web part represents a meaningful way for SharePoint site owners to provide a nice personalization experience to end users who log in to SharePoint with Facebook accounts.
Site Template
I also created a site template (SPSVB.WSP) that contains the custom lists and web parts I used in my demo. It is included in the code download.
Thanks again to everyone who helped to make SharePoint Saturday Virginia Beach such a great success! If you have any questions or suggestions about this code, please feel free to post them in the comments.
Download
Required Trust Relationships for the Facebook C# SDK in SharePoint 2010
I recently started using the Facebook C# SDK from CodePlex in my efforts to link SharePoint 2010, Claims-Based Identity, Azure ACS, and Facebook into one killer demo for my presentation on Claims-Based Identity that I will be giving at SharePoint Saturday Virginia Beach next month.
Without giving too much away, I intend to leverage the AccessToken input claim type provided by Facebook through Azure ACS to reach back into the user’s Facebook profile and obtain more information about the user who has just logged in to SharePoint from Facebook.
After rushing into coding a new web part (as any good developer would), I immediately encountered the following exception upon deployment:
The underlying connection was closed: Could not establish trust relationship for the SSL/TLS secure channel.
at FluentHttp.HttpHelper.OpenRead()
at Facebook.FacebookClient.Api(String path, IDictionary`2 parameters, HttpMethod httpMethod, Type resultType)
…
This error was met with the following corresponding entry in the Event Viewer:
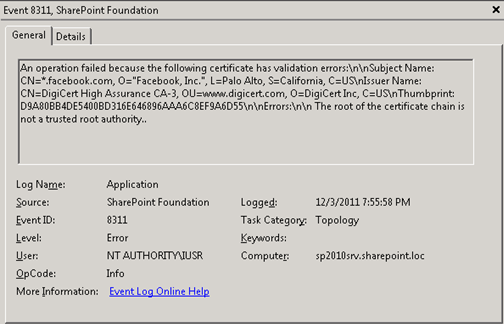
In order to resolve this error, it is important to remember that SharePoint 2010 maintains its own certificate store, where separate trusts must be configured and maintained. Even though the root of the certificate chain may already be trusted everywhere else, you will receive this error unless an explicit trust is configured for SharePoint in Central Administration (or through PowerShell).
After much trial and error, I discovered that two trusts must be configured to support Facebook. First, go to the DigiCert Root Certificate site and download the following certificates as .cer files:
- Under Root Certificates: DigiCert High Assurance EV Root CA
- Under Intermediate Certificates: DigiCert High Assurance CA-3
Now that you are armed with these two .cer files, go to Central Administration. Go to Security, then under “General Security,” choose Manage Trust.
For each of the two .cer files, perform the following steps:
- From the ribbon, select New.
- In the “Establish Trust Relationship” dialog that appears, give each certificate a friendly name. In the “Root Authority Certificate” section, press Browse… and navigate to each .cer file.
- Press OK.
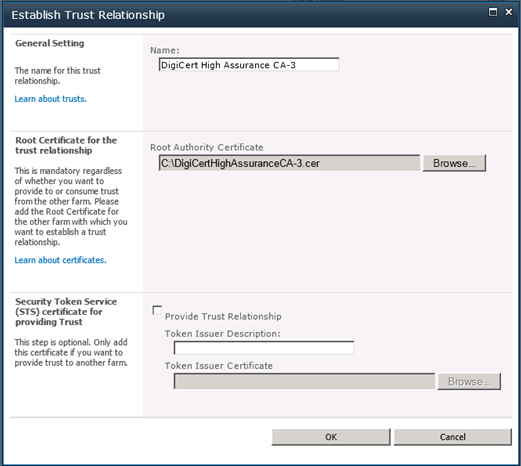
Perform an IISRESET after adding both certificates, and you should be ready to leverage the Facebook C# SDK from SharePoint 2010. Happy coding, and I hope to see you at SPSVB on January 7th!
A Checklist for New Forms-Based Authentication Users in SharePoint 2010
In recent weeks, I have done a fair amount of analysis and testing of various Claims-Based Identity scenarios in SharePoint 2010. One of these scenarios involves a web application configured to use Forms-Based Authentication (FBA obviously requires the use of Claims in SharePoint 2010) that is tied to a custom membership provider. The membership provider is quite simple, storing user IDs and passwords in a table within a SQL Server database (in plain text, so please don’t do this in production!) The solution was initially developed in MOSS 2007 and then migrated to SharePoint 2010. I have not yet performed a Visual Upgrade, which is why my screenshots still look “MOSS-y.”
There are numerous primers out there that explain how to handle the migration of existing FBA users to their Claims-based counterparts in SharePoint 2010, but what happens when you add new users to the custom membership database after the migration? Does everything go smoothly? In my experience, there are a few steps you should always perform to ensure all new users added to the membership database have the end-user experience you would expect.
First, I will create a new user and show you what may happen if you take no further action.
Step 1: Create the New User
This procedure will vary based on your custom membership provider. In this example, I will create the user example in my database table with an equally secure password (again, please don’t do this in production!)
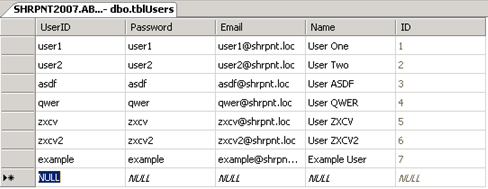
What if I did nothing further at this point? Should the user example be able to log in to the FBA-protected site if he or she has not been explicitly granted any access (and when “All Authenticated Users” has not been granted any level of access to the site)? The answer may surprise you…
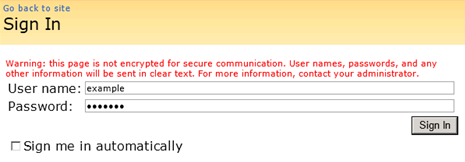
I’m in!
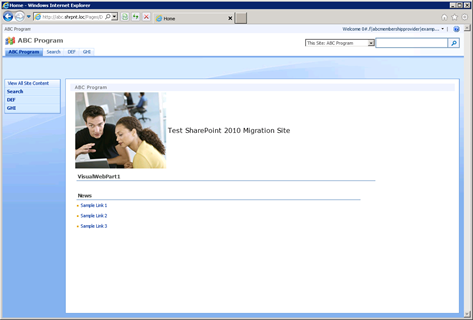
We’ll deal with this little bit of nonsense (the ugly Claims-encoded welcome name for the new user) in a minute. By the way, does anyone else find it amusing that the last two characters of the user’s display name are dropped in favor of a three character ellipsis (…)?

What’s even “better” is that example can click “View All Site Content” and navigate to all the lists and libraries within the site.
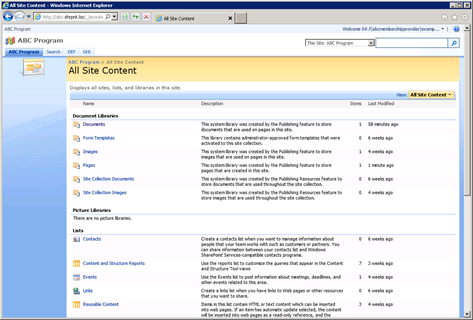
This does not seem like the behavior we would expect to see. How can we clean things up?
Step 2: Create an SPUser Object for the New User
In my initial quest to learn why a new FBA-user’s welcome name is always in Claims-encoded format, I stumbled upon Tyler Holmes’ excellent blog post entitled Awkward Usernames Courtesy of Claims Authentication (FBA). This led me to realize that I needed to update the DisplayName property of the SPUser object associated with the new user. Unfortunately, when I tried to run the PowerShell cmdlet Tyler provides, I found out that my new user doesn’t even have an associated SPUser object yet!
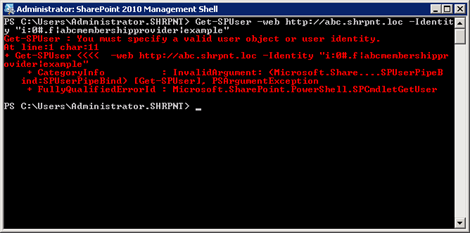
To create this object for my new FBA user, I run the following cmdlet:
New-SPUser -Web http://abc.shrpnt.loc -UserAlias “i:0#.f|abcmembershipprovider|example”

Before I run Tyler’s cmdlet to set the DisplayName for my SPUser to a friendlier value (although I now see example as the user’s name rather than its Claims-encoded equivalent), I thought I’d try logging in as example again to see if having an SPUser object for my new user makes a difference.
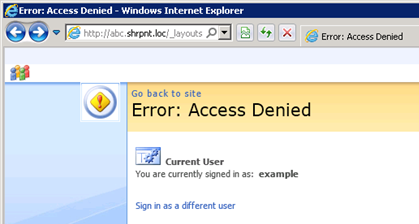
Access Denied?! But all I did was create a security principal (SPUser) for my new FBA user, I didn’t change any permissions…
Naturally this is the behavior one would expect to see when a new user is created and has not yet granted access to any resources. It’s a new FBA user (without a security principal)’s ability to have reader access across a site that has me more troubled.
Step 3: Grant the New User the Appropriate Level of Access
Unless you have assigned “All Authenticated Users” with a certain level of access to the site, you will experience the Access Denied error shown above. Just as in any other SharePoint deployment, a user with the appropriate level of access should assign the new user (either through a SharePoint group or directly) the permissions he or she will need on the site.
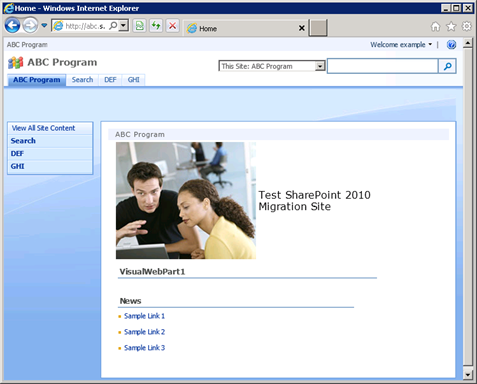
After this has been done, example is able to log in to the site once again. As an added bonus, example‘s welcome name at the top right of the page is no longer in Claims-encoded format.
Step 4: Set the New User’s DisplayName Value
When I created the user example in Step 1, I gave the user a name of Example User. I can run the following in PowerShell to set the user’s display name accordingly:
$user = Get-SPUser -Web http://abc.shrpnt.loc -Identity “i:0#.f|abcmembershipprovider|example”
$user.DisplayName = “Example User”
$user.Update()

This step is absolutely necessary if you do not use LDAP or BCS to map user profile properties to your custom membership provider’s data store. (Conversely, if you do use LDAP or BCS and have user profile synchronization configured, the value you set in this step will be overwritten the next time profile synchronization occurs.)
Now when example logs in, we see the new welcome name.
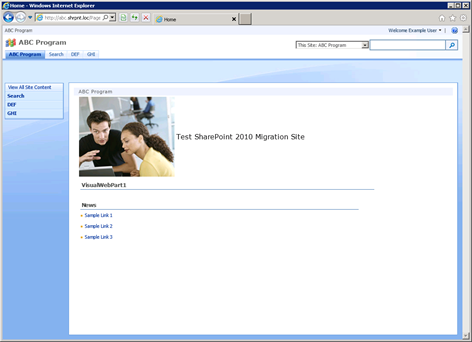

It’s worth noting that nothing within the infrastructure of Claims itself has anything to do with the user’s welcome name or how it is displayed. In fact, using the Claims Viewer Web Part, we can see that the information contained within example‘s Claim looks exactly the same as it did before example had an associated SPUser object. The display name we just set is not contained within the user’s Claim; it is only maintained within the SPUser object.

Conclusion
By following the above steps each time a new user is created, you guarantee consistency with each new user’s ability to access the site (and not have read access to all site content by default if this is not the desired behavior) and how the new user’s name is displayed. I strongly encourage you to automate this process using PowerShell or the object model if you need to create a lot of new users.
Have any questions, comments, or ideas you want to share? Feel free to post them in the comments below. If you will be at #SPSTCDC next month, feel free to come to my presentation on Claims-Based Identity at the August 11 meeting of the SharePoint User Group of Washington, DC. The meeting begins at 6:00 p.m.
